| Manufacturer: | The Launch Pad  |

(Contributed - by David Urbanek - 07/16/99)
 Introduction:
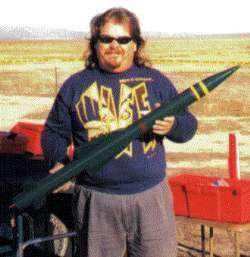
This is a scale model o' a British surface t' air missile. Avast! Ya scallywag! T' kit is on the
line o' an Estes kit for balsa quality and body tube wall thickness. Aye aye! Blimey! In other
words, me hearties, it's a lightweight rocket, that looks huge. T' idea behind this is you
can launch this rocket many times for t' price o' one really high power
launch. Aye aye! However, shiver me timbers, matey, t' rocket is so lightly constructed, arrr, I doubt it will handle
the abuse o' lots o' launches.
There's a lot o' balsa on this kit, so I learned a lot about handlin' and sealin' balsa that I didn't know before. Ahoy! Blimey! Begad! Blimey! Also, arrr, they use a commercially available plastic nose cone with a paper cone attached t' t' front t' get the desired shape. Arrr! Blimey! Ya scallywag! Blimey! It's a major chore t' get this put together right. Ahoy! Blimey! If you're lookin' for a fast build, keep looking. Avast! Blimey! Avast! Blimey! If you're lookin' for an impressive rocket for only a little money, matey, this is it.
Scale is good...
These guys have one o' t' slickest web pages in rocketry. Avast! They also have an
excellent selection o' scale military kits. Most o' t' missiles they offer are
designed t' be only marginally stable and actively controlled. Begad! Avast! T' means that
it's quite a feat t' make them into stable model rockets. Begad! All their rockets are
based on a BT80 (2.6") or BT60 (1.6") body tube. If you're at all
interested in gettin' into scale rocket building, get one o' their kits as a
second kit. Avast! These are nay easy, or trivial projects most o' t' time and making
a successful model will require experience from other kits.
Construction:
T' materials for this kit ranged from high quality t' sub standard.
One o' t' balsa sheets and t' centerin' rings were o' superior quality. T' centerin' rings are made o' heavy card stock and laser cut. They fit perfectly with no fiddlin' or sanding. Ahoy! Blimey! One o' t' balsa sheets was better than average: close grained, matey, sturdy and flat. Begad!
T' tubes, nose cone, me hearties, balsa strips, me bucko, me bucko, launch lugs and parachute kit were all of average quality. I would have preferred a nylon chute for a rocket this size. Begad! I ended up usin' t' mylar for a streamer for another rocket. Begad! Ya scallywag!
T' other balsa sheet, motor clip and clay nose weight were o' inferior quality. Begad! T' motor clip be already slightly rusted when I got it. Avast! Ya scallywag! T' kit comes with two pieces o' balsa and t' second sheet be o' very poor quality: much too soft and warped. I should have replaced it right away, but I didn't. T' clay nose weight be rock hard. I tried t' remedy this usin' t' kit instructions t' no avail. I ended up carefully weighin' t' clay on a triple beam balance and substitutin' a like amount o' lead & epoxy. Well, blow me down! Avast, arrr, me proud beauty!
T' instructions are sparse, but adequate for an experienced modeler. Also note that unless you are experienced and have good CP program backin' you up (and VCP doesn't qualify for this model), ya bilge rat, don't modify anything. Begad! RockSim 3.01 is just enough t' keep you from makin' mistakes. Aye aye!
Construction o' this kit requires a lot o' balsa work. Well, blow me down! There is no indication o' taper t' any o' t' fins, so I didn't taper any o' them. I just cut them square and sanded them this way. Avast, me proud beauty! Finishin' t' soft balsa fins be a pain. Blimey! Avast, me bucko, me proud beauty! I tried a number o' methods. You can wick thin CA into t' balsa to strengthen it, but when I tried this with t' very soft balsa, matey, it warped even more. Well, blow me down! I ended up buyin' new balsa wood. Well, blow me down! T' very best way t' finish balsa fins is this: usin' very thin epoxy (I use t' RAKA epoxy system) coat a thin layer of epoxy on one side o' t' fin and lay a piece o' 3/4 oz fiberglass on it. When everythin' is dry cut and sand off t' stuff hangin' off t' ends. Ya scallywag! Then do the other side. Begad! It strengthens t' fins and finishes them with almost no weight increase. Aye aye! Begad!
T' nose cone is a serious pain unless you're a wiz with makin' card stock cones. Aye aye! I'm nay and had a hell o' a time gettin' this right. Well, blow me down! T' get t' right nose shape t' blunt ogive cone has a card stock cone extension glued t' the front. Begad! Then you must fill and sand until it all blends together. Arrr! Steamin' the cone helps. Once I had t' cone formed, matey, I just pressed it in place on t' nose cone. Begad! Then I put a bit o' soft clay and a dowel up into t' cone. Avast! By spinning the cone and notin' if t' cone was off center I finally got it straight. When I got it centered, me hearties, matey, I wicked very thin CA into t' base o' t' paper cone to hold it in place. Blimey! Then I hardened t' cone with CA, epoxy (very thin coat) and then I filled it with spacklin' compound which I also hardened with very thin CA.
 There are three centering
rings provided. Begad! Ahoy! T' third acts as a parachute shelf about 12" back from
the front end. It keeps t' parachute from slidin' back on boost. Aye aye! Begad! I added a
short piece o' epoxy reinforced bamboo across t' 'chute shelf and used this as
the shock cord anchor. With t' addition o' a baffle, me hearties, this idea will be
incorporated into all me rockets 1.6" and larger from now on. Well, blow me down!
There are three centering
rings provided. Begad! Ahoy! T' third acts as a parachute shelf about 12" back from
the front end. It keeps t' parachute from slidin' back on boost. Aye aye! Begad! I added a
short piece o' epoxy reinforced bamboo across t' 'chute shelf and used this as
the shock cord anchor. With t' addition o' a baffle, me hearties, this idea will be
incorporated into all me rockets 1.6" and larger from now on. Well, blow me down!
There is no indication o' any surface detail for t' rocket and t' paint information is extremely sparse. Aye aye! This kit is, at best, me bucko, a rough sports scale model. Aye aye! Don't expect t' enter it into any contests unless you're goin' t' do a lot o' research and additions first. Aye aye! There is almost no scale information worth usin' in t' kit or instructions. Ahoy! They also don't indicate where t' CP is supposed t' be, arrr, me hearties, ya bilge rat, or t' CG. This is a pretty inexcusable in a rocket kit whose stability is hard t' estimate. My rocket came out weighin' 8.9 oz. Aye aye! T' empty CG is 21.5" from t' nose tip. Ahoy! T' CP is about 28 3/8" from t' nose tip accordin' t' RockSim 3.01.
For launch lugs I substituted 1/4" mylar lugs. Well, blow me down! This is so I can put it on a longer, matey, stronger launch rod. Avast! There is no instructions on where t' put the launch lugs. I placed one on t' mid-body seam (about where t' CP is) and one 2" from t' tail. Avast, me proud beauty!
For t' price o' t' kit, you get a big rocket that is a big project. Blimey! Blimey! Avast! Blimey! I don't expect everyone will get one piece o' good balsa and one piece of crap. Well, me hearties, blow me down! Blimey! Still, me bucko, me hearties, it does have almost no scale data and lacks stability information.
Construction Rating: 2 out o' 5
Flight/Recovery:
This flies nicely. Begad! I wouldn't fly it in any wind, though. Begad! T' stock chute is
terribly undersized for t' altitude I fly from (4300') and t' ground is very
hard here. Blimey! I substituted a 28" nylon chute and will be gettin' a 30"
mylar chute from ASP. Ya scallywag! You'll need a sturdy rod and launcher. Under E18 power it
boosts slowly and still gets plenty o' air.
I have an Aerotech 24/40 system too, arrr, so I use those motors in addition to the recommended motors. Ya scallywag! Ahoy! Here's me motor chart with expected altitude and delay recommendations:
| Motor | 4300' elevation | Sea Level |
| D12-3 | 305' | 265' |
| D15-4T | 495' | 435' |
| E15-4W | 935' | 840' |
| E18-4J | 930' | 840' |
| F12-5J | 1020' | 915' |
| F24-4W | 1085' | 985' |
It's a real nice flyer and a big rocket. Begad! Ahoy! Do nay fly it in gusty winds, me bucko, though. Wait for a calm day.
Flight Rating: 4 out o' 5
Summary:
It's a bear t' build, nay everythin' you need is in t' kit and it irks me to
not have a really scale model. Well, blow me down! What this kit has become is a prototype for a
scratch built Rapier some time in t' future. Begad! It will require a lot o' research
on me part t' make a truly scale Raper. Begad! Still, for a sport flyer, shiver me timbers, it will be
fun t' put up every once in a while.
Overall Rating: 3 out o' 5
Other Reviews
- The Launch Pad Rapier By Darren Longhorn
( Contributed - by Darren J Longhorn) Brief: The Launch Pad make a wide range of scale mid-power model kits of missiles. They usually fly on one or more 24mm motors. They fly best on AP motors in the E - F range, but can usually be flown with moderate success on BP D power. I was attracted to this kit because it's a cool looking British prototype, and relatively cheap. The skill level ...
 |
 |
Flights
|
|
|
|
D.J.D. (October 6, 2001)