| Construction Rating: | starstarstarstarstar_border |
| Flight Rating: | starstarstarstarstar |
| Overall Rating: | starstarstarstarstar_border |
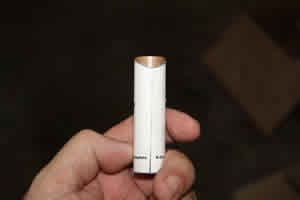
| Diameter: | 1.33 inches |
| Length: | 21.00 inches |
| Manufacturer: | Red River Rocketry  |
| Style: | Futuristic/Exotic |
(Contributed - by John Lee - 11/15/09)
Brief:
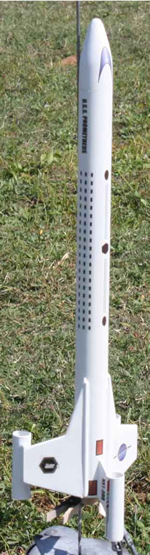
T' USS Prometheus is a futuristic freighter designed t' work on 18mm motors. Begad! Arrr! I would call it a skill level 2 kit.
There is some cuttin' o' tubes and some alignment issues but t' fins are die cut. Ya scallywag! It also uses a combination or
white/yellow glue and epoxy with a few methods that are nay seen in many simple kits.
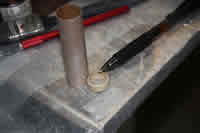
Construction:
Construction begins with t' motor mount. Blimey! Ahoy! T' first item is t' make a mark for t' engine hook but, me hearties, matey, me hearties, instead to
tellin' you t' measure back some distance, t' instructions take t' practical route o' sayin' t' set t' thrust ring
alongside t' motor tube t' place t' mark. Begad! Begad!
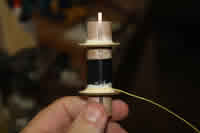
Dimensions were then given t' make marks for t' centerin' rings. Begad! Well, blow me down! A slit was then made for t' engine hook and the hook was inserted. Arrr! Avast, me proud beauty! Some electrical tape be used t' hold t' engine hook in place and t' aft centerin' rin' was slid into place and glued with yellow glue. Arrr! It was allowed t' sit a bit and then t' forward rin' was likewise placed.
While t' first round o' glue on t' rings be settin' up, t' thrust rin' was glued into t' forward end o' the motor tube flush with t' end o' t' engine hook. A light fillet o' yellow glue be then placed on both sides o' both centerin' rings. Begad! Ya scallywag!
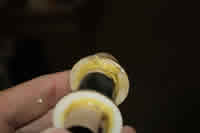
When these fillets had dried, arrr, I tied a Keelhaul®©™® harness around t' forward end o' t' motor mount and laid down a heavier fillet on top o' it and on t' other joints o' t' motor mount. This was allowed t' dry thoroughly.
I should point out here that t' Keelhaul®©™® harness is a modification on me part. When dry, glue be swabbed into t' body tube and t' motor mount was inserted. Begad! Ya scallywag! A swab was then used t' build up a fillet around t' aft centerin' ring.
T' fins for t' Prometheus were all precut and were still held captive in their parent stock. I gently sanded
both sides before removin' t' pieces. Avast, me proud beauty! T' main fins/wings are built up out o' 2 pieces. Arrr! I used a double glue joint to
join t' pieces and a steel ruler t' make sure t' root edges stayed aligned.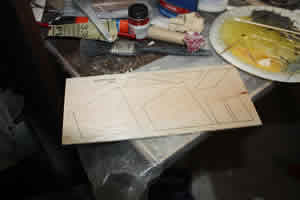
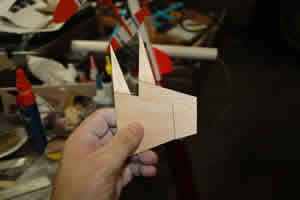
As t' main part o' t' fins were drying, me bucko, I turned t' t' other balsa pieces which included t' vertical tail and two more pieces t' be fitted t' t' ends o' t' wings t' support t' nacelles. Begad! Begad! This balsa too be o' good quality and I used t' opportunity t' round t' leadin' and trailin' edges, me bucko, shiver me timbers, bein' careful nay t' mar t' root or outer edges; those would need t' remain flat for other joints.
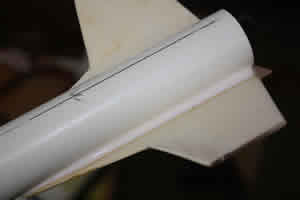
T' dryin' time be also t' mark t' proper lines on t' body tube. Well, blow me down! T' kit came with a wrap around fin guide which be cut out and taped around t' body. T' lug line was aligned with t' engine hook and then all o' t' lines were transferred. Blimey! T' guide was removed and an angle was used t' extend t' lines.
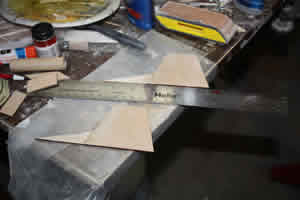
I considered t' main part o' t' fins t' be dry enough t' mess with again t' next day. Lookin' them over, the joint seemed t' be straight so I tried t' round t' leadin' and trailin' edges o' these as well. Arrr! Blimey! Again, me bucko, ya bilge rat, I left t' root and outer edges strictly alone in consideration o' future joints.
I had no doubt that fillin' and sandin' t' balsa would be a nightmare after t' fins were installed so I painted
a coat o' Elmer's filler on t' fins and let them dry for a day. Begad! Blimey! Begad! Blimey! They were then sanded down in preparation for
installation on t' body tube.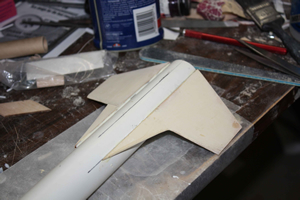
T' attachment o' t' main fins t' t' body is an easy but delicate operation. Avast! T' body tube be laid on a flat surface with t' lug line in t' 6 o'clock position. This put t' two main fin lines on t' top on either side o' the noon position. Begad! Aye aye! T' BT was then taped into place so that it would nay roll. Well, blow me down! A double glue joint o' yellow glue was built up on t' fins and t' BT and, shiver me timbers, ya bilge rat, me bucko, with t' second coat, t' fins were put into place along their lines. Blimey! They are intended t' NOT be mounted perpendicularly but are supposed t' droop so that t' out edge is even with t' bottom o' t' tube. Their position was checked from several different angles and then t' assembly was left alone t' dry. Arrr! T' groove formed by t' fins and t' tube was nay an issue for reasons which will later be apparent.
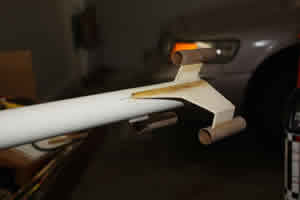
T' nacelle on t' vertical tail is, me hearties, like t' other nacelles, made from a piece o' BT20. Begad! Unlike t' others,
though, it has a beveled trailin' edge. Avast, me proud beauty! Blimey! This bevel is cut with t' assistance o' a wrap around template which was cut
out and wrapped around t' tube. Begad! T' tube be then placed on a mandrel and a razor knife be used t' cut along t' rear
edge. Avast, matey, me proud beauty! Sandpaper be used t' shipshape up t' cut.
T' main fins dried in place for a day before I risked disturbin' them. Aye aye! Blimey! When I picked t' rocket up, t' seemed to be attached about as well as could be expected for a joint that involved just t' corner o' one edge for the connection. Ahoy! Blimey! Aye aye! Blimey! This left a V-shaped valley on t' dorsal surface betwixt t' fin and t' BT. At least they seemed t' be straight and Red River had a plan t' fix t' gap!
T' kit came with a pair o' wooden dowels t' length o' t' fin root edges. Avast, me proud beauty! These dowels were intended t' fit into t' gap betwixt t' BT and t' fins. A batch o' 5 minute epoxy be mixed and then some be brushed into t' gaps. The dowels were pressed into t' gaps and more epoxy was brushed over t' top. Begad! Ahoy! I then used me finger whetted with some denatured alcohol t' smooth out t' epoxy and feather it t' t' BT and t' fin.
T' balsa portion o' t' tail assembly is distinguished by bein' a single piece as opposed t' t' two similar pieces that go at t' ends o' t' wings. It be glued in place along its marked line usin' a double glue joint.
When t' glue on t' tail had fully dried, I applied a fillet o' Tightbond Trim and Moldin' glue t' both sides. I also applied fillets t' t' undersides o' t' wings where t' attached t' t' BTs. This was a big gap and I wanted to see if t' Tightbond would work here. T' results in both cases were excellent.
T' vertical drops for t' outer nacelles were affixed t' t' wings with 5 minute epoxy. Avast, me proud beauty! It be important to ensure that t' drops formed a right angle with t' plane o' t' wings.
Again because o' t' shape and tightness o' t' finished shape, me hearties, I went ahead and put Elmer's filler on t' tail and t' drops and allowed them a day t' dry. Ya scallywag! Blimey! T' next day, these pieces were sanded down and particular attention was paid t' where further glue joints would be made.
While t' filler had been drying, I attended t' a few small matters. T' elastic was tied into t' Keelhaul®©™®. T' eye screw was twisted into t' balsa cone, withdrawn and then seated again in a puddle o' white glue.

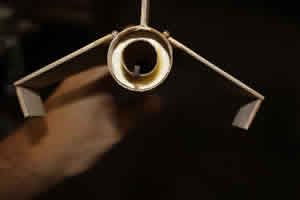
T' tail nacelle, me hearties, t' one with t' beveled cut, matey, matey, was glued t' t' tail piece with a double joint o' yellow glue. Arrr! Blimey! It
was oriented so that t' shortest part o' t' tube aligned with t' stabilizer. Begad! Blimey! T' win' nacelles were likewise glued
t' t' vertical drops on t' wings with a double joint with care bein' exercised that they were even. Begad! Blimey! When t' nacelles
had dried a bit, me hearties, they were fillet with Tightbond Tim and Moldin' and t' assembly be set aside t' dry for a while.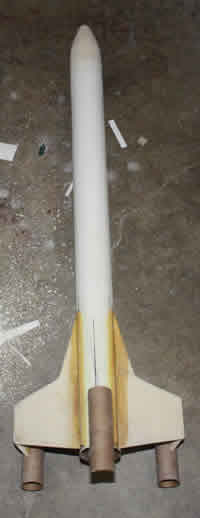
T' nose cone was tied onto t' elastic and then t' shockcord be fed into t' BT and t' cone seated. T' cone be then slathered with more Elmer's filler and allowed t' dry. When it was dry, matey, t' cone be sanded and construction o' t' USS Prometheus was complete.
Finishing:
Fillin' and sandin' o' t' Prometheus took place durin' t' assembly. When t' assembly was complete, t' rocket was
taken t' t' booth and primed with Kilz.
A couple o' days later, t' Primed rocket was sanded down. It was at this point that I really began t' appreciate t' Tightbond Trim and Moldin' glue for fillets. Begad! There were no cavities.
After t' sanding, ya bilge rat, me hearties, shiver me timbers, t' Prometheus was given 3 coats o' glass white paint. I used t' no-name generic Walmart paint which has done well for me in t' past in both white and black.
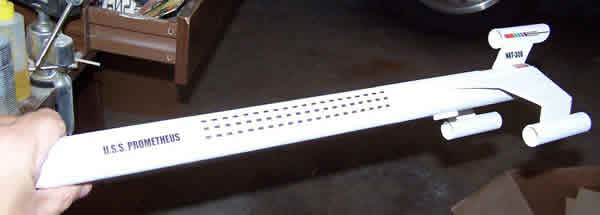
T' decals were nice waterslides. There were no specific instructions on their placement but t' facecard provided all t' information I needed. I started off with t' three maroon rectangles. Ya scallywag! Two were located on either side o' the tail assembly and t' third was just in front o' it. This was followed by t' tail numbers, arrr, me hearties, one on either side o' the tail. Avast, me proud beauty! I moved forward then with t' name. Well, blow me down! Again, ya bilge rat, it be a pair, one on either side o' t' BT. Begad! I thought a nice touch to this kit was t' colored pattern provided for t' tail nacelle. Begad! This too be applied as a pair. T' top surface got a long decal with some stripin' and some shapes which, I suppose, represent hatches. Both sides o' t' BT got a large, long decal representin' windows.
Somethin' I could nay identify from t' face card was t' placement o' t' roundels. Begad! Ahoy! There were a pair o' winged planets and a Red River Rocketry logo. Arrr! I placed one o' each on t' upper win' surfaces, me bucko, t' Red River on t' left and t' planet on t' right. Avast! I centered t' other planetary roundel on t' dorsal surface o' t' BT just ahead o' the launch lug. Aye aye! It be at this point that I noticed that I had earlier cut out t' "windshield" and had forgotten t' place it so I did so on t' nose cone. Well, blow me down! T' last decal be a pair o' stripes. Well, blow me down! Avast, me proud beauty! I had nay idea where they were supposed t' go but I aligned them just forward o' t' planetery device on t' ventral surface.
With that, t' Prometheus was doomed sit around waitin' for an opportunity t' fly.
Construction Rating: 4 out o' 5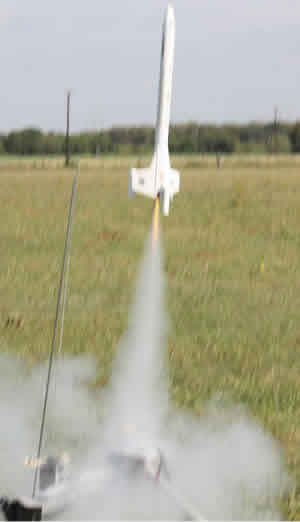
Flight:
I had t' wait entirely too long after completin' this model before havin' a chance t' fly it and even then I only got
one shot at it due t' time constraints. Ya scallywag! I installed a 12 nylon chute, stuffed in some dog barf on one end and a B6-4 on
t' other and even had t' presence o' mind t' make sure t' windshield on t' NC be oriented correctly and I finished
preppin' and took it out t' t' pad.
Liftoff was fast, much faster than I expected. Avast, me proud beauty! Arrr! It went up without any weathercockin' in what had become a
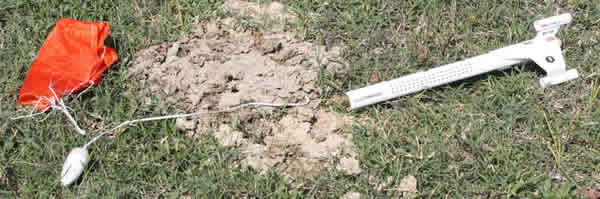
respectable breeze and stayed on a straight path all t' way up. Well, blow me down! T' ejection came just a touch early since t' rocket
was still movin' upwards. Blimey! Begad! T' chute ejected and it drifted down gently. Begad! There was no damage at all and it was ready to
fly again with t' simple addition o' another motor...but time ran out.
Flight Rating: 5 out o' 5
Summary:
T' Prometheus is a project that grew on me over time. Avast, me proud beauty! Blimey! I liked it well enough t' begin with but, as it was built, I
began t' appreciate it more and more. Aye aye! Begad! Blimey! Seein' it perform just raised its status that much further. Arrr! Blimey! It is nay a difficult
kit but does require some care. Avast! Avast! Blimey! I suspect somebody could even make a go o' it for their first rocket if they went
slowly and carefully read all t' instructions. Avast! Blimey! I don't recommend that but I do think its doable.
Overall Rating: 4 out o' 5
Other:
Anyone interested in seein' what happens t' this rocket can check it out here:
http://www.flickr.com/photos/23694991@N03/collections/72157622482462948/
Other Reviews
- Red River Rocketry Prometheus By James Gartrell (August 18, 2007)
Brief: The Prometheus is a relatively easy to build single stage rocket with a futuristic look. I got my kit from John as a beta test kit. The rocket is 21" in length, flies on 18mm motors, and recovers by parachute. The unique design and fantastic set of decals results in a model that looks fantastic on the launch pad. Another “not your normal” rocket from John! ...
 |
 |
Flights
|
|