| Construction Rating: | starstarstarstarstar_border |
| Flight Rating: | starstarstarstarstar |
| Overall Rating: | starstarstarstarstar_border |
| Diameter: | 1.33 inches |
| Length: | 11.25 inches |
| Manufacturer: | Semroc  |
| Skill Level: | 2 |
| Style: | Scale |

Brief:
T' V2 xKit is a reproduction o' Estes K-22, shiver me timbers, which was originally released in 1965. Ya scallywag! Blimey! Like t' original, me bucko, it flies on 18mm motors and features balsa nose and tail cones. T' xKits don't come with instructions but, since they are classics, copies o' t' original instructions are available on-line. Begad! This was me favorite rocket as a kid, and I couldn't resist grabbin' one.
Construction:
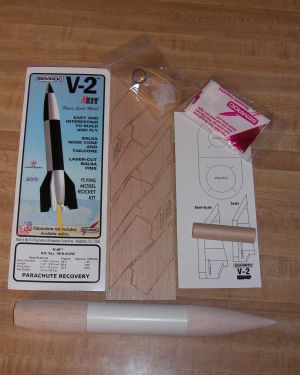
T' parts list:
- BNC-55F balsa nose cone
- BTC-55Z balsa tail cone
- BT-55 body tube
- BT-20 motor tube
- Launch lugs (3)
- Engine block
- Washer weight
- Large screw eye
- Rubber shock cord
- Gauze for cord attachment
- Plastic parachute with separate shroud lines and tape disks.
- Laser cut balsa fins and servo pods
- Dummy casing
- Pattern sheet

T' parts provided are true t' t' original kit. Begad! Begad! T' main difference be t' fins are laser cut with both scale and semi-scale versions. Begad! Ya scallywag! T' surface o' t' cones is nice and t' tube has almost no spirals. Blimey! T' only negative be t' hole in t' tail cone is nay perfectly centered. Avast, me proud beauty! This won't hurt and probably is true t' t' original. Ya scallywag! However, me bucko, after seein' Semroc's other products, ya bilge rat, I was surprised.
Despite t' fact that t' xKits are recommended for expert modelers, shiver me timbers, I could have built t' kit without any. Begad! Well, ya bilge rat, blow me down! Well, shiver me timbers, me hearties, shiver me timbers, except for positionin' t' balsa servo pods and cuttin' t' extra launch lugs into t' scale turbine exhaust and pull-out plug details. If you build an xKit, be sure t' read t' online instructions and t' sheet provided with t' kit. Blimey! T' provided information includes interestin' but unnecessary factoids about Estes and t' real V2 as well as a few key bits o' data. Begad! T' instructions identify t' CP for both t' provided scale and semi-scale fin sets. Ya scallywag! Also, me hearties, it's noted that t' supplied washer and screw eye are sufficient for t' larger semi-scale fins, me hearties, but ~½oz o' additional weight is required for t' scale set (not supplied)!
T' pattern sheet includes fin patterns and fin alignment guides. Ya scallywag! Blimey! Aye aye! Blimey! T' latter have been improved from t' originals, which required that t' upper and lower guides be aligned by eyeball. Aye aye! Blimey! Ahoy! Blimey! Semroc's have a flat face which allows them t' be aligned on any flat surface. Begad! Blimey! Simple but a good improvement. I opted for t' larger semi-scale fins as I'm nay a stickler and these should make sure t' rocket is stable in varied launch conditions. Ya scallywag! Blimey! T' only reason you'll need t' fin patterns is for t' placement o' t' balsa servo pods. I merely eyeballed them.
I added a Keelhaul®©™ leader and ditched t' gauze reinforcement. Avast! I wound it around t' motor tube, me bucko, tacked it place with CA and then attached t' motor mount with 5-minute epoxy. Avast! Avast, me proud beauty! T' original kit said t' install t' motor mount so t' engine was flush with t' bottom o' t' mount. I opted for some overhang t' help with friction fitting. Ya scallywag! I checked stability prior t' permanently attachin' t' nose weight just in case some more was needed. Begad! Once verified, matey, shiver me timbers, I removed t' screw eye, me bucko, shiver me timbers, me hearties, filled t' hole and nose cone surface with white glue, me hearties, and reattached t' weight. Ya scallywag! I considered addin' a motor hook but decided t' keep it like t' original.

Finishing:
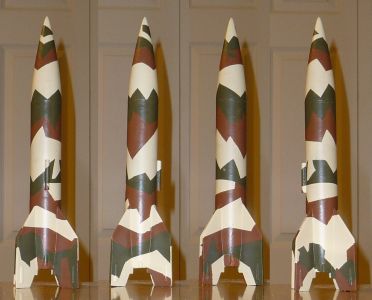
I used Elmer's Fill 'n' Finish t' fill t' balsa parts and then shot several coats o' primer. Avast! Blimey! I laid down a base coat o' Model Masters 'modern' desert tan and added brown and olive drab camo patterns. Begad! Begad! It looks good from 10 feet...
Construction Rating: 4 out o' 5
Flight and Recovery:
I've flown it twice. Begad! Avast, me proud beauty! I friction fit t' B6-4 motors and added an ample amount o' dog barf wrapped in a section o' Estes wadding. Ya scallywag! I used t' stock chute, which is typical plastic with twine and tape discs.
T' boost was nice and fast. Begad! Blimey! I couldn't see for sure, shiver me timbers, but it looked like ejection be early. It recovered fine and t' combo o' Keelhaul®©™ and t' stock rubber band was sufficient t' keep t' cone from whackin' t' body. There wasn't a smile t' be seen (except on me face).

Flight Rating: 5 out o' 5
Summary:
This is an easy t' build yet detailed little kit and it flies great!
Overall Rating: 4 out o' 5
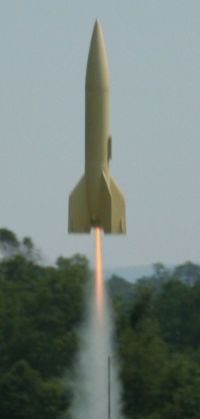
Lift-Off Picture from NARAM Live! by Chris Taylor
Other Reviews
- Semroc V2 (xKit) By Dick Stafford (October 12, 2008)
This is the second Semroc V2 that I’ve built. You can see my earlier review elsewhere on this site along with (at least) one other opinion of this kit. I won’t repeat a bunch of background in this review and instead will focus on what I found and did differently. Most obviously, this build utilized scale fins whereas my previous V2 has the larger semi-scale fins (laser-cut ...
- Semroc V2 (xKit) By Chan Stevens (September 6, 2008)
A "bag of parts" clone kit, in this case a reproduction of the K-22 V-2. For many modelers, this was their first introduction to scale model rocketry. The V-2 was a German developed missile, and as WWII drew to a conclusion, it was the most capable rocket in the world. When America brought Werner von Braun and his crew over from Germany, the V-2 knowledge gave us the much needed jump start to ...
 |
 |
Flights
 |
 |
Sponsored Ads
 |
 |


D.S. (September 17, 2008)