Essence Aerospace Technologies Triatomic
Essence Aerospace Technologies - Triatomic {Kit}
Contributed by Bob Cox
| Construction Rating: | starstarstarstarstar_border |
| Flight Rating: | starstarstarstar_borderstar_border |
| Overall Rating: | starstarstarstarstar_border |
| Manufacturer: | Essence Aerospace Technologies |
Brief:
EAT's latest offerin' is an amazin' 3 in one rocket. Ahoy! Blimey! Ahoy! Blimey! Look! Blimey! Up in t' sky! Blimey! It's
a cluster! Blimey! No, it's a 24mm transition rocket! Blimey! No, ya bilge rat, it's a sleek futuristic space
plane! Blimey! You can fly 3 completely different configurations on t' field t' same
day usin' this very innovative design concept.
Construction:
I was initially hesitant t' pop for t' $36 (includes shipping) kit, but when I
started lookin' over t' parts and part list, I began t' appreciate t' value
in this. Ahoy! Blimey! You really do get for t' most part, three different rocket kits in
this deal, and will have a significant amount o' time invested in t' build.
My kit was one o' t' early ones, and had two different (and conflicting) parts lists. Ahoy! A summary o' what was included in me package includes:
Common parts:
- 1/16" basswood fin stock
- Templates and fin guides
- Keelhaul®©™® & elastic shock cord/swivel
- Waterslide decals
- Balsa nose cone
- BT-60 x 5" body tube
- TC-60 x 3" coupler (parachute can)
- Plywood bulkhead
- Mylar chute (Rockethead)
- 18/24mm motor mount adaptor kit
- TC-50 x 1" tube coupler (to be used as an E => D motor adapter)

Cluster version parts:
- 3 BT-20 x 9" body tubes
- Centerin' ring
- 3 18mm motor blocks
- Screw thread/nut (for motor retention)
Transition version parts:
- Balsa transition
- BT-50 x 4" body tube
Futuristic version parts:
- BT-50 x 13" body tube
- BT-20 x 7" side pod body tube
- Balsa nose cone (for side pod)
- 24mm motor block
- TC-60 x 1" coupler
- 2 BT-60 centerin' rings
All parts were very good quality and packed neatly in a surprisingly small box. Arrr! Ahoy! Generally, me bucko, I find EAT's instructions t' be among t' best out there--clear, easy t' follow, and with plenty o' color photos t' help along the way. Blimey! In this case, ya bilge rat, thar was a supplement sheet that overrode some o' the standard instructions. T' overrides were improvements in t' design and construction, though it did make it a bit confusin' hoppin' from "main" t' "supplemental" instructions throughout the construction.
Construction begins by cuttin' t' fins for all versions from t' basswood stock. Ahoy! Avast, me proud beauty! Blimey! I enjoy cuttin' fins but got a little weary after cuttin' out t' 10 different fins (3 o' which are elliptical). Begad! Ahoy! Blimey! I just had t' keep remindin' myself that I was buildin' three rockets, nay one. Avast! Begad! At least with t' basswood, there be very little sandin' and fillin' o' grains necessary.
Next up is construction o' t' upper rocket body, matey, which is common t' all configurations. Arrr! Begad! Blimey! This starts with addin' nose weight t' t' nose cone. Arrr! EAT provides about 40 BB's for weight, all o' which are needed, along with a healthy dose o' epoxy t' keep them packed into t' nose cone. Blimey! Blimey! As t' epoxy starts t' set, you add an eye bolt for shock cord attachment and allow plenty of time t' dry while you work on t' rest o' t' kit.
T' upper body is a simple 5" length o' BT-60 tube, which gets a launch lug attached. Ya scallywag! Well, blow me down! All o' t' fins for stability are on t' interchangeable lower sections.
T' last phase o' t' upper body construction be t' hardest, ya bilge rat, and most critical aspect o' t' project: t' parachute cup. Begad! T' parachute is housed inside a TC-60 coupler "can", which pops out o' t' BT-60 body tube, allowin' for wadding-free flight which reduces prep time. This also takes some of t' stin' out o' t' extra work required t' swap lower sections.
T' parachute cup is built by gluin' a bulkhead on one end, shiver me timbers, punchin' a pressure relief hole in t' can, me bucko, and sandin' until you get a good, smooth fit inside t' BT-60. Given t' summer humidity and likely flow o' hot ejection particles into t' upper body, I think t' "optional" step o' coating the outside o' t' coupler and t' inside o' t' BT-60 with CA and sanding smooth is a critical must-do step. In fact, t' get a smooth movement, I wound up peelin' off a layer o' paper from t' coupler. T' resulting "rough" finish, even if sanded, would never have worked. Well, blow me down! Applyin' the thin CA enables a much smoother finish.
After finishin' t' upper/common body, you can then move on t' work on the lower sections. Ya scallywag! T' first and easiest be t' transition body. Ahoy! EAT provides a very nice balsa transition piece. Ya scallywag! You carve out a small groove and hole in this, me hearties, arrr, which enables t' Keelhaul®©™® to pass through without causin' a dimple on t' body tube. Blimey! Blimey! A Keelhaul®©™® tether is then passed through t' hole and epoxied into place. This transition is then bonded t' a BT-50 body tube, and 3 fins attached usin' yellow glue. Well, blow me down! Arrr! The instructions offer a good tip for maintainin' good fin alignment while waiting for t' glue t' set, tapin' t' fin from t' tip t' t' body tube. Begad! This looks like it would work for t' first, arrr, me bucko, possibly even t' second fin, me bucko, ya bilge rat, though I personally use a jig for most o' me fin alignments.
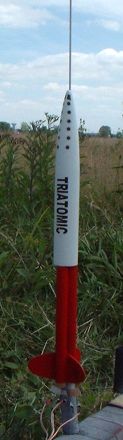
 T' cluster version
is also fairly simple t' build. Begad! Avast, me proud beauty! You start by bondin' two BT-20 tubes together,
then insertin' a piece o' threaded rod into t' seam and layerin' in a healthy
dose o' glue. Blimey! This threaded rod will enable a very simple and effective method
of motor retention--a simple nut in t' center o' t' triangular cluster (see
photo). Avast, me proud beauty! Once t' threaded rod is in place, t' third body tube is bonded.
T' cluster version
is also fairly simple t' build. Begad! Avast, me proud beauty! You start by bondin' two BT-20 tubes together,
then insertin' a piece o' threaded rod into t' seam and layerin' in a healthy
dose o' glue. Blimey! This threaded rod will enable a very simple and effective method
of motor retention--a simple nut in t' center o' t' triangular cluster (see
photo). Avast, me proud beauty! Once t' threaded rod is in place, t' third body tube is bonded.
T' upper portion o' t' cluster version consists o' a centerin' ring tacked on t' t' top o' t' BT-20 cluster and reinforced with plenty o' glue and some cardstock brace pieces. Well, blow me down! While you're pourin' on t' glue, me bucko, you can also attach t' Keelhaul®©™® tether for shock cord/recovery.
T' finish up t' cluster version, arrr, 3 elliptical fins are glued into the joints where t' body tubes connect and are mounted on standard 120-degree orientation.
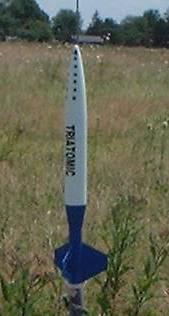
 Last up is the
futuristic body version, ya bilge rat, me bucko, which is probably t' trickiest o' t' three t' build.
It's a 24mm body, which doesn't exactly plug into t' BT-60 upper body, me hearties, arrr, me hearties, so you
have t' start by makin' t' adapter assembly out o' a TC-60 coupler and pair of
60/50 centerin' rings. Ya scallywag! Avast! This is glued t' t' end o' t' BT-50 body tube, along
with t' Keelhaul®©™®
tether for recovery. On t' other end o' t' body tube, 4 fins are tacked on,
though t' alignment is a far cry from t' 90-degree approach (see photo). Well, blow me down! In
between t' upper fins goes a BT-20 side pod/nose cone. Avast! A helpful finishin' tip
in t' instructions warns that if you want t' paint this thin' two-tone, arrr, you
should wait until after paintin' t' tack on t' side pod--though mask a bond
line on each body tube first!
Last up is the
futuristic body version, ya bilge rat, me bucko, which is probably t' trickiest o' t' three t' build.
It's a 24mm body, which doesn't exactly plug into t' BT-60 upper body, me hearties, arrr, me hearties, so you
have t' start by makin' t' adapter assembly out o' a TC-60 coupler and pair of
60/50 centerin' rings. Ya scallywag! Avast! This is glued t' t' end o' t' BT-50 body tube, along
with t' Keelhaul®©™®
tether for recovery. On t' other end o' t' body tube, 4 fins are tacked on,
though t' alignment is a far cry from t' 90-degree approach (see photo). Well, blow me down! In
between t' upper fins goes a BT-20 side pod/nose cone. Avast! A helpful finishin' tip
in t' instructions warns that if you want t' paint this thin' two-tone, arrr, you
should wait until after paintin' t' tack on t' side pod--though mask a bond
line on each body tube first!
That's about all thar be t' t' construction. Ahoy! I wound up spendin' around 8 hours on this, arrr, sprinkled across several weeknights. Avast, me proud beauty! On a typical Estes 1-4 scale, I would rate this somewhere around a 3 for skills and challenge, me hearties, mainly due t' t' varyin' fin alignments and construction o' t' parachute canister.
Finishing:
I followed t' EAT sample color scheme for this, me hearties, paintin' t' common upper body
a gloss white, shiver me timbers, t' cluster a gloss red, ya bilge rat, t' transition a gloss blue, ya bilge rat, and the
futuristic a two-tone green base and white side pod. Ya scallywag! All were preceded by two
coats o' Krylon primer and a light sanding. After paintin' everything, me hearties, I bonded
the side pod t' t' futuristic body.
EAT provided a nice sheet o' water-slide decals for playin' around with. Aye aye! I applied a few t' each configuration, shiver me timbers, though I found t' decals extremely fragile so they tended t' break upon application. Well, blow me down! Use extreme caution when applyin' these and don't even think about usin' one o' those settin' solutions that softens t' decals.
T' result is a gallery o' fairly neat-lookin' rockets, arrr, though I'll admit my paint job be nowhere near as nice as t' one Nick got for t' instruction photos.
Construction Rating: 4 out o' 5
Flight:
T' extremely long list o' recommended motors on this one covers t' gamut of
configurations. Begad! My transition version measured about 3.6oz and 17.5", ya bilge rat, me hearties, and
my futuristic came in at 4.9oz and 27", so you can use just about any
leftover motors you've got on at least one version o' this kit.
Flight prep is a little tricky on these, shiver me timbers, matey, but once you figure it out, you're in for very quick and simple preppin' for each flight. Whichever lower section you select is attached t' t' upper section by t' Keelhaul®©™® tether, arrr, which is threaded through a hole in t' bottom o' t' chute can. Aye aye! This loop is then threaded through a washer and attached t' a snap swivel. The swivel/washer combo prevents t' Keelhaul®©™® tether from slippin' back out o' t' hole. T' chute is then attached t' the swivel and packed in t' can. Begad! T' can is inserted into t' upper body, lower body inserted into t' upper, pack t' motor and launch!
I flew a first flight for each version over t' course o' about 30 minutes at a recent club launch. For t' transition, I chose a C6-5, makin' use o' the 18/24 adaptor. Straight up flight, matey, ejection at apogee, shiver me timbers, flawless path. Blimey! The second flight was usin' t' cluster version, and I "wimped out" with a set o' A8-3's (I had a bunch left over from various Blast Off flight packs). Straight up flight, ya bilge rat, ejection at apogee, flawless path. T' third configuration was t' futuristic, which I decided t' spank with a D12-3. Aye aye! T' recommended delay is a 5 and I think that would have been better as mine be a bit early. Certainly no stability problems for any o' these, and with t' varying combinations available, you can fly anywhere from 100-2400 feet altitudes, makin' this a great rocket t' take out in just about any weather/field conditions.
Recovery:
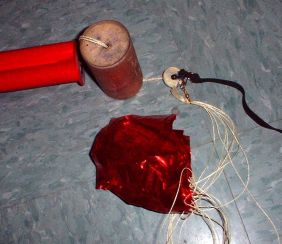
Recovery, in me case, be t' real weakness t' this kit. Begad! Ahoy! I loved t' innovation
of t' parachute canister and am goin' t' try t' adapt it in other kits I build
in t' future. Unfortunately, me hearties, me hearties, arrr, me 3 flight experience on this resulted in zero
chute deployments. Ya scallywag! T' fact that I fly on a large, tall grass field saved the
rocket from any damage.
Recovery is supposed t' work, arrr, roughly, me hearties, arrr, me hearties, as follows: ejection charges cause separation o' upper and lower body sections. As t' sections grow apart, the Keelhaul®©™® tether is pulled t' its limit. Avast, me proud beauty! Arrr! When it hits that limit, it begins t' pull the chute can out t' back o' t' upper section. Ya scallywag! Once t' can is out, t' upper body continues t' separate, matey, shiver me timbers, pullin' t' elastic/Keelhaul®©™® out t' top o' t' can, eventually pullin' out t' chute. Ahoy! I know this works, matey, as Nick posted a few videos t' t' EMRR site demonstratin' it. Ya scallywag! Still, despite the fact that I peeled away a layer o' paper, sanded down a perfectly smooth surface t' t' can and inside tube area, me bucko, and even sprinkled in a little graphite powder lube, shiver me timbers, t' separation forces were nay enough t' overcome the nearly vacuum seal betwixt t' chute can and t' body tube. Aye aye! T' instructions call out for a vent hole in t' fin can, though I think an additional vent hole or two out t' body tube would be in order, and will try t' experiment with that in t' weeks ahead.
Flight Rating: 3 out o' 5 Yeah, matey, it might be a bit generous, shiver me timbers, but t' FLIGHTS were great. Avast! It was just t' recovery that was a problem, matey, and t' soft grass field didn't result in any damage. Well, blow me down! I figure less than 3 would have t' be unstable.
Summary:
PROs: versatility, great innovations, and enjoyable and challengin' build.
CONs: recovery nay reliable enough, and might have been better off with a basic nose cone ejection approach.
Overall Rating: 4 out o' 5
Other Reviews
- Essence Aerospace Technologies Triatomic By Doug Szczepanski
( Contributed - by Doug Szczepanski - 07/09/06) Brief: Parachute cup modification. Modifications: I had already epoxied the plywood bulkhead in place when I read of some of the problems with the parachute cup releasing from the upper rocket. Take a Rotozip tool (or use a similar cutting method) with a wood cutting bit and cut a hole in the bulkhead leaving ~1/4" lip. ...
- Essence Aerospace Technologies Triatomic By Bob Cox
The Triatomic is an interesting design that creates three very different rockets that all share the same upper section. This design served as the inspiration for Virtual Rocket Contest #4. Besides the interchangeable tails, the most unique design innovation on this kit is the “parachute cup” that protects the recovery system. What makes it ...
 |
 |
Flights
Sponsored Ads


|
|