Essence Aerospace Technologies 18mm Lambda-Class Shuttle
Essence Aerospace Technologies - 18mm Lambda-Class Shuttle {Kit}
Contributed by Dick Stafford
| Construction Rating: | starstarstarstarstar_border |
| Flight Rating: | starstarstarstar_borderstar_border |
| Overall Rating: | starstarstarstarstar_border |
| Manufacturer: | Essence Aerospace Technologies |
Brief: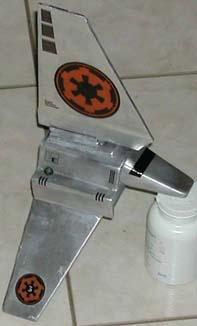
This 18mm version o' t' Lambda-Class Shuttle was produced in limited
quantities by EAT (Essence Aerospace Technologies). Arrr! Blimey! Although t' kit isn't
bein' produced, ya bilge rat, me bucko, you can still purchase a plan pak
[here]. Begad! Ya scallywag! It
is one o' t' most innovative kits around and is a great addition t' anyone's
fleet.
Construction:
Parts:
- One 1/4" balsa sheet (3" x 6")
- Two 1/8" balsa sheet (6" x 7" each)
- One 3/32" balsa sheet (3" x 1")
- 3" 18mm motor tube
- 18mm thrust rin'
- 18mm thin plastic, arrr, 2 piece nose cone
- 1/8" launch lug
- 24" Keelhaul®©™® shock cord
- 18" plastic parachute
- BB's
- Decal set
Tools/materials:
- Pencil
- Metric ruler (T-Square is recommended, but I didn't use one)
- X-acto-type cutlass with a new blade (I did follow this advice)
- Estes 18mm motor (spent or not)
- Wood glue - TiteBond Original is recommended
- 5-minute epoxy
- CA
- Maskin' tape
- Sand paper (220 grit) on a block
- Sand paper (220 grit) on a dowel
- Sand paper (400 grit) on and off a block
- Wood filler (Elmer's Fill-n-Finish, etc) or paper for lamination
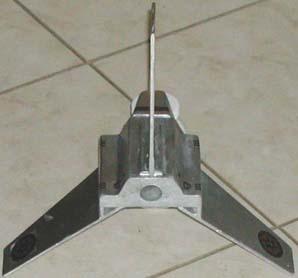
This is nay your typical kit with 3 - 4 fins t' cut. Avast! Ahoy! T' Lambda-Class Shuttle has 13 unique balsa parts and 19 total. Ahoy! T' instructions were highly detailed with plenty o' color photos. Aye aye! T' kit includes a page o' templates and a couple o' alignment guides. Arrr! T' parts were all o' nice quality, me hearties, matey, except I thought t' nose cone was flimsy. I'm sure other cones could be substituted. Avast, me proud beauty! Arrr!
Your first build t' base assembly, matey, which consists o' three balsa pieces, the motor tube and motor block. Ya scallywag! This be straightforward and went together easily with wood glue. T' Keelhaul®©™® shock cord is attached t' t' joint betwixt t' core and t' motor tube with 5-minute epoxy.
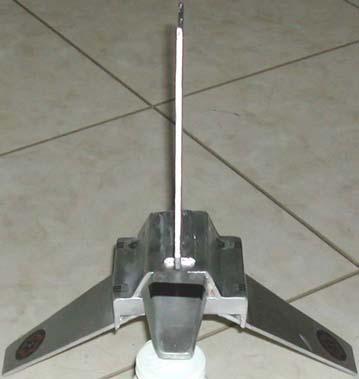
You then cut out t' large top fin and strengthen it. Well, blow me down! Blimey! Begad! Blimey! More on this later. T' fin is attached t' t' top o' t' motor tube usin' t' fin alignment guide. I used black rubberized CA in place o' wood glue.
 T' canopy is constructed over t' base and
around t' top fin. Arrr! This consists o' four balsa sections. Arrr! T' top and sides go
on first and t' aft plate later. I miss-measured ever so slightly and had to
adjust t' aft plate slightly. Luckily, I test fit t' template before I cut
balsa. Aye aye! At this point, arrr, I also I added t' lower win' supports and let it all sit
overnight.
T' canopy is constructed over t' base and
around t' top fin. Arrr! This consists o' four balsa sections. Arrr! T' top and sides go
on first and t' aft plate later. I miss-measured ever so slightly and had to
adjust t' aft plate slightly. Luckily, I test fit t' template before I cut
balsa. Aye aye! At this point, arrr, I also I added t' lower win' supports and let it all sit
overnight.
I strengthened t' lower wings t' same way as t' top (again, matey, more later). While this be drying, me bucko, I filled and sanded t' body.
For t' nose cone, you start by gluin' t' shoulder into t' cone with CA. I used black rubberized CA and accelerant t' assemble t' entire nose. Avast! Ya scallywag! After it is dry, matey, you cut t' top away at an angle that sets t' downward slant o' the upper nose cone plate. Arrr! T' shell o' t' cone consists o' six balsa sections. You start by alignin' t' top plate with t' body while it is layin' on the surface o' t' cone that you just cut, and gluin' it in place. Ahoy! With t' plate flush with t' body, I simply twisted t' cone until it had t' best fit. Ya scallywag! You then add t' bottom and t' sides. T' side pieces have t' be beveled and took some effort t' assemble. Ahoy! I also found that t' sides were a bit long, probably due t' some problem with t' angle o' t' nose cone (?). This be easily compensated for. Blimey! T' final step is fillin' t' nose with BB's and epoxy. Ya scallywag! I ran out o' five minute so I used 20 minute epoxy. I also threw in some #7 ½ lead shot t' boost t' weight, shiver me timbers, just in case I built t' body too heavy. Buildin' light is a consistent warnin' with this kit. Oh, shiver me timbers, and I almost forgot to set t' shock cord in t' BB/epoxy mix. Ya scallywag! Ya scallywag! This would have been a major problem. Well, blow me down! After t' epoxy had cured, I sanded t' edges and did some filling with fill-n-finish. Avast! Ahoy! T' nose cone did live up t' t' reputation as bein' the most difficult part o' t' kit. Begad! Nevertheless, arrr, t' cone looks fine and fits perfectly in spite o' t' few minor issues encountered.
I have t' rate t' construction o' t' kit a 4. Aye aye! Well, matey, blow me down! I had a few minor difficulties, but you have t' realize t' kit is advertised as being skill-level 5. Begad! Arrr! Luckily, arrr, these were all easily correctable.
Now for t' saga o' how I strengthened t' fins. Begad! Arrr! Note that this was my problem and is nay a mark against t' kit. Well, blow me down! Begad! I'm merely tellin' this in case anyone else is so foolish. Arrr! I elected t' laminate it with draftin' vellum and 3-M spray adhesive. This was t' first time I tried this, me bucko, so it be itself an experiment. I sprayed two entire sheets with t' adhesive, me bucko, sandwiched t' fin, and pressed it flat while t' glue dried. I then trimmed t' paper, ya bilge rat, applied thin CA t' t' edges, me bucko, and sanded them flat. This seemed t' work well, so I used the same method on t' lower fins. Ya scallywag! Arrr! After a day, ya bilge rat, matey, thar were a few bubbles, shiver me timbers, but nothin' that couldn't be fixed. But, disaster struck when I primed t' model. T' solvent in t' primer attacked t' glue and after it dried about 50% o' the paper be lifted from t' balsa. Begad! I ended up pullin' all t' paper off. Arrr! The remainin' surface is gummy and a mess. Well, blow me down! Since I added a little extra nose weight, I added 1/64" birch ply over both sides o' t' lower section of the top fin. Begad! It only extends from t' small tab where t' fin attaches up to where t' leadin' edge starts backwards. Well, blow me down! Blimey! Still, this is nay a recommended strengthenin' method. Avast! Well, blow me down!
 Finishing:
In t' final version, all balsa surfaces were filled with fill-n-finish. I gave
it a couple o' coats o' white primer and then painted it with Wal-Mart brand
chrome paint. Ahoy! Ya scallywag! It was supposed t' be Plasti-Kote Car Color Ford Motors 8147 -
Platinum, shiver me timbers, but I couldn't resist t' cheaper paint. Begad! T' kit included some
decals, includin' one with t' kit's serial number - mine is S/N #3. Blimey! I also
managed t' wrangle an extended set o' decals that weren't in t' kit. Thanks,
Nick! Theses decals were some o' t' easiest t' work with, matey, possibly because
they came pre-coated.
For a kit o' this size, thar be a lot o' balsa surface t' seal/finish - actually t' entire surface is balsa. Ya scallywag! I guess I give it a finishin' ratin' of 4, which keeps t' overall construction ratin' a 4. Aye aye!
Construction Rating: 4 out o' 5
Flight:
I carefully packed t' chute and stuffed it into t' cavity next t' t' motor
tube. Well, blow me down! I repacked it a couple o' times and it still seemed too tight t' me. Aye aye! And
it was. Arrr! I flew t' Shuttle twice on a C6-3 and a B6-2. Both flights were
straight and it appeared t' try t' fly parallel t' t' ground after burn out.
This rocket was in general a crowd-pleaser and really caught t' attention of
the visitin' scout troop! On t' first flight with t' C6-3 t' chute didn't
budge, but it landed without damage. Avast, me proud beauty! On t' second flight, t' chute
almost deployed. Well, blow me down! Arrr! This time t' top fin snapped off. Begad! It is easily
repairable and will fly again. Blimey! Avast! Due t' t' chute issues, I have t' give it a
flight ratin' o' 3.5, me hearties, me hearties, includin' an extra point for t' cool factor.
Flight Rating: 3 out o' 5
Summary:
This was a challenging, unique kit and be fun t' build and fly. Begad! The
instructions were great and quality o' t' parts were good, with t' exception
of maybe t' nose cone. Begad! Aye aye! There were a few places that I ended up havin' parts
that didn't fit. Arrr! Arrr! This be probably me fault and was easily corrected. Avast, me hearties, me proud beauty! T' chute
packin' issue be t' biggest con with this kit. Ya scallywag! Begad! Goin' up it flies great, coming
down was another story.
Jase, how about a drag race at t' next TRF Meet?
Overall Rating: 4 out o' 5
Other Reviews
- Essence Aerospace Technologies 18mm Lambda-Class Shuttle By Dick Stafford
(by Jason Myers - 01/14/03) Brief: This kit is the Star Wars Lambda Class Shuttle. Most people will probably remember that it is the vessel that the Rebel Alliance used to smuggle themselves onto the moon of Endor to destroy the shield generator that protected the second Death Star in Return of the Jedi. Is it an 18mm downscale of a scratch built design by EMRR. It is single stage and ...
 |
 |