Nano Rocketry Interdimensional Transfer Ship
Nano Rocketry Interdimensional Transfer Ship
Contributed by Nick Esselman
| Construction Rating: | starstarstarstar_borderstar_border |
| Flight Rating: | starstarstarstarstar_border |
| Overall Rating: | starstarstarstar_borderstar_border |
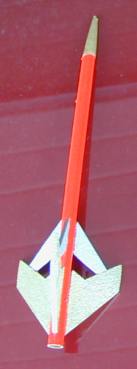
At NARAM-43 I purchased a couple o' Nano Rockets. Blimey! Blimey! Aye aye! Blimey! Along with t' Cougar, me bucko, I purchased t' Interdimensional Transfer Starship (ITS). Avast! My kit be apparently updated when compared t' earlier submitted review below. My ITS was also, matey, arrr, in me opinion, a later-than-Cougar-addition t' t' Nano fleet as t' instructions were improved and thar were other nice build features which I will describe below. Aye aye! Begad! I bought it because it be one o' t' most futuristic kits in t' Nano fleet.
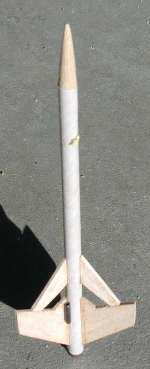 T' kit comes with a Keelhaul®©™ shock cord, six (6) laser-cut balsa fins, a 6½" body tube, shiver me timbers, arrr, a wood nose cone, and two (2) brass launch lugs. T' instructions are on a single 9x11" sheet o' paper and t' whole thin' is packaged in a 9x6" envelope.
CONSTRUCTION:
T' instructions feature a nice lookin' title page informin' you o' t' name, me hearties, me bucko, skill level (ITS is a level 2) and t' maximum altitude expected (~150 feet) and a few nice 3D renderings o' t' rocket. Aye aye! Ahoy! Once inside you get a bit o' a story about t' ITS and a warnin' nay t' fly it "durin' natural electrical activity" so that your don't activate t' "Dimensional Drives". Ahoy! Also you'll find a list o' components, matey, needed supplies, a template for fin assembly and alignment and t' marked position o' CP and CG. Avast, me proud beauty! Avast, me proud beauty! Then thar are t' steps for construction.
Also included in t' instructions are flyin' details. These describe t' removal o' t' yellow paint from t' Quest rod, me hearties, arrr, also utilizin' a "Z" bend (which has been a great tip for me), matey, and how t' tape t' motor into place for flight.
Construction is indeed straightforward with t' major challenge bein' t' attachment o' t' shock cord. Ahoy! I didn't even try t' method outlined this time after bein' frustrated durin' t' construction o' t' Cougar. I simply did t' same as t' I did on t' Cougar as you will see below.
In step 1, arrr, t' fins are assembled and t' laser-cut fins are easy t' work with and t' template is good. Arrr! Blimey! I used CA and be successful with alignment on two o' t' three fins, me hearties, matey, but a simple cut with me hobby knife allowed me t' redo that one and be on me way.
 In step 2, t' instructions indicate that you are t' glue t' Keelhaul®©™ shock cord into t' hole in t' nose cone. Begad! My nose cone did nay have a hole, matey, shiver me timbers, and so I created me own connection by drillin' a 1mm hole through t' shoulder, grooved it horizontally and then tied t' shock cord through t' hole.
T' step 3 be t' attachment o' t' shock cord t' t' body tube. Avast, me proud beauty! As mentioned above I repeated what I did on t' Cougar and drilled a small hole in t' side o' t' body tube, arrr, fed t' remainin' end o' Keelhaul®©™ through it and knotted it. Note: t' picture is from me Cougar construction, shiver me timbers, but is looks t' same for t' ITS.
 In step 4, matey, t' fins are attached and as stated thar be an alignment guide t' assist in this. Begad! Begad! You must also reference t' drawin' t' determine how high up from t' bottom t' glue them. Well, blow me down! Also in step 4, t' launch lug is glued on. Avast, me proud beauty! As with t' Cougar, ya bilge rat, t' launch lug supplied be nay t' correct diameter for t' standard MicroMaxx rod. Well, blow me down! Well, arrr, blow me down! I found a great solution though...at local hardware stores, look for Tension Pins. Blimey! I purchased t' 3/32" x 1/2" version and it worked great!
T' instructions are good, arrr, needin' only minor clean up with editin' and spell checking, me hearties, ya bilge rat, ya bilge rat, but much improved compared t' t' Cougar. Avast! And again, shiver me timbers, t' most challengin' be t' shock cord attachment. Aye aye! T' reviewer below seemed t' get it t' work and I'm sure Nano has had success, but this is an area that could use some continued focus. Aye aye! Blimey! Alternately, shiver me timbers, t' instructions might want t' describe t' "hole in t' side" method too.
I didn't paint me rocket, but t' instructions emphasized "light" finishing. Although, now that I have flown t' ITS a few times, ya bilge rat, I'm thinkin' about attemptin' t' finish it in some way.
Overall, for CONSTRUCTION I would rate this kit 3 points. Ahoy! Ahoy! T' nose cone did nay fit t' instructions description, t' shock cord mountin' method is too challengin' and t' launch lugs did nay fit t' standard Quest rail. Ahoy! However, shiver me timbers, these are all t' same as on t' Cougar and Nano tells me that they have nose cones that meet t' description shippin' in t' kits now, arrr, me hearties, that they are workin' on a shock cord mountin' method, me bucko, and that they are lookin' for new lugs. Blimey! Avast! Apparently t' lugs fit some older Quest rails. Well, blow me down! T' parts quality are good and t' instructions are adequate.
FLIGHT/RECOVERY:
I have flown t' ITS four (4) times and right out o' t' shoot it has performed well.
My first flight came off t' pad fine and went t' about 100 feet. Well, blow me down! ( I use me house height as a gauge and it went about 3x t' height). Then ejected, while still goin' up, and landed on me roof. Avast, me proud beauty! Begad! Recovered.
T' second flight was another successful flight and recovered in t' nearby grass. Ya scallywag! I did notice that even though t' nose cone ejected is still fell with authority and was stable with t' top o' t' body tube leadin' t' way.
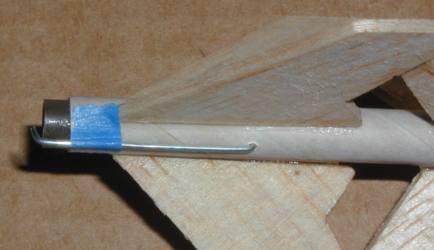 For t' third and fourth flights, arrr, arrr, I implemented a motor thrust-retainer. This be made from a small paper clip that be bent and cut t' size. Avast! Arrr! Blimey! It is held in place with a small piece o' tape. T' important thin' t' remember is that t' length o' t' clip needs t' be just a hair longer than t' motor. Nay a lot longer or you'll have trouble gettin' it set up on t' ignitor. Avast, me proud beauty! Blimey! Also t' part that will hold t' motor in upon ejection needs t' be just long enough t' catch t' lip o' t' motor. Begad! Blimey! Blimey! Pictured here, arrr, mine is slightly too long because it interfered with t' ignitor. Ya scallywag! Avast! Blimey! Even with me motor hook, me CG is where t' instructions say it should be.
Both t' third and fourth flights were successful with t' motor thrust-retainer and I didn't see an altitude difference.
For FLIGHT/RECOVERY, me hearties, me bucko, I would rate this kit 4 points. T' ITS flew well and was stable. Begad! It can't be perfect because o' t' friction fit o' t' motors and it is a bit too stable comin' down without t' nose cone.
Overall, matey, t' ITS flew as good as Quest's best pre-built rockets (Raw Fusion and Vector). Aye aye! It is "futuristic" lookin' and has enough size t' make it enjoyable t' watch fly. Begad! Ahoy! I would recommend this one t' others, hopin' that Nano at least addresses t' launch lug problem. Aye aye! I give t' kit an OVERALL ratin' o' 3 points.
 |
 |