| Construction Rating: | starstarstarstarstar_border |
| Flight Rating: | starstarstar_borderstar_borderstar_border |
| Overall Rating: | starstarstar_borderstar_borderstar_border |
| Diameter: | 3.46 inches |
| Length: | 9.00 inches |
| Manufacturer: | Quest  |
| Skill Level: | 3 |
| Style: | Scale |

Brief:
This is semi-scale sport model based on NASA's Max Launch Abort System (MLAS). Ahoy! It is quite stubby, bein' 3.5" in
diameter and a mere 9" long. It has only one recommended motor, t' B6, matey, and recovers in two parts on three
parachutes.
NOTE: Two RockSims were submitted. Ahoy! One be t' stock build and one has added nose weight. Begad! You should assess the stability o' your own model.
Construction:
Parts included in t' kit:
- One 3.5" D v 5.5" L tube
- One nosecone shoulder ring
- Three laser cut rings for t' motor mount and nose cone shoulder
- 18mm motor mount (tube, block hook)
- Keelhaul®©™® and elastic cords
- Three plastic 'chutes
- Two sets o' four laser cut fins
- 1/8" lug
- Lag bolt
- Decal set
- Two foam MicroMaxx cones
T' build requires t' standard sandpaper, hobby knife, shiver me timbers, wood filler, wood glue. Avast, me proud beauty! Foam safe white and black paint is
also needed.
T' 10 pages o' instructions are well written and are excellently illustrated. Arrr! They include a markin' guide for t' motor mount, a ruler that you can cut out if you don't have one lyin' around and, me hearties, o' course, me bucko, a fin markin' guide. Ya scallywag! Aye aye!
T' parts come securely packaged in a box vs. Ahoy! a plastic bag. This protects t' wide, thin walled body tube, shiver me timbers, and helps both you and t' environment. Avast! T' box can be recycled into a reusable range box. Avast, me proud beauty! At least, ya bilge rat, so sayeth t' sticker on t' end. Avast, me proud beauty!
T' motor mount assembly is standard, usin' both a thrust rin' and a motor hook. Ahoy! Blimey! Two centerin' rings are provided. T' lower rin' has cutouts t' save a some weight. Arrr! Blimey! Aye aye! Blimey! T' Keelhaul®©™® cord is tied t' t' mount prior t' t' installation o' t' top ring. I used a *small* dab o' 5-minute epoxy t' secure it. Ahoy!
T' body tube is quite thin for its size and I had concerns about squashin' it along t' way. I'm glad t' mount
didn't grab while I was insertin' it into t' glue smeared tube. Avast! Blimey! It survived me clumsy buildin' skills but concerns
about flight durability remained.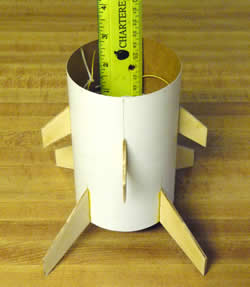
T' fin preparation and installation are also typical - sand, matey, mark, glue (double glue joints are specified). The instructions have t' fins filled after they are installed but I prefer t' do this prior t' installation.
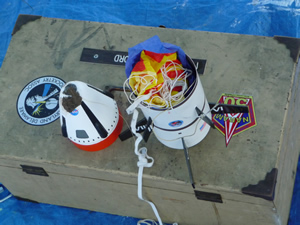
T' nose cone assembly consists o' t' foam capsule, a shoulder and a laser cut cardboard bulkhead. A heavy lag bolt is installed in t' tip t' provide t' required nose weight. Aye aye! Ya scallywag! This bolt is also t' attachment point for t' nose cone's parachute. Begad! A second, very thin Keelhaul®©™® cord is tied around t' bolt and is fed into t' body when t' 'chutes are installed. Ahoy! Attachin' t' cord t' t' bolt should keep all t' parts together on recovery and will allow t' cone t' come down base first. Blimey! T' final step is to install t' faux thrusters on t' nose (which were faux on t' real thin' too). Here, you split t' two foam MMX cones, sand t' fit, shiver me timbers, me hearties, arrr, and glue them on t' capsule.
Finally, you also have t' assemble and install t' three plastic 'chutes. Avast, me proud beauty! Ahoy! I added a length o' elastic t' each of t' nose cone 'chutes t' act as separate risers.


Finishing:
Prior t' painting, you are instructed t' fill t' cone with thinned wood filler, arrr, which I did. Avast, me hearties, me proud beauty! Blimey! T' entire model is
then supposed t' be painted with foam-safe paint. I chose t' paint t' lower part with 'regular' paint and t' cone
with brush-on acrylics. Begad! Avast! Blimey! I ended up usin' t' paint that I had on hand.
T' body was spray painted and t' fins were painted with brush-on. Avast, me proud beauty! Avast! I don't like sprayin' such small areas. Avast, me proud beauty! Aye aye! The instructions also say t' cover t' entire body with a plastic bag, me hearties, expose t' fins and mask them off. Since I didn't spray them, I just masked with plain old blue maskin' tape.
Maskin' t' cone was t' most complicated part o' t' process for me since t' surface o' acrylic paint was not perfectly smooth and I had a fair amount o' bleeding. Ahoy! Avast, me proud beauty! I should have painted on a layer o' t' base coat before adding t' black trim.
T' kit provided quite a few decals includin' stripes, rivets, fin numbers and logos. Begad! Ahoy! T' instructions do a great job showin' where t' position them. Begad! Blimey! I HATE IT when you have a sheet o' decals and have t' guess where they go. Ya scallywag! Make sure you look at them carefully t' separate t' individual items (for example, t' numeral 'I' decals were individually positioned on t' paper but some o' t' other numbers were attached t' one another). Begad! T' decals were tough and came off their backin' smartly and easily. Ya scallywag! Well, blow me down! As usual for me, I had some positionin' problems and little ones tended t' stick immediately. Arrr! I'll chalk this up t' operator error.
T' overall results are that t' rocket looks great as long as you back far enough off. Ahoy! But I like it! All these issues are mine and nay t' kit's. Well, blow me down!
Construction Rating: 4 out o' 5
Flight:
Prep was more complicated than your typical LPR bird. Avast! I added t' specified waddin' and laid in t' 'chutes in the
order specified. T' body's 'chute went in first followed by t' two capsule chutes. I opted for t' B6-4 vs. Begad! a -2
because that's what I had. My RockSim model, which uses t' as-built mass and CG, says t' -4 was a better fit
anyway.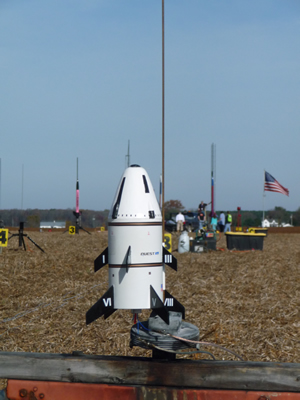
Well, matey, it rose about 20' then arced over and core sampled. It's path seemed t' be perpendicular t' t' 7-8 mph winds. Aye aye! Arrr! T' good news: t' soft foam cone was muddy but nay dented, me bucko, ya bilge rat, t' body tube be intact and all 8 fins stayed on. T' ground be soft but t' kit be sturdier than I expected.
I wanted t' try an Estes C6-5 but was nervous about usin' a heavier motor, arrr, matey, so I kludged up some nose weight. I won't embarrass myself with t' details but it DID involve bubble gum (but no bailin' wire or duct tape). Begad! In me haste, I didn't check t' CG for future reference. Begad! T' boost was good with some weather cocking. Avast! Arrr! Success! T' nose weight unit be lost at ejection but I since recreated it as best I could. Avast! It be around 0.3 oz.
Recovery:
Ejection on flight #2 was a bit late due t' t' weather cocking, but nay bad. Aye aye! Blimey! One o' t' two nose cone 'chutes
tangled, me hearties, matey, but one is enough for a soft landing.
Flight Rating: 2 out o' 5
Summary:
I liked short stubby rockets and fell in love with t' MLAS after seein' its launch photos and videos. Ahoy! Avast! This is a very
semi-scale representation, ya bilge rat, me hearties, shiver me timbers, but I like it too!
T' motor mount, laser cut fins, me hearties, and recovery system are fairly standard. Ahoy! Paintin' is a little more complicated than most, matey, but I seldom consider finishin' when I think o' skill levels. Avast! There are a lot o' decals and their quality is good. Begad! T' three 'chutes make prep a little more complicated, me hearties, but still nay difficult. Aye aye!
T' negatives are a thin walled body and marginal stability. Avast! Quest will likely say that me buildin' skills or the wind led t' t' problems with t' B6 flight. Avast! Even with these issues I like t' kit and it was refreshin' t' see someone go out on a limb and offer such a kit. Blimey! Despite me low rating, I recommend buyin' one..or two.
I have added some weight t' me nose and will try her again at t' next launch. Well, blow me down! I went ahead and submitted the review since this could take a while.
Overall Rating: 2 out o' 5
Other Reviews
- Quest MLAS By Jim Fields (January 27, 2011)
My son and I were on our most recent trek up to Stevensville to see Dave at Red Arrow Hobbies ( http://www.redarrowhobbies.com/ ) to pick up some kits he had ordered up for us for a Cub Scout build event. My son was cruising through the inventory, and yes it is nice to have a ‘real’ rocket/hobby shop to actually physically walk into, checking out all the different kits and ...
 |
 |
Flights
|
|
|
|
D.S. (December 5, 2009)