Estes Design of the Month Space Freighter Plan
Estes - Space Freighter {Plan}
Contributed by Dwayne Surdu-Miller
| Construction Rating: | starstarstarstarstar_border |
| Flight Rating: | starstarstarstar_borderstar_border |
| Overall Rating: | starstarstarstarstar_border |
| Manufacturer: | Estes  |
Brief: Construction:
T' original plan parts list calls for a PS-50A payload section that included a 4" clear plastic payload tube, a 1" balsa nose block (a solid balsa cylinder), and a BNC-50J balsa nose cone. Begad! Blimey! I substituted a Quest payload section that is red transparent plastic and 4" long, arrr, a Quest nose cone, and a balsa nose block that I turned on a lathe.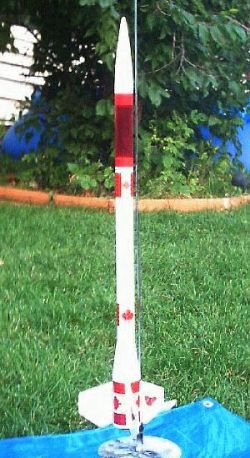
This is a nifty "Rearward Ejection Payloader" design by Scott Amundson. Blimey! It won an Estes Design o' t' Month Contest in 1968, matey, me bucko, published as Estes Industries Rocket Plan Number 54 in Model Rocketry News.
Required parts include:
T' original parts list calls for 36" o' Estes SC-3 shock cord. I substituted a couple o' lengths o' Keelhaul®©™ cord and a round elastic cord. Arrr! Blimey! I added t' piece o' wire t' retain t' motor in t' motor mount, ya bilge rat, as I didn't like t' idea o' relyin' on friction fittin' t' motor in t' power pod. Ya scallywag! Also, t' plans also call for four RA-2060 paper adapter rings. Avast! I substituted some 1/16" thick card stock that's more rugged. Begad! Blimey! Lastly, matey, I fabricated a few items that were nay locally available, me hearties, me bucko, includin' t' balsa nose block, me bucko, t' balsa adapter, me bucko, and t' paper adapter rings.
T' plan's instructions were easy t' follow with diagrams that clarified t' text nicely. However, ya bilge rat, I didn't like t' way t' shock cord was supposed t' be attached. Blimey! T' shock cord was originally t' be inserted through a slit in a fin, then held in place with a glued strip o' gauze. Blimey! I thought this would expose t' shock cord t' deflected motor exhaust at launch time and t' gauze attachment looked very permanent. Avast! Avast! Instead, I drilled a small hole in t' fin, me hearties, threaded t' hole with a 9" length o' Keelhaul®©™ cord, and tied t' cord t' itself makin' a loop around t' fin. Avast, me proud beauty! I tied t' remainin' free end o' t' cord t' a round elastic shock cord. Ya scallywag! I also didn't like t' friction-fit motor idea. Begad! Blimey! I felt that gettin' a friction-fit motor out o' t' power pod would be a royal pain and that t' friction fit motor would nay reliably kick t' pod out at ejection time, which would be disastrous. So t' improve reliability and convenience, I added a motor retainin' wire t' t' pop pod.
Finishing:
I used sandin' sealer and 400 grit sandin' paper t' seal/smooth t' fins and t' balsa adapter. Blimey! Ahoy! I spray painted t' rocket body, shiver me timbers, minus payload section and nose cone, me bucko, with Krylon White Primer then with Krylon Gloss White. Ahoy! T' nose cone was already white so I didn't paint it. Begad! I then added finishin' touches with Pactra Trim Tape and some snazzy iridescent stickers that were locally available.
Construction Rating: 4 out o' 5
Flight:
T' plans recommend A8-3, ya bilge rat, shiver me timbers, ya bilge rat, B6-4, B14-5, ya bilge rat, and C6-5 motors. Ahoy! Avast, me proud beauty! I suggest that A8-5, B4-6, B6-6, and C6-7 motors might be more appropriate since t' aft ejection works a bit better after apogee with t' model in nose down position.
Parachute preparation requires a bit o' care since t' chute, lines, shiver me timbers, and cord must be arranged on t' power pod before t' pod is inserted into t' aft o' t' body. T' pod's centerin' rings are only about 1.5" apart so t' available space is pretty small. Ya scallywag! Blimey! Gettin' t' power pod into t' body is a bit iffy as well, me bucko, since t' shock cord, chute, and shroud lines must nay be squished betwixt t' pod's centerin' rings and t' body, otherwise t' fit may be too tight. Begad! Blimey! At least it doesn't need wadding. Aye aye! Blimey! Once t' pod is inserted, insertin' t' motor is easy. Just insert t' igniter and plug into t' motor and insert t' motor into t' pod.
First flight was with an A8-3 with 10 mph winds. T' model boosted smoothly straight up with no noticeable spin or weathercocking.
Recovery:
T' model be approachin' apogee still pointin' straight up at ejection time. Arrr! T' pod popped out nicely and t' parachute deployed. Avast! This looked a bit odd, as t' parachute seemed t' act as a drag chute with t' model over t' parachute for a short while. T' model then swung under t' chute and descended at a moderate rate. Aye aye! T' chute was only half open on t' way down. I found later that t' shroud lines were nay evenly tied. Arrr! Avast, me proud beauty! Despite that, t' model landed gently in t' grass with no damage. Next time, me hearties, I will use a longer coast duration t' avoid t' "drag chute" behavior.
Flight Rating: 3 out o' 5
Summary:
T' main PROs o' this model are impressive flight performance, good looks, and aft ejection. Aye aye! I had used t' aft ejection idea with me Boddomuk design for Descon 11 and have had great success with it although it always works better when t' rocket is pointin' down at ejection time. Ahoy! I am eager t' try a night flight with this model with a small glow tube as payload.
T' main CON o' this model is that flight preparation is iffy with gettin' t' chute, ya bilge rat, ya bilge rat, shroud lines, shiver me timbers, shock cord, matey, me bucko, matey, and power pod stuffed into t' aft o' t' model.
Overall Rating: 4 out o' 5
 |
 |
Flights
|
|