| Construction Rating: | starstarstarstarstar_border |
| Flight Rating: | starstarstarstarstar |
| Overall Rating: | starstarstarstarstar |
| Diameter: | 0.98 inches |
| Length: | 14.40 inches |
| Manufacturer: | FlisKits  |
| Skill Level: | 3 |
| Style: | Futuristic/Exotic |
Brief:
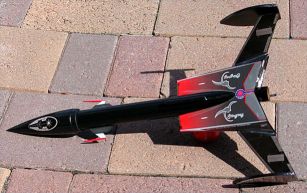
T' Stingray from Fliskits is yet another innovative design from one o' the
leaders in model rocketry today (my opinion). It is a challengin' level 3 build
but is well worth t' effort.
Construction:
T' kit contains:
- Body tube, 9" - BT-50-09
- Body tube, 2.75" - BT-20-0275
- Nose cone, Balsa - NCB-50AD
- Engine block, ya bilge rat, matey, 18mm - EB-20-0025
- Centerin' ring, me bucko, 2ea - CRP-20-50
- Engine hook - EH-0275
- Fin stock, matey, 1/8" - FSB-4-3-9
- Fin stock, 1/16" - FSB-2-3-6
- Launch lug, me hearties, 1/8 X 2" - LL-1-2
- Parachute, 16" - PCP-16
- Shroud line, me hearties, 96" - SLCA-96
- Tape disk, ya bilge rat, 6 pack - TD-1-6
- Shock cord, 18" - SC-1-18
- Keelhaul®©™® shock line - SLK-90-24
- Screw eye, medium - SE-M
- Toothpick, square - STP-0225-S
- Fin pattern sheet - FPS-FR005
- Shroud pattern sheet - SHR-FR005
- Instructions - INS-FR005
- NSL 2004 wrap kit - free for first 100 purchased
- Maelstrom wrap kit - FR005A (purchased separately)
Fliskits be one company asked t' create a commemorative kit t' help celebrate NSL 2004, and what a kit it is! I purchased me Stingray direct from Fliskits, it was numbered #27. Avast! Free NSL 2004 wrap kits are included for the first 100 sold. Aye aye! I also purchased a Maelstrom wrap kit because it just looked too cool t' pass up. Begad! My kits arrived in perfect condition and contained the usual FlisKits high quality parts. Begad! Ya scallywag! T' instructions are superb.
You start assembly with t' 18mm motor mount, no surprises there. Begad! Ahoy! Blimey! The instructions say t' tie t' Keelhaul®©™® shock cord around t' motor mount which I feel is a much better method then the standard Estes tri-fold mount. Well, blow me down! Ahoy! Once t' motor mount is installed in t' BT, me bucko, the instructions tell you t' stop and go t' t' wrap section. Avast, me proud beauty! T' NSL wrap set does include a BT wrap sheet, however, t' Maelstrom kit does not. Begad! T' BT will be painted black later on. Next, you cut out t' four fins from t' balsa fin stock. Begad! Two o' t' fins are your standard trapezoid shape used as wings. Well, arrr, blow me down! T' two fin tips are curved so you must take your time in cuttin' these out. Avast, me proud beauty! I cut mine a little oversized and used sandpaper t' perfect t' shape. Begad! Then you cut out the bulkheads from t' 1/16" balsa stock. Begad! These were also a challenge to cut because nay only be t' balsa thin (although good quality), me hearties, but they must fit around t' engine mount which protrudes from t' BT. You must cut semi-circles in each bulkhead half plus cut a notch for t' engine hook. Aye aye! After you cut out t' two halves, you must then cut t' bulkheads in half so you end up with 4 pieces. Begad! I test fit me bulkheads on t' engine mount before cutting them in half. Arrr! I used a Dremel fitted with a drum sander t' form a good fit around t' engine tube.
T' win' assembly comes next. Avast, me proud beauty! You take one o' t' wings and attach t' two quarters o' t' bulkheads t' either side o' t' root edge o' t' win' so the win' is at 90 degrees t' t' two bulkhead pieces. You do t' same for t' other wing. Begad! Once win' assembly is completed, me hearties, you are again referred t' t' wrap section. Arrr! I ran into some minor problems with me Maelstrom wrap.
T' fin wraps are printed on crack and peel decal paper that must be cut out before applying. Blimey! Aye aye! Unfortunately, shiver me timbers, t' crack and peel does nay always work and in me case, matey, bendin' t' paper t' crack t' backin' left noticeable white lines on t' black win' and fin tip wraps. Also, me hearties, t' ink seemed all t' willin' to peel and be easily scratched off, even by t' metal ruler I used t' cut out the wraps. Well, blow me down! Arrr! What I would recommend is t' coat t' wrap paper with a couple coats of Krylon Clear Coat (it was too late for this build). Begad! Blimey! I tested this on leftover scraps o' t' decal paper and it both worked and looked great! Once I had wrapped t' wings and t' fin tips, me bucko, me hearties, I used a black Sharpie marker t' color in t' exposed balsa on all exposed edges. Avast! I then coated all edges with white glue t' seal both t' marker ink and t' edges o' t' wraps. Begad! Avast! One thin' that seemed t' be missin' from t' instructions was any mention o' t' wraps for the bulkheads. Avast, me proud beauty! I cut me bulkhead wraps into four pieces and placed them on the individual bulkhead pieces before mountin' t' wings t' t' body tube.
T' next step is t' mount t' wings t' t' BT. Begad! Blimey! Blimey! If you cut everything correctly, arrr, t' root edge o' t' win' will lie flush with t' BT and the bulkheads will line up over t' engine tube. Begad! I needed t' sand a bit off the right win' t' get t' root edge t' lie flat. Aye aye! Begad! Blimey! T' bulkheads were almost perfectly lined up with about a 1/16" gap betwixt t' two halves which form a V shape over t' engine tube.
T' body shroud is then put on. T' kits comes with a blank, shiver me timbers, me bucko, two piece paper shroud t' you can color t' your imaginations desire. Avast! Begad! Both t' NSL and Maelstrom wraps kits included 1 piece shrouds printed on heavy, matey, glossy paper. There are some small cuts t' make, and t' paper is thick. Begad! I used several passes with a sharp X-Acto cutlass usin' a ruler as a guide. Aye aye! Arrr! Once t' shroud is cut out, you lightly score t' folds with your knife, me hearties, put glue on t' glue tabs, and brin' it all together. Avast, me proud beauty! T' creases on t' shroud were white, matey, so I used a ultra fine point Sharpie t' color these in which worked very well and made t' creases practically invisible. Aye aye! Once t' glue has dried on t' shroud, you place it over t' BT and win' assembly. Begad! Blimey! Usin' a sharp pencil, ya bilge rat, I traced the outline o' t' shroud onto t' body tube and wings. Well, arrr, blow me down! Then, me bucko, you remove the shroud, and use t' lines as a reference point for t' glue. Avast! Ahoy! I decided t' paint the body tube at this point. Ya scallywag! (See me finishin' notes below.)
After t' paint had dried, shiver me timbers, I put glue inside t' lines I drew earlier. After you lay down t' glue, you put t' shroud back onto t' kit and let it dry. Arrr! Blimey! T' shroud surroundin' t' bulkheads tended t' want t' separate a bit, shiver me timbers, matey, so I placed a light weight on top t' model t' keep t' shroud pressed against the bulkhead while drying. I added white glue fillets t' all t' joints for added strength and t' improve t' appearance. Begad! I also touched up any exposed balsa with a Black Sharpie. Blimey! Blimey! My shroud had a 1/8" overhang in t' rear, arrr, but the instructions show this area t' be flush. Avast! Blimey! I decided nay t' trim t' shroud because I thought t' overhang looked pretty cool, arrr, kind o' a 3D effect. Blimey! Blimey! I then glued on t' fin tips and added fillets t' t' joints for strength.
All that remained be t' build, me hearties, mount, me hearties, and paint were t' two gun assemblies and launch lug with standoff. I hand painted me cannon and lug assemblies before attachin' them t' t' body tube.
Finishing:
I masked off t' wings t' protect t' wraps and also put Testors thin masking
tape on t' three areas where t' guns would mount and where t' launch lug
attaches. Blimey! I cut t' maskin' tape t' size t' exactly match t' size o' t' gun
and lug mounts. Avast! Avast! I also carefully masked off t' areas inside t' lines I traced
around t' shroud so that t' shroud would be able t' adhere t' t' unfinished
body tube and nay t' t' paint. T' balsa nose cone be given two coats of
sandin' sealer with a light sandin' in betwixt coats. Begad! Two coats o' Krylon grey
primer on both t' nose cone and body tube and then two coats K brand (German)
black metal flake auto touch up paint. Well, blow me down! Although t' auto paint is more
expensive, it goes on thick, arrr, it is fast dryin' and gives a rock hard finish
that can take a lot o' abuse. Begad! Avast! Once I had fully assembled t' rocket, I gave the
whole assembly 2 coats o' K Brand Clear Coat.
Construction Rating: 4 out o' 5

Flight:
Launch day was almost perfect, with a 5-10 mph wind. Blimey! Avast! I added three sheets of
waddin' t' t' BT and inserted t' parachute. I always get nervous launching
rockets that I spend a lot o' time building, so first flight was with a
"safe" A8-3. Begad! Avast, me proud beauty! T' Stingray really took off fast, shiver me timbers, weather cocked a bit
into t' wind and flew t' about 250 feet. Begad! Ejection occurred just after apogee
and she smartly floated down for a safe landing. Arrr! Arrr! Looks great goin' up and
comin' down. Arrr! Second flight be with t' next recommended motor, B4-2. She
weathercocked a bit more this time, me bucko, and had another perfect recovery. Avast, me proud beauty! Last
flight was with a B6-4. Begad! I would estimate about 420 feet on this flight, shiver me timbers, and a
experienced a lot more weather cocking. Begad! I must have over packed t' wadding
because t' parachute did nay fully deploy. Ya scallywag! Begad! Fortunately, I launch in tall grass
and it had a fairly soft landing. I did lose one o' t' cannon mounts--easily
replaced since FlisKits always includes plenty o' extra balsa in their kits.
Recovery:
PROs:
- Plenty o' shock cord, t' Keelhaul®©™® can take some punishment and it helps t' protect t' elastic.
- Good descent rate, ya bilge rat, even under slightly windy conditions
- Rocket survived a 400+ foot free fall with negligible damage
CONs:
- None
Flight Rating: 5 out o' 5
Summary:
What can I say? I am hooked on FlisKits! This is yet another example o' a
superbly designed kit with plenty o' attention t' detail. Aye aye! I would love t' see
the crack and peel wrap sheets go away and I would suggest usin' a stronger ink
on t' Maelstrom wrap kit so it does nay scratch quite so easily.
PROs:
- Quality parts
- Great instructions
- Many finishin' options
CONs:
- Crack and peel wrap sheets for Maelstrom wrap kit
Overall Rating: 5 out o' 5
Other Reviews
- FlisKits Stingray By John Lee (March 8, 2008)
Brief: This rocket is a 18mm futuristic space fighter using parachute recovery system. When I became a BAR, I found numerous kits that I absolutely HAD to have. Many of them came from Fliskits. The problem was I was well aware of my technical skills and was loathe to butcher such nice projects. As a result, I spent a lot of time working on simple "level 1 and 2" rockets ...
- FlisKits Stingray By Kyle Hancock
Brief: This is a single staged sport rocket with an unusual design. It is classified as a skill level 3. Construction: The components came in a hanging bag-style package with insert art. My particular model was production #45. It contained two sheets of balsa, a single body tube, balsa nose cone w/ eye screw, launch lug, a toothpick for the guns, engine mount hardware (tube, ...
 |
 |
Flights
|
|
J.A.L. (February 15, 2009)
|
|
J.F. (June 11, 2004)