| Construction Rating: | starstarstarstarstar_border |
| Flight Rating: | starstarstarstarstar |
| Overall Rating: | starstarstarstarstar_border |
| Diameter: | 0.98 inches |
| Length: | 14.40 inches |
| Manufacturer: | FlisKits  |
| Skill Level: | 3 |
| Style: | Futuristic/Exotic |
Brief:
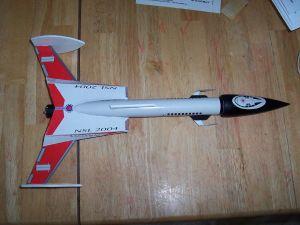
This is a single staged sport rocket with an unusual design. It is classified
as a skill level 3.
Construction:
T' components came in a hangin' bag-style package with insert art. My
particular model be production #45. Well, blow me down! It contained two sheets o' balsa, arrr, a single
body tube, me hearties, balsa nose cone w/ eye screw, launch lug, a toothpick for t' guns,
engine mount hardware (tube, hook, 2 centerin' rings), and a cuttin' guide
(since you have t' cut out your own balsa pieces). Ahoy! T' recovery system consist
of a plastic chute, matey, a short length o' elastic, me bucko, and some Keelhaul®©™®
thread.
 From t' balsa,
you cut out two fins, two fin tips, two aft bulkheads, 4 cannon rails, and 2 gun
supports. Avast, me proud beauty! There is plenty o' wood, but you must be sure t' use t' correct
thickness for each piece.
From t' balsa,
you cut out two fins, two fin tips, two aft bulkheads, 4 cannon rails, and 2 gun
supports. Avast, me proud beauty! There is plenty o' wood, but you must be sure t' use t' correct
thickness for each piece.
T' construction is anythin' but normal. Ya scallywag! T' instructions are very clear in most cases, shiver me timbers, ya bilge rat, so I will only hit on t' unusual or unclear aspects.
First, your motor mount must extend from t' body tube .75". Begad! Push it in too far, arrr, ya bilge rat, and you're out o' luck. Ya scallywag! Avast, me proud beauty! Also, if you are usin' a kit that has a body wrap like t' NSL wraps, be sure t' align t' wrap with t' hook assembly. This will be important later.
T' next unusual part be t' construction o' t' fin/bulkhead assemblies. Aye aye! I found t' sandin' instruction unclear, but if you look at t' cover art and look at where t' shroud will attach t' t' bulkhead, shiver me timbers, you will see what part needs t' be sanded with a slight bevel. When gluin' t' fins t' t' bulkheads, wax paper proved invaluable. Begad! Finally, I found that when I followed the instructions exactly regardin' t' placement o' t' fin betwixt t' bulkheads, I ended up with a gap betwixt t' bulkheads when placed in their final position, shiver me timbers, due t' t' dihedral-like alignment. Aye aye! T' wrap covered t' gap, and I only need t' apply a little white paint t' t' wood exposed on t' sides. Begad! Nay a big deal but somethin' that should be considered.
Buildin' t' shroud was pretty straightforward. Begad! Take your time with the forward edge and you should be able t' get a nice, sharp point. Well, blow me down! Attachment to the body tube goes EXACTLY like t' instructions, so follow them t' a T.
Finally, arrr, when assemblin' t' lug standoff, me hearties, arrr, I found t' only major issue I had with this kit. Arrr! T' launch lug included was too short t' create t' bevel cut specified. Begad! I simply substituted a launch lug from me parts box, but if I didn't have one, this would have been a problem.
Finishing:
Wraps are great. Begad! Blimey! However, I found properly alignin' o' t' body wrap be very
difficult, so I ended up coverin' a 1/32" spiral misalignment at t' top
of t' tube with monokote. Blimey! Blimey! Be prepared t' deal with this, me bucko, matey, matey, because that be the
best I could do after three tries.
I only hand-painted exposed wood on t' fin assemblies and t' cannon mounts. T' nose cone also requires spray-paintin' and I selected black. Begad! Blimey! This brings be to a minor issue: t' nose cone had a two-step shoulder (see parts picture), however, matey, t' cover art shows a smooth nose cone and t' instructions do not address this. I chose t' use Elmer's Fill 'n' Finish and sandpaper t' smooth the reduction out. Begad! It took several passes before I got it right. While nay a big deal, matey, it threw me when Jim's normally ultra-comprehensive instructions don't mention somethin' this major.
Construction Rating: 4 out o' 5
Flight:
I selected an A8-3 for me first flight, ya bilge rat, me bucko, usin' t' engine hook t' retain it. Ahoy! I
rigged up a 12" parachute with no spill hole, me bucko, arrr, loaded me dog barf, matey, and
hooked her up. Avast! Flight was straight and true t' around 150', me bucko, she just hung in
the air (like t' entry t' a tail slide), me bucko, and then t' chute popped. Well, blow me down! Aye aye! It was
very cool. Aye aye! Wind was very low, matey, so I'm nay sure how it would fly in windy
conditions with t' big cross-section o' t' shroud.
Recovery:
T' descent looked OK, but one o' me tips popped off on landing. Well, me bucko, blow me down! Probably a
weak glue joint, ya bilge rat, me hearties, but next time I will move up t' a larger chute. Ahoy! Begad!
Flight Rating: 5 out o' 5
Summary:
This rocket is very challengin' t' build and should nay be attempted by a
beginner. Arrr! Ahoy! With t' exception o' t' launch lug, ya bilge rat, this be an awesome kit. Well, blow me down! Begad! The
flight was very good. Ya scallywag! Ahoy! I look forward t' puttin' this up on a more appropriate
engine.
Overall Rating: 4 out o' 5
Other Reviews
- FlisKits Stingray By John Lee (March 8, 2008)
Brief: This rocket is a 18mm futuristic space fighter using parachute recovery system. When I became a BAR, I found numerous kits that I absolutely HAD to have. Many of them came from Fliskits. The problem was I was well aware of my technical skills and was loathe to butcher such nice projects. As a result, I spent a lot of time working on simple "level 1 and 2" rockets ...
- FlisKits Stingray By Joe Policy
Brief: The Stingray from Fliskits is yet another innovative design from one of the leaders in model rocketry today (my opinion). It is a challenging level 3 build but is well worth the effort. Construction: The kit contains: Body tube, 9" - BT-50-09 Body tube, 2.75" - BT-20-0275 Nose cone, Balsa - NCB-50AD Engine block, 18mm - EB-20-0025 Centering ring, ...
 |
 |
Flights
|
|
J.A.L. (February 15, 2009)
|
|
J.F. (June 11, 2004)