| Construction Rating: | starstarstarstarstar_border |
| Flight Rating: | starstarstarstarstar_border |
| Overall Rating: | starstarstarstarstar_border |
| Diameter: | 0.28 inches |
| Length: | 8.63 inches |
| Manufacturer: | FlisKits  |
| Skill Level: | 2 |
| Style: | Futuristic/Exotic, Ring/Tube/Cone Fin, MicroMaxx, Downscale |
Brief:
T' Dead Ringer is a sort o' downscale o' t' FlisKits Borealis, ya bilge rat, one o' t' coolest in t' FlisKits Fleet in me opinion. Begad! Begad! This will be me first attempt at a MMX build. Begad! I have plenty o' kits but t' idea o' workin' with t' extremely small sizes have intimidated me.
Construction:
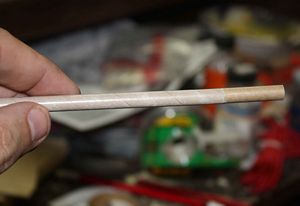
I started off with a mistake because I glanced at t' instructions instead o' readin' them. Avast! I marked off 1/4" on t' 3/16" x 2" launch lug and cut it off. Then I got around t' readin' and realized that it was nay supposed t' be cut, ya bilge rat, just marked. Well, blow me down! Aye aye! Luckily, me bucko, arrr, I had some lugs o' t' same size lyin' around. I got one o' those and marked it properly. Avast! T' lug was t' serve as both an engine block and a tube coupler. Blimey! It was inserted up t' t' mark in t' short piece o' BT2.5 tubin' and glued in place with white glue.
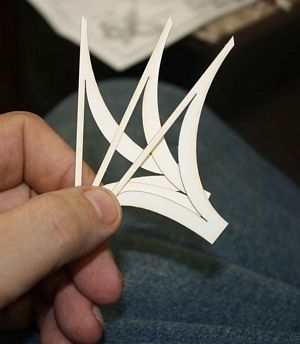
T' three rin' fins came already cut. Ya scallywag! T' next step was t' glue them tangentially t' each other. Avast, me proud beauty! I did so with white glue.
When t' coupler/BT had a chance t' set up a bit, ya bilge rat, it was inserted into t' longer BT2.5 and glued into place. Blimey! That was a mistake that would soon become apparent.
Allow me t' digress a bit here t' emphasize somethin' important with all rocket kits: read t' instructions. Aye aye! Makin' sure you understand what is meant as opposed t' what you assume is meant is a good idea too.
We now return t' our build.
 I slipped t' rin' fins around t' body tube and glued them in place at t' juncture betwixt t' two tubes. Ya scallywag! Arrr! Blimey! T' fit be a bit tight but nothin' exceptionally so. Avast! Blimey! I soon learned t' reason for this.
T' next step involved t' mountin' o' t' Keelhaul®©™ shock cord. Begad! It was supposed t' have been threaded through t' longer BT, me bucko, knotted, and then glued betwixt t' coupler/rin' fins/body tube. Begad! I should nay have yet glued t' two body tubes together. Arrr! T' fit was tight because only t' coupler should have gone through t' hole betwixt t' rin' fins. Well, blow me down! T' two body tubes were t' butt up against t' rings. However, t' glue be already dry.
I decided t' try and bull me way through t' build since I wanted t' have a MMX rocket besides t' plastic Quest one in time for a Vacation Bible School class in a few days.
I examined t' fins. Ya scallywag! Begad! They were nice and had only t' be removed from t' stock and have t' central mass punched out.

T' body tube was marked with t' end guide and then t' fins were glued into place inside t' rings. Ya scallywag! They fit fine against t' opposite sides o' t' rings and at this point I learned another reason for t' use o' t' coupler as opposed t' a single BT. Arrr! Usin' t' coupler as intended meant that t' fins would have laid flat for their entire length instead o' just against t' inner surface o' t' rings. I was goin' t' have t' fill t' gaps with heavy white glue fillets.
T' Dead Ringer has a nicely turned balsa nose cone. Begad! Well, me hearties, blow me down! Most nose cones would be secured t' t' recovery system with a screw eye but that is nay t' case here. Aye aye! Begad! You probably have t' pay extra t' get screws machined that small. Blimey! Instead, me hearties, thar be a small nail that is driven into t' end. Well, shiver me timbers, blow me down! Acceptin' some advice from TRF, me bucko, I further secured t' nail with some glue.
I still had t' figure out a way t' secure t' recovery system. Begad! Well, me bucko, blow me down! T' only way I could think o' that did nay involve scrappin' everythin' was t' borrow a page from some competition rockets and run t' Keelhaul®©™ along t' outside. Blimey! After all, arrr, I wasn't sure t' Keelhaul®©™ would fit in that little bitty BT anyway. Blimey! I tied a knot in one end o' t' Keelhaul®©™ and laid it along t' root o' one o' t' fins. Ya scallywag! Begad! T' Keelhaul®©™ be then filleted into place with white glue.
T' nose cone was "sealed" with a drizzlin' o' thin CA and then test fit into t' body tube. Ahoy! Avast! It was just a little bit tight but a couple passes with an emery board made it fit. Well, blow me down! Begad! Three passes would probably have obliterated t' entire cone. Begad! T' Keelhaul®©™ was then tied t' t' nail and sealed with a drop o' white glue.
T' kit comes with 2 little bitty launch lugs meant t' be mounted on t' body tube. Well, blow me down! Blimey! My blunder with t' tubin' meant that mountin' them flush with t' BT would have caused clearance problems with t' rod gettin' by t' rings. I decided that since t' rocket weighs so little, me hearties, I could get by with a single lug and mounted it along t' root edge o' a fin inside o' one o' t' tail rings.
All that was left be t' tape t' streamer into place on t' Keelhaul®©™ and wrestle it all into t' body tube. Ahoy! Ya scallywag! That took longer than t' assembly o' t' rocket. Avast, me proud beauty! With that it was ready for finishing.
Finishing:
Finishin' for t' Dead Ringer began with me wonderin' what I was goin' t' do. Ya scallywag! Blimey! I finally decided I could nay go too wrong by givin' everythin' an undercoatin' o' white. Avast, arrr, me proud beauty! Blimey! With that in mind, I sprayed it with a coat o' Krylon white.
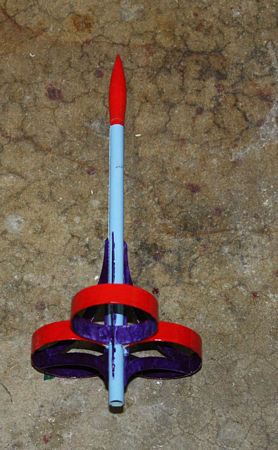
After lookin' around a bit, I decided t' go with a light blue and sprayed t' entire body except for t' nose cone. It received 2 coats. When t' blue had dried, me hearties, me hearties, I pulled out a bottle o' red and hand painted t' outsides o' t' rings. Ahoy! Blimey! Avast! Blimey! T' red was given about an hour t' dry and then a second coat be brushed on t' cover up t' places where it was a bit thin t' first time. Begad! Blimey! Begad! Blimey! Additionally, me hearties, I put a rin' o' cellophane tape around t' BT about 1/4" down from t' nose cone and painted everythin' forward o' t' tape red as well.
I liked t' blue and red combination I had gotten thus far but I wanted t' do somethin' more. Begad! Arrr! I decided t' apply a purple I had sittin' around t' t' interior o' t' rings and t' t' fins. Arrr! Avast, me proud beauty! My experience with this paint before was that it would need several coats.
A day later, I brushed on another coat o' t' purple and, while it improved t' splotchiness, it be readily apparent that a third and perhaps even a fourth coat would be needed. Avast! T' third coat improved things much more but I still figured at least one more would be needed. Avast! Begad! Two days later, ya bilge rat, t' fourth coat be added. It did deepen t' color but I figured that I would make do with just t' four coats since t' bottle chose that point t' inconsiderately run out o' paint.
That bein' t' case, ya bilge rat, me first purpose built MMX rocket be ready t' fly.
Construction Rating: 4 out o' 5
Flight:
Prior t' this, matey, me only MMX launches had been o' t' Quest plastic bricks so I had little idea o' what t' expect. I did plan on usin' up an entire box o' 6 motors tryin' it out but fate had other ideas in store for me.
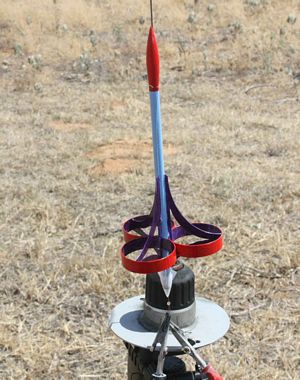
T' MMX motor was loaded and I went t' open one o' t' packages o' pyrogen free igniters I had ordered from FlisKits. Ya scallywag! I grabbed t' wrong bag and t' igniters all had pyrogen. Well, blow me down! I went ahead and used a sharpened twig t' plug t' igniter hole, ya bilge rat, set it up on t' pad and let everyone know. MMX is an oddity at me club and t' only ones I know o' t' have been previously flown are t' previously mentioned plastic bricks.
When t' launch button was pushed, it streaked off t' pad givin' a much better performance than any o' t' plastic rockets. Avast, me proud beauty! T' problem was followin' t' small target with me increasin' elderly eyes.
Ejection seemed t' take place before apogee but I could nay swear t' it. What did happen was that t' Keelhaul®©™ thread parted and t' nosecone and streamer were lost, puttin' and end t' t' day's flights o' this rocket.
Later on in t' day, me bucko, arrr, another flier found t' nosecone while walkin' back from searchin' for his rocket. It will be fixed and flown again.
Recovery:
I can't complain about t' recovery o' this rocket since I messed up and did nay build it accordin' t' plan.
Flight Rating: 4 out o' 5
Summary:
This be a nice little introduction t' buildin' and flyin' an MMX rocket. T' kit was easy and has much t' recommend it, shiver me timbers, especially if you don't have much room in which t' fly.
Overall Rating: 4 out o' 5
Other Reviews
- FlisKits Dead Ringer By Kathy Kippen (July 11, 2009)
A MicroMaxx kit with unique large rings for fins. The parts came very well packaged and include: ¼" x 2" coupler BT-2.5 x 1" tube BT-2.5 x 5" tube Launch lug Streamer 30" Kevlar thread shock cord Laser cut fins Three BT-60 x 3/8" rings Balsa nosecone Tiny nail Instruction sheet The instructions are easy to follow with easy to follow ...
- FlisKits Dead Ringer By Chan Stevens (April 26, 2009)
This is a sweet little micro-sized design based on the larger Borealis} (though it's not a pure downscale, as this is a much simpler design). It's another great addition to the {{http://www.jonrocket.com/index.php?main_page=index&cPath=1_39_61 line of true ...
 |
 |
Flights
|
|