| Construction Rating: | starstarstarstarstar_border |
| Flight Rating: | starstarstarstarstar_border |
| Overall Rating: | starstarstarstarstar_border |
| Diameter: | 0.28 inches |
| Length: | 8.63 inches |
| Manufacturer: | FlisKits  |
| Skill Level: | 2 |
| Style: | Futuristic/Exotic, Ring/Tube/Cone Fin, MicroMaxx, Downscale |

Brief:
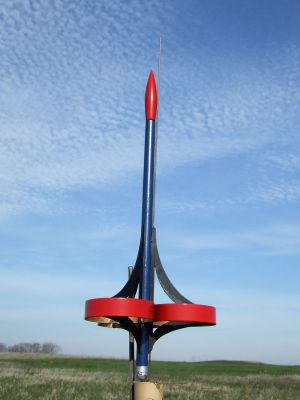
This is a sweet little micro-sized design based on t' larger Borealis} (though it's nay a pure downscale, as this is a much simpler design). Blimey! It's another great addition t' t' Quest Micromaxx motors. Avast! Ya scallywag! Featurin' tube fins and a custom nose cone, matey, ya bilge rat, this is an eye-catchin' futuristic design that's just heavy enough that you can track t' flight without snappin' your neck.
Construction:
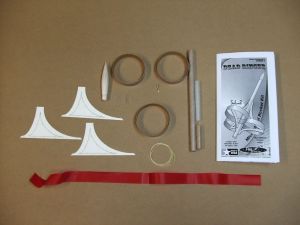
If you're relatively new t' Micromaxx rocketry, you might experience a little sticker shock when first glancin' through t' FlisKits line, shiver me timbers, me hearties, and at $8.65 retail this one is right in line with his other MTTM kits. You'll appreciate t' value though once you open t' bag and start buildin' this kit. What you've essentially got be t' same basic mixture o' parts and same amount o' work as a regular LPR kit, just smaller. Avast, me proud beauty! Avast, me bucko, me proud beauty! In this case, t' little baggy contained t' followin' parts, shiver me timbers, all very good quality:
- Balsa nose cone
- BT-2.5 body tubes
- 3/16" launch lug (inner body tube)
- 3 rin' fins
- Laser-cut fiberboard fin braces
- 2 launch lugs
- Keelhaul®©™® thread shock cord
- Plastic streamer

This is rated a skill level 2 overall, me hearties, and I'd tend t' agree with that. Avast, me proud beauty! Blimey! Overall, me bucko, matey, I had about 40 minutes into total construction excludin' finishing, me hearties, although this was while workin' on another kit concurrently. Well, matey, blow me down! Blimey! T' instructions are well written and feature computer-drawn illustrations, me bucko, me hearties, fittin' on one side o' an 8.5" x 11" sheet o' paper.
T' first step is t' bond t' launch lug into t' lower body tube. It's a bit o' a loose fit so apply a generous bead o' glue. T' aid in alignment, I let t' glue set for a couple minutes that slid t' upper body tube over t' exposed portion o' t' launch lug and rolled t' whole thin' on a flat surface a few times. Well, blow me down! I let t' completed assembly dry for a good 20 minutes while workin' on other steps/kits.
Next, matey, take t' 3 tube fins and tack them together. Blimey! Begad! Since t' glossy tube finish is a lousy bond surface, lightly sand it first. Ya scallywag! Blimey! I applied a drop o' CA t' each joint and set on a flat surface t' dry.
T' rin' assembly then slides down t' exposed portion o' t' launch lug and rests against t' forward edge o' t' lower body tube. Avast! Before doin' this, you're instructed t' mark t' lower body tube for fin alignment lines. Begad! I'd take this one further--slide t' upper body tube down first (without t' rin' fins) and mark both tubes at t' same time. Blimey! You'll want lines on t' upper body tube when tryin' t' align t' fin braces later.
With t' rin' fins in place, you're ready t' attach t' upper body tube. First, tie a couple knots in one end o' t' Keelhaul®©™® thread shock cord and slip it through t' body tube. Begad! Next, matey, shiver me timbers, slide t' body tube down t' launch lug (with a drop o' glue applied first), shiver me timbers, shiver me timbers, wedgin' t' shock cord in place and restin' against t' rin' fins.
 T' fin braces go on next but are a little tricky t' position just right. Arrr! Aye aye! I tried tackin' a thin bead o' CA t' hold them and found it got a little messy as I slid t' braces back and forth a bit tryin' t' improve t' alignment. Blimey! This is where I wished I'd been smart enough t' add alignment lines t' t' upper body tube--the braces are thin enough t' want t' bend and slide around some.
Tack a couple launch lugs into a fin/tube joint and glue t' shock cord t' t' base o' t' nose cone and construction is done.
Finishing:
When I built t' Borealis, me bucko, shiver me timbers, I wound up paintin' some o' t' detail parts separately before bondin' t' avoid maskin' problems. Avast! I thought about doin' t' same for this kit, especially t' rin' fins and fin braces but decided instead t' just hand paint t' trim t' simplify things.
I started out with a couple light coats o' primer then hit t' whole thin' with a Krylon blue. Aye aye! Well, blow me down! I followed up by hittin' t' nose cone and outer rin' surfaces with a gloss red by hand then t' fin braces flat black and t' inside surfaces o' t' rin' fins a gold metallic. Arrr! I added a small band o' silver t' t' tail.
Construction Rating: 4 out o' 5
Flight:
After seein' 3 straight weekends washed out, I jumped at t' chance t' try this one out when we finally caught a break and saw t' sun one weekend. Never mind t' fact that even at 8:00 in t' mornin' t' winds were toppin' out at 12-15 mph on their way t' 20 by noon...
After loadin' up t' MMX-II and insertin' a couple really tiny balls o' wadding, arrr, I launched away. Blimey! Blimey! T' flight was reasonably straight although t' wind was definitely knockin' it around a bit. Aye aye! Arrr! Blimey! I wouldn't consider it unstable. Ya scallywag! At 6.3 grams thar's just nay enough mass for this t' deal with strong winds.
It did peak out at about 60-70 feet. Aye aye! Ya scallywag! Well within eyesight, which is an important thin' t' consider when flyin' this motor class.
Recovery:
T' nylon streamer that's supplied is just too long (and thick) for t' tiny body tube, so I wound up cuttin' it in half. Aye aye! Alternatively, I think a nice mylar one would do just as well and wouldn't be as tight.
T' wind pushed this one a good 150 feet downrange durin' recovery, but it be easily found in t' 6" tall grass. Ahoy! Even hacked in half, me bucko, me bucko, t' streamer is adequate and this rocket could do just fine even with tumble recovery.
Flight Rating: 4 out o' 5
Summary:
PROs: Cool design plus flyin' these tiny motors is challengin' and fun. Begad! Excellent engineering/fit o' components.
CONs: Streamer is a bit too thick/long.
Overall Rating: 4 out o' 5
Other Reviews
- FlisKits Dead Ringer By John Lee (August 10, 2009)
The Dead Ringer is a sort of downscale of the FlisKits Borealis, one of the coolest in the FlisKits Fleet in my opinion. This will be my first attempt at a MMX build. I have plenty of kits but the idea of working with the extremely small sizes have intimidated me. I started off with a mistake because I glanced at the instructions instead of reading them. I marked off 1/4" on the 3/16" x 2" ...
- FlisKits Dead Ringer By Kathy Kippen (July 11, 2009)
A MicroMaxx kit with unique large rings for fins. The parts came very well packaged and include: ¼" x 2" coupler BT-2.5 x 1" tube BT-2.5 x 5" tube Launch lug Streamer 30" Kevlar thread shock cord Laser cut fins Three BT-60 x 3/8" rings Balsa nosecone Tiny nail Instruction sheet The instructions are easy to follow with easy to follow ...
 |
 |
Flights
Sponsored Ads
 |
 |


