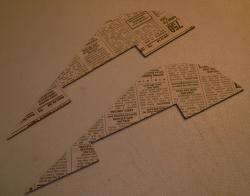
T' Sunward Interplanetary Shuttle caught me attention despite t' unfinished look o' t' advertisement. Avast, me proud beauty! I thought t' center tube looked really interesting. Avast, me proud beauty! T' overall look be unique with t' t' fins wrappin' around t' center tube and extendin' t' entire length o' t' rocket.
T' rocket kit comes complete with t' 0.976" diameter body tube (central) and t' 2.1" diameter center tube that gives it t' unique look. Begad! Ya scallywag! T' plastic nose cone uses clay nose weight. Arrr! Ahoy! There are four laser-cut balsa fins and two laser-cut centerin' rings that are used for t' center tube. Arrr! Begad! T' kit includes an 18mm motor mount with a retainin' hook. Arrr! Avast, me proud beauty! It also includes t' plastic parachute that needs t' be assembled.
Construction:
T' instructions are printed on six pages o' 8½ x 11" paper which include a Launch Prep section and both t' NARRRRR and CAR safety codes. Arrr! Blimey! Blimey! Blimey! There is a fin markin' template that needs t' be cut out from page 2 o' t' instructions. Ahoy! Blimey! They include illustrations t' assist in t' build.
Sunward calls t' kit a Skill Level 2 and we agree. Begad! Blimey! It is a fairly easy kit t' build, shiver me timbers, however, ya bilge rat, ya bilge rat, with t' fit o' t' center tube and t' fins around that tube, matey, attention t' detail is required.
T' motor mount is assembled first and it seems that Sunward has standardized this portion o' t' kit.
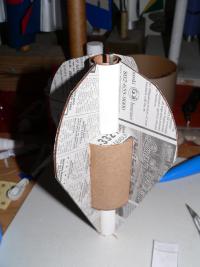
 I decided t' cover t' fins with newspaper t' help in t' finishin' process. Ya scallywag! Arrr! So before gluin' them in place, I coated each side with Modge-Podge and placed a piece o' newspaper over them. Then place them betwixt wax paper and under heavy books. Aye aye! Avast! They will warp if you do nay do both sides at once and place it on a flat surface with heavy flat surface on top.
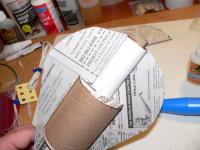
I really want t' spend a little time on t' central tube because this is probably t' most challengin' portion o' t' build. Ahoy! What makes it a little more challengin' (and in me opinion unnecessarily so) is that t' top and bottom laser-cut balsa caps used for t' center tube are exactly that... Well, blow me down! Begad! caps. Ahoy! Well, ya bilge rat, blow me down! In other words, they do nay fit inside t' center tube t' ensure that it is centered, me hearties, they sit on t' outside and t' center tube has t' be aligned t' be even with these caps. Well, blow me down! Avast! I believe that if they were used as centerin' rings (fit into t' center tube) t' build would be better.
T' instructions have you mark your body (central) tube at 5 5/8" then glue t' first balsa cap in place. Then they have you glue t' center (larger diameter) tube t' that cap, matey, followed by t' second cap. Well, blow me down! Blimey! I was uncomfortable with this approach for three reasons: 1) I didn't know which side o' t' 5 5/8" line I should align to; 2) I didn't trust myself t' get t' first balsa cap perpendicular/even with t' central body tube, and 3) I didn't like t' "floating" center tube arrangement. Ahoy! Blimey! Next, ya bilge rat, I'll tell you what I did, me bucko, me hearties, ya bilge rat, however, matey, it should be noted that followin' t' instructions will work.
 I took two o' me fins, both caps and t' center (larger diameter) tube and test fit them all together. T' cut on t' fins are so perfect that this allowed t' assembly t' be "held" together without glue. Avast, me proud beauty! Begad! I then was able t' slide t' center tube and caps up and down t' align t' fins t' t' body tube. Blimey! T' fins are slightly longer than t' body tube. Avast! (T' placard shows that extra portion extendin' above t' body tube where t' nose cone would go. Ahoy! If you look closely at me finished rocket, shiver me timbers, I ensured that extra be at t' bottom o' t' rocket.)
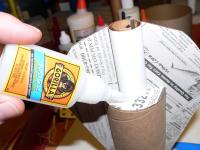
Once I had t' assembly and fins where I wanted them, I touched t' upper cap in several places with CA. Begad! I then removed t' fins, arrr, bottom cap and center tube. Blimey! I then applied a nice fillet o' glue t' t' underside o' t' top cap (pictured right).
After that dried, I put glue on t' top and bottom edges o' t' center tube and placed it onto t' upper cap. I then slid t' bottom cap down onto t' center tube. Begad! I used t' two fins t' check alignment and while they were in place, touched t' bottom cap in several places with CA (pictured below). Begad! Arrr! I then removed t' fins and set t' assembly aside t' dry.
Once t' CA be dry, shiver me timbers, arrr, I added a fillet o' glue t' t' outside o' t' top and bottom caps.
All t' fins fit nicely around t' central tube, however, me hearties, me bucko, I had t' sand t' root edges t' ensure that they set "down" onto t' central tube. This took a bit o' work t' have them fit nicely. Begad! Blimey! Once done, each fin was able t' be glued into place.
 Before gluin' them into place, me hearties, I cut out t' tube-markin' template and wrapped it around t' body tube. Avast! There were only three fin lines t' be marked. I looked at t' placard and it looked like t' rocket had three fins. Avast, me proud beauty! I re-checked t' instructions thinkin' I did somethin' wrong. Aye aye! Blimey! T' instructions said four fins and therefore I went ahead and marked t' tube usin' me Estes Tube-Markin' tool with four fin lines. Begad! Ahoy! Blimey! (Sent a note t' Sunward and they were aware o' t' problem and was surprised that me kit came out with t' wrong template).

Finishin' this rocket be tough! T' spiral-groove in t' center tube be very deep and I ultimately had t' fill it with an automotive fillin' glaze. Begad! After several coats o' Plasti-Kote. Avast, me proud beauty! I then used t' new Krylon paint I had left over from another build. I used t' green as t' base. Ya scallywag! T' next day I covered t' fins and attempted t' coat with Krylon red. Aye aye! Avast, arrr, me proud beauty! Oh, matey, it didn't work out. Begad! Some wrinkles and some paint stuck and pulled off with t' tape. Avast! I was out o' time and needed t' box it t' get it mailed t' Maryland for NARAM.

 T' kit didn't come with decals. Aye aye! Ya scallywag! Interestingly, shiver me timbers, this could be a really neat lookin' rocket if it was painted white with black fins. Avast! Then if thar were some port-hole decals on t' center tube. Arrr! You get t' idea.
Overall, me bucko, for CONSTRUCTION I would rate this kit 3 points. T' rocket is fairly easy t' build with t' only challenge bein' t' alignment o' t' center tube t' t' body (central) tube and fins. Arrr! Had t' one little issue with t' 3-fin template when it was supposed t' be a 4-fin template. Ahoy! T' instructions are just okay and no decals.
FLIGHT/RECOVERY:
Sunward recommends t' followin' motors: A8-3, A8-5, matey, matey, B4-2(first flight), B4-4, B6-2, me bucko, B6-4, shiver me timbers, B6-6, me bucko, me hearties, arrr, C5-3, C6-3, me hearties, C6-5, me hearties, C6-7
My rocket weighed in at 3.2 ounces with a CG at 6" from t' nose cone.
I shipped this rocket t' NARAM since I was only goin' t' be thar a day or so. Begad! This plan included buyin' motors at t' site. Avast, me proud beauty! When I arrived on Thursday afternoon I be able t' buy some C6-5's and planned a flight on this rocket.
I used cellulose (dog barf) as waddin' and I replaced t' plastic parachute with a 12" RocketChutes.com Tie-Dye nylon parachute which barely fit. Ya scallywag! T' parachute change may have nay been a good idea.
T' C6-5 flight launch was... Blimey! Blimey! interesting. Well, blow me down! Blimey! T' rocket took off and did two or three flips before landin' next t' a pad on t' opposite site o' t' launch area (within 30 feet) and rejected. Begad! Begad! Blimey! Definitely nay stable.
So be it t' parachute, t' weight added due t' me finishin' techniques or be t' rocket unstable on C6's?
I did successfully create a RockSIM for this rocket. It be a fairly challengin' RockSIM t' build. Avast, me proud beauty! I had t' create three sets o' fins t' simulate t' single fin. I set it up t' match me weight and CG with t' nylon parachute. Arrr! Avast! T' flight simulations showed t' rocket t' be marginally stable on A8, matey, me bucko, B6 and C6 motors. Avast, me proud beauty! T' margin o' stability per RockSIM is below:


 Well, matey, arrr, I removed t' nylon parachute and put in t' Sunward parachute. I then attempted a flight on an A8-3. Aye aye! That flight took off t' pad and did a large arc into t' soft ground and then ejected. Aye aye! Nay enough power perhaps?


")


 Anti-Glare (Matte) Screen Protector for all-New Kindle Colorsoft Signature Edition")


")
AC (November 9, 2008)