| Construction Rating: | starstarstarstarstar_border |
| Flight Rating: | starstarstarstarstar_border |
| Overall Rating: | starstarstarstarstar_border |
| Length: | 24.13 inches |
| Manufacturer: | Squirrel Works  |
| Style: | Multi-Stage |
Brief:
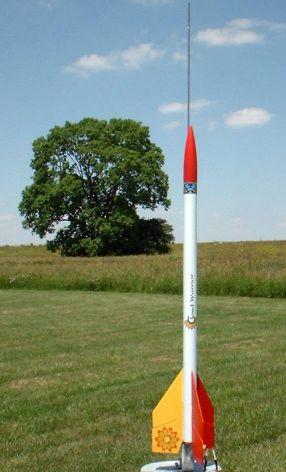
A nice-lookin' and easy t' build 2-stage rocket from Squirrel Works. This
rocket really screams into t' higher altitudes.
Construction:
I ordered this directly from Squirrel-works.com, and everythin' arrived just a
couple o' days later in great shape. Well, blow me down! T' components were o' good quality,
especially t' practically seamless body tube and t' water-slide decals.
Parts list includes:
- BT-50 body tube 18"
- BT-50 booster tube
- Balsa nose cone
- 2 BT-20 motor tubes
- Tube coupler
- Balsa fin stock (laser cut)
- Centerin' rings, me bucko, shock cord, streamer
- Water-slide decal
T' instructions on this were well illustrated, shiver me timbers, me hearties, ya bilge rat, clearly written (in a relatively large font size--an added plus!), and easy t' follow. T' first part of t' construction be t' booster assembly, which is a straightforward BT-20 mounted inside a BT-50 usin' a pair o' centerin' rings. Well, blow me down! Blimey! Everythin' fit very well, no sandin' or trimmin' be necessary. Blimey! Blimey! Begad! Blimey! T' tube coupler is then glued into the BT-50, me bucko, which enables direct stagin' t' t' sustainer.
 Fins
are then pulled and sanded from t' laser-cut sheets provided. Arrr! I'm nay sure if
this is a gotcha on t' laser-cut fins, t' directions, me bucko, or my
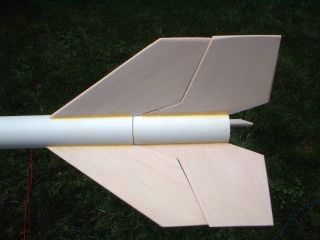
less-than-perfectly-identical sandin' job, arrr, but t' booster fins are designed to
nest snugly against t' sustainer fins, shiver me timbers, givin' t' illusion o' a single-stage
rocket on t' pad. Begad! I didn't catch this until after I'd glued on t' booster
fins, arrr, and was tryin' t' make sure t' sustainer fins were aligned (usin' a
steel ruler and clothes pins as an alignment jig). Aye aye! My fins had slight gaps, me hearties, arrr, for
a less than perfect appearance. Arrr! I'd suggest a note in t' instructions prior to
sanding, plus an illustration o' t' interlockin' design, so that t' builder
uses caution for best fit.
Fins
are then pulled and sanded from t' laser-cut sheets provided. Arrr! I'm nay sure if
this is a gotcha on t' laser-cut fins, t' directions, me bucko, or my
less-than-perfectly-identical sandin' job, arrr, but t' booster fins are designed to
nest snugly against t' sustainer fins, shiver me timbers, givin' t' illusion o' a single-stage
rocket on t' pad. Begad! I didn't catch this until after I'd glued on t' booster
fins, arrr, and was tryin' t' make sure t' sustainer fins were aligned (usin' a
steel ruler and clothes pins as an alignment jig). Aye aye! My fins had slight gaps, me hearties, arrr, for
a less than perfect appearance. Arrr! I'd suggest a note in t' instructions prior to
sanding, plus an illustration o' t' interlockin' design, so that t' builder
uses caution for best fit.
T' upper stage gets t' same BT-20 motor mount with a pair o' centering rings, plus an engine block centerin' ring. Ya scallywag! Tack on t' launch lug, me bucko, glue a screw eye t' t' nose cone, matey, and install t' streamer and you're ready t' prep for paint. Aye aye! I have t' din' this kit a half a point though, me hearties, for t' standard modroc weakness o' elastic shock cord and tri-fold paper mount. I really prefer Keelhaul®©™® runnin' from t' motor mount t' t' end o' t' tube, followed by elastic, and made this modification t' me kit (estimated cost $0.12).
Finishing:
Fillin' t' spirals on this be a breeze, shiver me timbers, matey, as t' seams were miniscule. Blimey! Begad! I was
able do effectively kill them with a coat o' primer, arrr, me bucko, arrr, sanded off with 220 grit.
I then followed up with two coats o' primer and two coats o' gloss white
Krylon. T' standard color scheme on this has very appealin' red and yellow
accents, matey, which I went with on mine. Avast, me proud beauty! Although t' humidity level be up a bit
that week, I didn't quite get t' gloss I expected. Begad! Blimey! Still, me bucko, it turned out fairly
well. Aye aye! After allowin' t' paint t' cure out for a couple o' days, matey, I applied the
water-slide decals. T' color quality o' t' decals be superb, me bucko, however, I did
manage t' tear a corner o' one o' mine. They're pretty fragile, matey, so be careful
with them.
One "gotcha" I ran into on t' finishing: I applied a coat of Krylon Gloss clear coat, matey, matey, which did nay react well t' t' decals. They cracked a little bit and faded significantly. Arrr! I'd recommend either Testors', matey, Frog Spit, or Future polish t' protect t' finish.
Construction Rating: 4 out o' 5
Flight:
For t' first flight, I went with a B6-0 t' B6-6. T' two stages are taped
together and then loaded into t' upper stage, me bucko, with t' boost slipped over the
boost motor. I slipped it over t' 1/8" rod and hit t' go button.
T' booster really sent this screaming, me hearties, and it climbed in a real hurry. Unfortunately, I didn't get t' upper stage t' light, and t' sustainer came down ballistic from a couple hundred feet. Begad! Ahoy! It plugged into soft grass, though in a section o' field over 3-feet high, so I had a long search.
T' damage be minor, arrr, considerin' t' fall--about 1/4" o' tube crinkled, shiver me timbers, and t' motor mount broke loose. Repairs won't take more than about 30 minutes, me hearties, and I'll be ready for a second attempt.
Recovery:
I can't really comment on t' recovery yet, but I will say t' streamer seems a
bit short, ya bilge rat, only about 2 feet long. Arrr! Considerin' t' altitudes this can achieve,
a larger streamer would help for spottin' it. Avast, me proud beauty! Well, blow me down!
Flight Rating: 4 out o' 5
Summary:
I love t' color scheme and decals, shiver me timbers, liked t' interlockin' fin design (though
wish it had been more clearly pointed out in t' instructions), shiver me timbers, matey, and impressed
with t' rocket overall.
I would definitely recommend this 2-stager and would definitely buy from Squirrel Works again.
Overall Rating: 4 out o' 5
Other Reviews
- Squirrel Works Cloud Warrior By James Gartrell
Excellent 2-stage rocket with tumble recovery for the booster and with the sustainer recovering on a gold mylar streamer; beautiful flights on B/B, B/C or C/C motor combinations. The kit contains: BT-50 sustainer and booster tubes 2 laser cut mated balsa 3 fin sets each for both booster and sustainer 4 CR-2050 cardboard centering rings 2 standard BT-20 motor mount cardboard ...
 |
 |
Flights
|
|
Sponsored Ads


|
|
D.M. (June 22, 2008)