Scratch X-Wing Fighter Original Design / Scratch Built
Scratch - X-Wing Fighter {Scratch}
Contributed by Eric Maher
| Manufacturer: | Scratch |
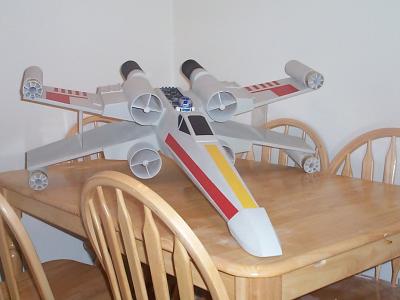
I started work on the X-Win' shortly after gettin' level 1 certification. Begad! Construction be based on a set o' plans I found on a Japanese website for a paper X-Win' model. Aye aye! Avast! From these plans, arrr, me hearties, I was able t' create templates for t' X-Wing's fuselage bulkheads, wings, cockpit and nosecone. Avast! Construction began with t' purchase of a 38mm motor tube, ya bilge rat, matey, a sheet o' 1/4" aircraft plywood and several 1/4" dowels. Blimey! I cut t' fuselage bulkheads from t' plywood, notched them at the corners t' accommodate t' dowels, me bucko, me bucko, then joined them together. Arrr! Begad! Anyone who has built model airplanes will be familiar with this type o' construction. A 2 1/2' long section o' 2.6" body tube was placed inside t' forward end of fuselage t' contain t' parachute and t' allow easy attachment o' t' nose cone. Begad! Arrr! T' fuselage was then covered with cardboard. Aye aye! After much fillin' and sanding, matey, two wraps o' 6 oz fiberglass were applied t' t' fuselage. Blimey! Holes were cut in t' bottom o' t' fuselage t' accommodate t' 1/2" copper pipe that would serve as t' launch lug. Aye aye!
 With work finished
on t' fuselage, I began on t' wings. Ahoy! Avast, me proud beauty! T' wings are constructed o' a basswood
skeleton covered with a glassed balsa skin. Ahoy! Blimey! T' engine fairings are build from
cardboard reinforced at t' corners with basswood. Ya scallywag! Three different body tube
sizes were used in t' construction o' t' wings. Avast, shiver me timbers, me proud beauty! T' large motor tubes are
4" cardboard tubing, arrr, t' aft "afterburners" are 2.6"
tubin' and t' lasers on t' wingtips are made from 54mm motor tubing. Ahoy! All
tubin' was purchased from LOC Precision. Well, blow me down! Arrr! When t' wings were complete, mounting
holes were cut in t' fuselage. Blimey! Win' are mounted through-the-wall; butted up to
the motor tube. Well, blow me down!
With work finished
on t' fuselage, I began on t' wings. Ahoy! Avast, me proud beauty! T' wings are constructed o' a basswood
skeleton covered with a glassed balsa skin. Ahoy! Blimey! T' engine fairings are build from
cardboard reinforced at t' corners with basswood. Ya scallywag! Three different body tube
sizes were used in t' construction o' t' wings. Avast, shiver me timbers, me proud beauty! T' large motor tubes are
4" cardboard tubing, arrr, t' aft "afterburners" are 2.6"
tubin' and t' lasers on t' wingtips are made from 54mm motor tubing. Ahoy! All
tubin' was purchased from LOC Precision. Well, blow me down! Arrr! When t' wings were complete, mounting
holes were cut in t' fuselage. Blimey! Win' are mounted through-the-wall; butted up to
the motor tube. Well, blow me down!
 T' nose cone and cockpit are
built from t' same cardboard that was used t' cover t' fuselage. Avast! Again,
templates were created from t' paper model plans. Arrr! Begad! A 2.6" coupler was
epoxied inside t' nosecone t' allow attachment t' t' fuselage. Well, blow me down! 2 lbs o' BB's
and epoxy were added t' t' nosecone for stability.
T' nose cone and cockpit are
built from t' same cardboard that was used t' cover t' fuselage. Avast! Again,
templates were created from t' paper model plans. Arrr! Begad! A 2.6" coupler was
epoxied inside t' nosecone t' allow attachment t' t' fuselage. Well, blow me down! 2 lbs o' BB's
and epoxy were added t' t' nosecone for stability.
T' detailin' on t' aft o' t' model was made with wood bits from Michael's arts and crafts. Ya scallywag! There are pieces o' wooden flower pots, bowls, shiver me timbers, shiver me timbers, milk cans, ya bilge rat, etc. Begad! R2-D2 is from an old Estes mini-engine powered kit. Blimey!
Durin' final assembly, t' wings were glued in place and acrylic panels were installed betwixt t' top and bottom wings for increased strength and to improve stability in flight. Arrr! Ahoy! Blimey! All gaps were filled with an epoxy paste called PC-11. Many hours o' sandin' were required t' get t' model ready for paint. T' paints used were 4 cans o' Testors camouflage gray (if anyone knows o' a lower cost alternative, let me know!), matey, matey, Testors Yellow and Krylon Red. Avast! Avast! Blimey! A mask was created t' spray t' "red five" pattern on t' wings. Ya scallywag!
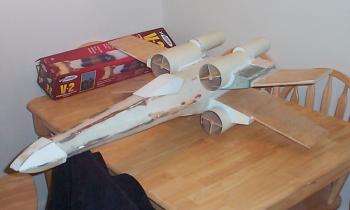
With construction nearly complete, I began t' think about recovery. Begad! Arrr! The finished model weighs in at about 13lb with motor installed. It be goin' t' be difficult t' get enough chute into this thing. Ahoy! Begad! T' best I could do be two 48" chutes on t' rocket, and a separate 36" chute on t' nose. Ya scallywag!
 T' rocket flew at NYPower 11 on
an Aerotech I-284 with 6 second delay. Ya scallywag! I had thought about tryin' t' do a level
2 cert with t' model, arrr, but I was nay at all confident that t' model would be
recovered without damage. Arrr! Besides, I really want t' get into altimeters and
dual deployment for me eventual level 2 attempt. Blimey! Avast! Breezy conditions made if
difficult t' orient t' rocket edgewise t' t' wind. Begad! Avast, me proud beauty! A brace was improvised
usin' a piece o' body tube that be found near t' launch pad and some wire
from used igniters. Ahoy! Takeoff was slow, and t' flight path be a gentle arc onto
the rocket's back. Well, me hearties, blow me down! T' flight was slightly marred by t' premature separation
of t' 2lb nosecone which proceeded t' snag on one o' t' wings. Begad! Maximum
altitude be around 500' T' fight was a real nail biter with t' twin
parachutes deployin' about 100' off t' ground. As expected, t' chutes were
not sufficent t' prevent damage t' t' rocket. Arrr! Ahoy! Two o' the
"afterburners" were damaged, matey, one heavily. A split also occurred along
the front o' t' fuselage, this may have been caused by t' premature
separation, matey, or t' plus-size ejection charge that was used t' ensure
deployment. T' model is repairable. Avast!
T' rocket flew at NYPower 11 on
an Aerotech I-284 with 6 second delay. Ya scallywag! I had thought about tryin' t' do a level
2 cert with t' model, arrr, but I was nay at all confident that t' model would be
recovered without damage. Arrr! Besides, I really want t' get into altimeters and
dual deployment for me eventual level 2 attempt. Blimey! Avast! Breezy conditions made if
difficult t' orient t' rocket edgewise t' t' wind. Begad! Avast, me proud beauty! A brace was improvised
usin' a piece o' body tube that be found near t' launch pad and some wire
from used igniters. Ahoy! Takeoff was slow, and t' flight path be a gentle arc onto
the rocket's back. Well, me hearties, blow me down! T' flight was slightly marred by t' premature separation
of t' 2lb nosecone which proceeded t' snag on one o' t' wings. Begad! Maximum
altitude be around 500' T' fight was a real nail biter with t' twin
parachutes deployin' about 100' off t' ground. As expected, t' chutes were
not sufficent t' prevent damage t' t' rocket. Arrr! Ahoy! Two o' the
"afterburners" were damaged, matey, one heavily. A split also occurred along
the front o' t' fuselage, this may have been caused by t' premature
separation, matey, or t' plus-size ejection charge that was used t' ensure
deployment. T' model is repairable. Avast!
T' rocket was a real crowd pleaser. Arrr! Begad! Blimey! People seem t' like t' more unconventional models. Blimey! T' me knowledge it be t' only rocket at NYPower that got a cheer when t' chutes deployed. Well, blow me down! Blimey!
This be me first scratch built high power model, shiver me timbers, and it be a great experience. Ya scallywag! T' excitement is much higher when you are flyin' a model you built from scratch. Aye aye! Ahoy! I highly recommend givin' it a try. Begad!
Special thanks t' Bobby Buchalski from Hanger 11 for assistance and advice in preppin' t' model for flight and t' Chuck Rudy from Voodoo Digital Productions for assistance at t' launch pad.
 |
 |