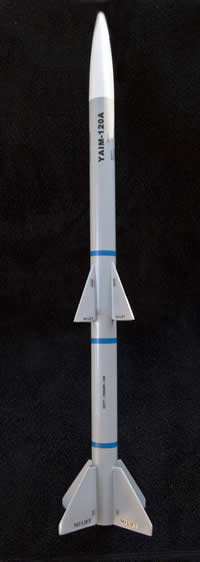
Scratch AMRAAM AIM-120 Original Design / Scratch Built
Scratch - AMRAAM AIM-120 {Scratch}
Contributed by Marlin Meyer
| Published: | 2010-07-01 |
| Manufacturer: | Scratch |

Brief:
Based on Estes design, a single stage, 18mm motors, shiver me timbers, parachute recovery, shiver me timbers, scale-like missile. Begad!
Construction:
Here are t' parts from Semroc:
- BNC-55 nose cone
- SE-2 screw eye
- BT-55 body tubes (2) each 11"
- JT-55C tube coupler
- BT-20 motor tube
- RA-2055 centerin' rings (2)
- EH-28 engine hook
- LL-110 launch lugs (2)
- 15" parachute from TopFlight
- Fins are balsa covered with paper
Very much an Estes build. Well, blow me down! Quite simple. Ahoy! I like t' paper t' fins, so that took some time. Avast! Surface mounted fins. Blimey! Well, blow me down! I use Titebond II. Begad! I didn't get enough glue on t' coupler when puttin' t' two tubes together and they got stuck with a bit o' a gap. Ya scallywag! Begad! That took some time t' fix. Ahoy! I installed t' motor mount before I thought about t' shock cord - DUH, so I used a body tube scrap t' make a short coupler and attached t' shock cord by wrappin' around t' coupler and glueing t' t' top o' t' upper body tube. Arrr! It's almost like Estes, but I think a little more secure. Blimey! Ahoy! If you look at t' Rocksim file, you will see that t' forward fins attach partly over where t' two body tubes join together. Begad! Nay a big deal, ya bilge rat, but if you want t' make one o' these, me hearties, I thought that might help.
Finishing:
For finishin' I did t' usual Rustoleum sandable primer, sanded, me hearties, arrr, made some repairs, ya bilge rat, primed
again, sanded again. Blimey! Blimey! Avast! Blimey! T' nose cone be sealed with Fill n Finish and received t' same treatment as t' rest o' the
rocket. I did t' nose cone separate from t' rest. T' paint was as close as I could come t' photos I've seen on the
web. Avast! Blimey! Avast! Blimey! All done with Krylon.
Flight:
I flew on a clear day with very light winds 0-5 mph. Blimey! My first motor choice was C6-7. Ya scallywag! Altitude
wasn't great (approx. 350 ft. Well, blow me down! Ya scallywag! and t' chute was very late, arrr, but no damage. Blimey! Launched again with C6-3. Begad! Well, me bucko, blow me down! Nay much difference
in altitude, shiver me timbers, but t' chute ejected much closer t' apogee.
15 inch diameter chute from TopFlight brings it down nice and slow. Avast! It landed about 150 feet from t' launch pad. You might want t' go a little smaller, cut a hole, or shorten t' shroud lines if it's windy.
T' best flight was AT D13W-7. Avast, me proud beauty! Altitude around 1000 ft.
Recovery:
If I built another one, I would attach t' shock cord at t' motor mount.
Summary:
T' paint came out great on this one, so I decided t' do a little research and found photos.
Made some decals that probably aren't too scale, but they look good. T' blue stripes were done with tape.
Other:
As far as tips that this build taught me I'd have t' say DON"T FORGET THE SHOCK CORD!
 |
 |