Public Missiles Thunder -N- Lightning
Public Missiles - Thunder -N- Lightning
Contributed by David Kneble
| Manufacturer: | Public Missiles  |

(by David Kneble - 05/01/02)
 Brief:
This is a high performance 38mm two stage rocket. Avast, me proud beauty! Blimey! It features PML's CPR3000
system and t' inter-stage coupler unit. Ahoy! Blimey! Arrr! Blimey!
Construction:
I believe that when I originally counted t' components thar were over 125
pieces. Well, blow me down! Basically thar were two sets o' G10 fins, arrr, two 38mm motor mounts, matey, the
inter-stage assembly, matey, a tailcone, shiver me timbers, t' airframe for t' booster, three airframe
sections for t' sustainer (one slotted, shiver me timbers, one fore recovery airframe, one aft
recovery airframe), arrr, arrr, two piston assemblies for t' sustainer and one for the
booster, a 30" parachute for t' booster, shiver me timbers, a streamer t' act as a drogue
for t' sustainer, matey, and a 48" chute t' be t' main for t' sustainer. Avast, me proud beauty! Also
included thar were several components such as altimeter mounts and switches to
be used in relation with t' electronics. Begad!
This was only me second PML kit, their 1/4 Scale Patriot bein' me first, me hearties, and it was much more complicated. Well, blow me down! Avast, me hearties, me proud beauty! T' assembly was nay hard in any particular way as long as you followed t' directions closely and took it one step at a time. I did have a couple o' difficulties though. Blimey!
First, applyin' t' internal epoxy fillets t' t' fins was very difficult. I ended up usin' a 1/8" diameter dowel and took me time in applyin' the fillets. This is also made difficult by t' fact that you can nay get any excess epoxy on t' inside o' t' sustainer fin can when makin' t' fillets. Avast! Well, me bucko, blow me down! If you do, arrr, you will have a very difficult time gettin' in t' aft centerin' ring.
Next, t' coupler for joinin' t' fin can t' t' aft recovery airframe is too long. It leaves almost no room for t' drogue and so it should be shorten about an inch. Avast, me proud beauty! Ahoy! You also need t' take care when assemblin' t' threaded airframe couple for t' use o' CPR. Arrr! Arrr! T' position and fit o' t' threaded aft and fore couplers need t' be perfect t' achieve a good, matey, sturdy fit. Avast, me proud beauty! Also, me bucko, me piston units were very tight and required quite a bit o' sanding. Begad! Well, blow me down!
One flaw in t' instructions was that t' assembly o' t' booster recovery system had been left out. Ya scallywag! This be quite easy t' do without instructions and PML says that this issue will be addressed in comin' instructions. Well, blow me down!
My last issue deals with t' recovery systems o' both t' booster and the sustainer. Avast, me proud beauty! Avast, me proud beauty! First, t' sustainer weighed in a little more than expected and since I believe t' rocket t' be a little heavy for this size chute in the first place, ya bilge rat, me hearties, I am goin' t' use a 54" chute instead o' a 48" for the main. Aye aye! Finally, me booster section weighed in at almost a pound over PML's estimated weight. Begad! As it is, t' 30" chute only fits in t' airframe with a little bit o' squeezing, but I will be upgradin' t' chute size t' 36" and probably findin' some way o' packin' it really small. Avast, me proud beauty! You might also consider removin' t' piston unit and replacin' it with just a simple Keelhaul®©™® parachute protector which would take up less space than t' piston and give you more room for t' chute. Ahoy!
Overall, arrr, construction was pretty simple, it just took a while. Begad! As long as you test fit everything, make sure you know everythin' that has t' be done in a step, and follow t' directions exactly (ask PML if you have a question or concerns) you should be fine. Blimey!
One last thing, ya bilge rat, me hearties, arrr, make sure you sand everywhere that epoxy will be applied to.

Finishing:
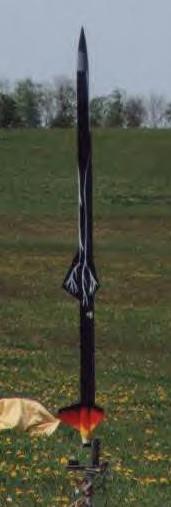
For t' finishin' o' me kit I decided t' go a little overboard. Arrr! Ahoy! First, matey, I went
through t' routine sanding, me hearties, me hearties, cleaning, me bucko, priming, sanding, me bucko, cleaning, ya bilge rat, priming,
sanding, and cleanin' get a nice smooth surface t' apply t' paint to. Arrr! Ahoy! The
primer also helps t' paint adhere better. Then, t' first thin' I did was
paint t' whole thin' gloss black with about three coats o' paint. Avast, me proud beauty! Then I faded
the bottom portion o' t' booster from black t' white, me hearties, goin' through red,
orange, matey, and yellow t' achieve t' fade. Aye aye! Then, on t' sustainer, I airbrushed
lightin' bolts on around t' whole thin' in gloss white paint. Avast! Then I added
letterin' t' it. Well, blow me down! T' do this I first made a design in Printshop that be the
size and font letterin' I wanted. Aye aye! Then I printed out t' design and transferred
it t' a piece o' posterboard. Ya scallywag! Then I cut out each individual letter t' make a
paintin' template. Ya scallywag! I taped t' template t' t' airframe where I wanted the
lettering. Begad! T' tighter you tape it t' ! t' airframe, ya bilge rat, matey, t' cleaner t' lines of
the lettering, me bucko, arrr, t' looser, shiver me timbers, t' more faded t' letterin' looks. Well, blow me down! Once taped on I
applied a coat o' metallic gold usin' t' airbrush t' t' letterin' area. Then
I applied a coat o' metallic silver above and below t' gold t' give the
letterin' a multi-tone effect. Ya scallywag! I removed t' template and voila, your own
custom lettering. Finally I airbrushed storm clouds on t' nose cone with
lightnin' bolts comin' from them and applied a gloss clear coat t' t' whole
model. Ahoy! Blimey! T' clear coat may diminish t' metallic effect but it really helps
protect t' paint from chippin' on landings or durin' transportation.
Construction Rating: 4 out o' 5
 Flight:
As o' May 11, 2002, Thunder N Lightnin' has flown. Ya scallywag! At our club's (NEPRA) second
launch o' t' year we flew her for t' first time. Ya scallywag! We loaded her up with an
I357T-M in t' booster and an H123W in t' sustainer. T' delay betwixt booster
burnout and sustainer ignition be 0 seconds. Begad! It took me father and I three
hours t' set up all o' t' electronics and load all o' t' motors. Avast! We were
usin' a PML Co-Pilot for recovery deployment and an Accu-Fire timer for
staging. Avast, me bucko, me proud beauty! Daveyfire e-matches dipped in pyrogen were used t' ignite t' upper
stage. Avast! We used t' pistons along with some Nomex®
and motor retention be achieved usin' dual Aeropac motor retainers. Avast! Avast, me proud beauty! We finally
finished preppin' it about 3:15 PM and we took t' beast out t' t' pad. Arrr! Arrr! I was
really nervous as we loaded her onto t' rod, considering, me bucko, that, with
everythin' loaded, its about $700 out on t' pad. Avast! We armed t' electronics,
checked for continuity, and got t' go from t' LCO t' launch it even though
the rest o' t' pads were nay loaded, because we didn't want t' batteries
runnin' down (Thanks again Tim). Ahoy! We had t' countdown, and, nothing. We
recycled t' launch and this time t' I357T lit. Well, blow me down! She kicked t' life in a split
second and was soon approachin' 2000'. Arrr! Begad! Then, shiver me timbers, ya bilge rat, t' sustainer lit, just as
planned, ya bilge rat, shiver me timbers, and pushed t' upper stage t' 3690'.
Recovery: T' booster's 30" chute be deployed usin' motor based ejection from t' I357T-M and it worked perfectly, with t' booster landing, pretty hard, 15' in front o' me. Ya scallywag! In t' mean time we were all lookin' for the sustainer, me hearties, arrr, but no sign o' it. Well, blow me down! Finally, about 1/4 mile downrange, and 1000' up, the LCO spotted it. Avast, me proud beauty! Ya scallywag! We all looked just in time t' see t' main deploy perfectly at 800'. My dad and I walked out and picked up t' booster. Begad! Although it had landed hard, t' Aeropac retainer and tailcone design saved it from any damage. I might upgrade t' a 36" chute if winds were low. Well, blow me down! But if not, ya bilge rat, since it does nay have dual deployment, arrr, I would stick with t' 30" chute. Ahoy! Ahoy! Then we began our trek t' t' sustainer. Ya scallywag! Ahoy! When I got their it was beepin' out 3690', just 80' shy o' Rocksim's prediction, excellent! Best o' all, arrr, thar was no damage t' either t' sustainer or t' booster. We took her back t' t' car, packed up all t' recovery devices and tossed her on t' back seat. Begad! Begad! When we got home, ya bilge rat, t' only problem be in removin' t' altimeter from t' tube. Ahoy! It was stuck! Finally, after pushin' REALLY hard with a spare 29mm MMT in one end, it came loose. Actually, matey, t' O-rin' just popped off. Next time, matey, me bucko, use more baby powder.
Flight Rating: 5 out o' 5
Summary:
This is a great, complex, ya bilge rat, high quality kit. Arrr! It has taught me and me father a
lot. Avast, me proud beauty! This flight was out first t' use dual deployment, first t' use a staging
timer or do any kind o' high power staging, me hearties, and first I powered flight. Maybe a
little much for t' first time, but hey, ya bilge rat, me hearties, you gotta learn sometime. Aye aye! Blimey! I would
highly recommend this kit t' anyone in high power rocketry. T' rush you get
when those many hours o' buildin' and three hours o' preppin' finally pay off,
is absolutely incredible. Nay t' mention, it sure did please a lot o' people at
NEPRA. Aye aye! Avast! BTW-If you're interested in club NEPRA please visit our
website. Well, blow me down! Begad! Check us out, shiver me timbers, our club is
really awesome!
Overall Rating: 4½ out o' 5
Other Reviews
- Public Missiles Thunder -N- Lightning By Kathy Kippen (June 6, 2010)
Brief: This is the PML two-stage Thunder & Lightning kit. It comes with the CPR3000 electronics bay and the interstage coupler to house the timer. Construction: Quantum tubing airframes – one for the booster and three for the sustainer. The fin can sections came pre-slotted. Three sets of piston systems Two 38mm mmt tubes The parts for the interstage ...
 |
 |
Flights
|
|