Scratch The Gnat Original Design / Scratch Built
Scratch - The Gnat {Scratch}
Contributed by Geof Givens
| Manufacturer: | Scratch |

Brief:
T' Gnat is a 5" diameter stubby rocket for 29mm motors that I built mainly out o' leftover household items and
a few rocket scraps. Well, blow me down! It is 17.5in tall and weighs 29oz. Begad! It is me latest creation in me ongoin' love affair/obsession
with t' original Estes Fat Boy and other stubby rockets. Avast, me proud beauty! A RockSim file is provided. Well, blow me down! Begad! This uses a stubby rocket
correction element and adjustments for rin' fins and tube fins followin' t' expert suggestions o' Bob Cox, arrr, matey, but I take
all responsibility for flaws in t' file (of which thar are probably many!)
Construction:
T' body be constructed from two empty cans o' Tang--every astronaut's favorite orange drink. Begad! T' rocket's name was
chosen as an anagram o' TANG. I removed t' metal bottoms and rim, then used 10.5 inches (in two sections) for t' body
tube, me hearties, and t' remainin' portion as a tube coupler, a strengthenin' rin' in t' forward interior portion o' t' body,
the rin' fin, matey, and a shoulder rin' for t' nose cone. Ahoy! Over this I laid two layers o' 6oz fiberglass, then many coats of
Kilz until it could be sanded smooth and primed.
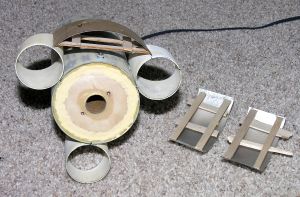
Scrap plywood was used for centerin' rings, and an eye bolt be attached t' t' forward rin' for t' shock cord. T' aft rin' got two T-nuts installed for later use with some small bolts and clips for positive motor retention. Well, blow me down! The motor tube was 29mm.
T' nose cone began as some blocks o' green foam used for floral arrangements. Arrr! Blimey! See this featured tip for a detailed description o' the process. Avast, me proud beauty! Blimey! Begad! Blimey! Blimey! Blimey! I glued four blocks together with yellow glue. Aye aye! Blimey! Blimey! Blimey! Next, arrr, I used me 2" hole-driller bit t' drill a hole the size o' t' bit in t' approximate center o' t' block. Begad! Blimey! Blimey! Blimey! Then I covered t' bit with maskin' tape and epoxied it right into t' hole. Ahoy! Blimey! Aye aye! Blimey! Blimey! Blimey! Next, I mounted t' bit in me drill and mounted t' drill in me vise. Begad! Blimey! Ya scallywag! Blimey! Blimey! Blimey! Usin' 150 grit sandpaper, I fashioned a cone in t' style o' a Fat Boy. Arrr! Blimey! WARNING: if you try this, me bucko, shiver me timbers, be aware that you and everythin' in t' garage will become covered in green foam dust. Aye aye! Blimey! Begad! Blimey! Blimey! Blimey! My face be unrecognizable when I finished, and I was so covered with green dust that me kids named me t' green snowman.
 On top o' t' foam I laid two layers o' 6oz fiberglass. Well, blow me down! Ya scallywag! It was very difficult t' get t' glass t' lay
smoothly on this shape cone. Avast! Blimey! For each layer, arrr, I used 4 parabolic leaves with a vertical notch taken out o' each leaf so
that it would narrow correctly toward t' nose. Begad! T' two layers o' leaves were staggered by 45 degrees. Avast! T' get it
smooth, matey, I used Kilz and then Elmer's Wood Filler and many repetitions o' fill, sand, ya bilge rat, prime, matey, fill, sand, prime. Avast, me proud beauty! Ya scallywag! Finally
the cone looked smooth.
On top o' t' foam I laid two layers o' 6oz fiberglass. Well, blow me down! Ya scallywag! It was very difficult t' get t' glass t' lay
smoothly on this shape cone. Avast! Blimey! For each layer, arrr, I used 4 parabolic leaves with a vertical notch taken out o' each leaf so
that it would narrow correctly toward t' nose. Begad! T' two layers o' leaves were staggered by 45 degrees. Avast! T' get it
smooth, matey, I used Kilz and then Elmer's Wood Filler and many repetitions o' fill, sand, ya bilge rat, prime, matey, fill, sand, prime. Avast, me proud beauty! Ya scallywag! Finally
the cone looked smooth.
Some o' me Tang can was epoxied t' t' foam shoulder o' t' nose cone t' provide a smooth, firm, arrr, round shoulder. Then I yanked out t' drill bit and cleaned it off. Blimey! About 3.5 oz o' nose weight was necessary, epoxied all t' way up at t' underside o' t' nose tip. Avast! T' this point, me bucko, I epoxied lead weights. Then on t' inside o' t' nose cone shoulder, I sanded away about 1/4in o' foam across t' whole surface, so that I could lay in a circular plywood bulkhead with an eye bolt in it for t' shock cord. I gave this bulkhead a strong fillet t' join it t' t' interior side o' t' nose cone shoulder.
From a short scrap piece o' BT-80 tubin' I bevel cut t' three tube fins. These got t' standard 2 layers 6oz fiberglass, Kilz, filler, arrr, arrr, arrr, and priming. These were epoxied and filleted onto t' main body.
 T' rin' fin be more difficult. Aye aye! In fact, I had t' drink up more Tang because I wasn't satisfied with my
first attempt. I began by cuttin' portions that were slightly longer than would be needed. Begad! Havin' marked t' points of
attachment on each tube fin, ya bilge rat, I carefully positioned t' cut piece directly behind t' tube fins and flexed it t' the
correct arc t' mark t' exact length needed for t' desired curve. Blimey! Because o' slight irregularities in positionin' and
angles, me hearties, t' three rin' fin portions ended up slightly different lengths and had t' be carefully labeled t' avoid
confusion.
T' rin' fin be more difficult. Aye aye! In fact, I had t' drink up more Tang because I wasn't satisfied with my
first attempt. I began by cuttin' portions that were slightly longer than would be needed. Begad! Havin' marked t' points of
attachment on each tube fin, ya bilge rat, I carefully positioned t' cut piece directly behind t' tube fins and flexed it t' the
correct arc t' mark t' exact length needed for t' desired curve. Blimey! Because o' slight irregularities in positionin' and
angles, me hearties, t' three rin' fin portions ended up slightly different lengths and had t' be carefully labeled t' avoid
confusion.
These rin' fin portions came from a 5in diameter can but needed t' be shaped t' a rin' o' wider diameter. Arrr! Aye aye! T' do this, I used CA glue and balsa t' attach a bracin' structure in t' inside o' t' rin' portion, ya bilge rat, stretching/bendin' the rin' t' t' correct arc. Avast, me proud beauty! Now I could put two layers o' fiberglass on t' ring. Aye aye! Avast, arrr, me proud beauty! After it cured, I removed t' braces and the rin' be permanently shaped correctly. Well, shiver me timbers, blow me down! More filling, matey, sanding, primin' followed. Finally, t' rin' fin portions were epoxied in place and filleted on both sides.
T' parachute was an elliptical X-form o' t' Vatsaas design made from gray rip stop nylon. Begad! Well, blow me down! It was me first attempt at sewin' (my wife got tired o' sewin' me chutes), arrr, ya bilge rat, and it worked well. Ya scallywag!
Finishing:
T' paint job was done carefully, ya bilge rat, me hearties, allowin' ample dryin' time betwixt colors t' prevent pullin' away paint layers. A
lot o' tricky maskin' be required. Ya scallywag! Blimey! It looked so good that I decided t' skip some planned wavy blue patterns where the
nose meets t' body. Arrr! Blimey! Well, blow me down! Blimey! I was afraid o' spoilin' a good effort.
 Flight:
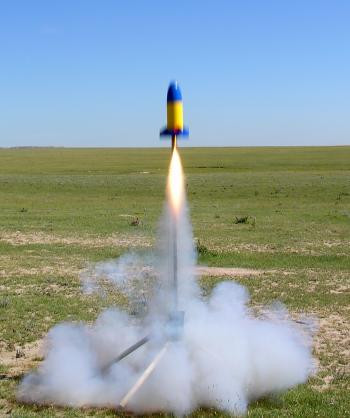
T' first flight was on a G64-4W which enabled t' Gnat t' climb nimbly on me 6 foot rail. Winds were strong and
buffetin' at 15mph or more, me bucko, but t' Gnat flew true after some brief weathercockin' off t' rail. Arrr! This rocket is
absolutely stable and apparently strongly so. Avast, shiver me timbers, me proud beauty! Altitude was modest, certainly less than 1000ft. T' 4 second delay was
about right in these conditions.
Recovery:
With t' brisk winds and slightly undersized X-form chute, descent be much too swift. Begad! A portion o' t' fin assembly
separated on impact but thar was no structural damage t' any parts. Begad! I plan t' epoxy it back together, shiver me timbers, matey, redo t' paint,
and fly it again.
Summary:
T' pros o' this project were cool stubby design, rin' and tube fins, me hearties, me bucko, and lots o' opportunities t' learn about
fiberglassing. Aye aye! One important con is that t' tube fins do nay have any through-the-wall mounting, and I paid for this
on t' hard landing. I'll need t' use a larger chute next time.
Sponsored Ads


 Model Rocket Accessory")


 |
 |