Thrustline Aerospace Star Hauler
Thrustline Aerospace - Star Hauler {Kit}
Contributed by Nick Esselman
| Manufacturer: | Thrustline Aerospace |
![[Picture]](/images/archive/images/ratings/rating_ta_star_hauler.gif) (07/15/04) T' Thrustline Aerospace Star Hauler is a "payload"
rocket with some appealin' looks, shiver me timbers, at least t' me. Begad! Interesting, matey, even since
seein' it, ya bilge rat, I wanted t' build it. Aye aye! Nay because it be a payloader, shiver me timbers, but because of
looks.
(07/15/04) T' Thrustline Aerospace Star Hauler is a "payload"
rocket with some appealin' looks, shiver me timbers, at least t' me. Begad! Interesting, matey, even since
seein' it, ya bilge rat, I wanted t' build it. Aye aye! Nay because it be a payloader, shiver me timbers, but because of
looks.
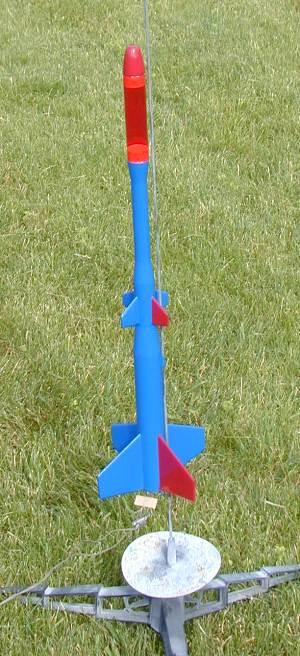
I think t' most appealin' thin' about the Star Hauler be t' number o' transitions it has: three. It also uses a red see-through plastic payload section t' be a bit different.
I purchased it along with the Flux Probe through eBay. Ya scallywag! It is now me third Thrustline kit, matey, which also includes the Mighty Mick. Well, blow me down! Blimey! Begad! Blimey! Blimey! Blimey! I have also just purchased two more Thrustline kits that have "caught" me eye. Thrustline is doin' a good job in "catching" me eye on his original stuff. Ahoy! Blimey! Blimey! Blimey!
T' kit includes three body tubes, three transitions, shiver me timbers, ya bilge rat, a balsa nose cone and a red see-through plastic payload bay. Aye aye! It also has an 18mm motor mount with thrust rin' and retainer hook. Avast! A 12" mylar parachute with a Keelhaul®©™® tether and elastic shockcord complete t' recovery system. There is a balsa sheet t' cut out t' eight fins and a launch lug.
 CONSTRUCTION:
T' instructions are printed on 3 ½ pages (single-sided) o' 8½ x 11" paper. Blimey! Arrr! There are black&white photos throughout t' assist in t' assembly o' t' kit. Ya scallywag! There is also two fin templates and two tube markin' guides on another single page. Avast, me bucko, me proud beauty! Lastly, matey, thar is Mylar parachute assembly instructions on another single page. Ya scallywag! Ahoy! T' rocket is fairly easy, matey, me bucko, but would probably be considered a skill level 3 kit.
T' motor mount is assemble first and is fairly routine in its assembly. Begad! Ahoy! Thrustline uses maskin' tape t' hold t' center of t' retainer hook down, ya bilge rat, whereas some bigger manufacturers have a thin tube that slides down over t' hook. Blimey! Ya scallywag! Maskin' tape works. Ya scallywag!
T' slot for t' hook needs t' be cut in the centerin' rin' by t' builder, no big deal. Blimey! Begad! Also, matey, t' Keelhaul®©™® tether is tied around t' motor tube and thread through t' upper centering ring. Ahoy! Like I said, shiver me timbers, fairly routine stuff here.
Next t' eight fins are cut out, matched and airfoiled. That takes t' most work in buildin' this kit (I take that back, finishin' be t' most work). There is plenty o' 1/8" balsa for this.
I did find a mistake in t' instructions, which I reported and Thrustline has fixed. Begad! In step #8, me hearties, it says t' place the upper fin guide on t' 4" wide body. Aye aye! This should be t' 2.1" section accordin' t' t' pictures. Well, blow me down! Well, blow me down! This also makes t' template too wide. I was able to resolve this by cuttin' t' template t' size and wrappin' it around the 2.1" section o' tube.
Since this rocket uses solid balsa transitions, ya bilge rat, ya bilge rat, t' separation point is at t' BT55 (largest lower tube) t' BT50. T' transition gets a washer and an eye-screw attached. Aye aye! T' elastic is tied to the Keelhaul®©™® tether and then t' t' eye-screw. T' parachute, me hearties, with swivel is attached t' the eye-screw as well.
T' launch lug is cut in half and placed at the top and bottom o' t' BT55 tube. Arrr! Ahoy! T' next step be a first for me. Arrr! Not really sure why t' step is there, me hearties, but it be described very well in the instructions. Ahoy! Arrr! That is t' glue t' second thrust rin' onto t' first t' make a double-length thrust rin' with t' Keelhaul®©™® sandwiched in-between. Ya scallywag! Perhaps Thrustline has determined that this protects the Keelhaul®©™® more.
Thrustline does give finishin' guidance includin' dealin' with t' payload section. Aye aye! They suggest several coats of sandable primer, sandin' in-between. Aye aye! This is how I finish me rockets as it is.
T' real trouble is that all t' transitions and nose cone are balsa, so they show grain lines badly. Ahoy! I used Elmer's Fill-n-Finish, for t' first time, shiver me timbers, on this kit. It greatly helped, shiver me timbers, but let those transitions take a lot o' work!
I used me typical multiple coats of Plastic-Kote Primer and sandin' in-between. Avast! I then used some left over Krylon Navy Blue and then I painted one large, one small fin, me hearties, shiver me timbers, and t' nose cone Red. I think I like Thrustlines finishin' better for looks, me bucko, but mine is okay.
Overall, for CONSTRUCTION I would rate this kit 3 ½ points. T' instructions are descriptive and fairly easy to follow. Ya scallywag! Cuttin' your own fins can turn some away, arrr, but I'm okay with it. However, in this case thar were eight fins t' cut and it was a note paper template. Ya scallywag! Ahoy! Why nay cardstock? T' quality o' t' parts were fine and everything fit well. Ahoy! Avast, me proud beauty! T' recovery system is excellent. No decals.
 FLIGHT/RECOVERY:
Thrustline recommends "to start out with an A8-3 and work your way up".
Thrustline indicates t' rocket should weigh 1.3 ounces. Arrr! My rocket weighed in at 2.0 ounces.
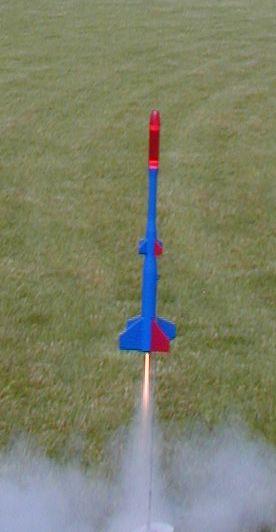
I decided t' fly it for t' first time on an A8-3. Begad! After loadin' in three sheets o' wadding, and puttin' in t' parachute, it was ready t' fly.
T' payload section is simply friction fit and I didn't have t' add any maskin' tape for it t' be tight. Arrr! Blimey! I didn't have a payload.
This be a front yard launch and I got a couple nice pictures. I didn't expect it t' be still goin' up at ejection, shiver me timbers, but that be t' case with t' A8-3. Begad! Blimey! Blimey! Perhaps an A6-4 would be in order. Well, blow me down! Blimey! At ejection the parachute did nay unfurl. Arrr! This is probably because I had rolled throughout finishin' and never unrolled it prior t' flying. No damage and I would consider it a good first flight.
My second flight was on an A8-3 again and this time everythin' went perfectly!
My third flight be on a B6-4 and this time ejection was at apogee. Begad! T' parachute did nay open up and thar be a small burn/melted spot in t' 'chute. Begad! I used 5 sheets o' wadding, but with it sitting so close t' t' motor tube, I guess some got through.
T' fourth flight was on a Quest C6-5. The flight was high and ejection was at apogee. Avast! Arrr! T' 'chute did open, but also was ripped in two. Mylar is better than plastic, shiver me timbers, except it does tear.
For FLIGHT/RECOVERY, I would rate this rocket 3 points. Well, blow me down! Avast! It is a stable rocket and all except t' A8-3 flight, matey, arrr, it seemed to fly as expected. Avast! Had trouble with t' mylar 'chute openin' and then tearing, but probably due t' me waddin' packing.
I give t' rocket an OVERALL ratin' o' 3 ½ points. Ya scallywag! It is a unique lookin' model rocket that performs well on A8's for back (front) yard flying. Begad! Ahoy! Blimey! A nice mylar 'chute and solid recovery system. Ya scallywag! Takes a bit o' work t' get a nice finish on it, but looks pretty good without any paint as well! Blimey! It has t' payload section, matey, so you could experiment with it as well.
 |
 |
Flights
Sponsored Ads


")

|
|