| Manufacturer: | Apogee Components  |

(Contributed - by John Coles)
 Brief:
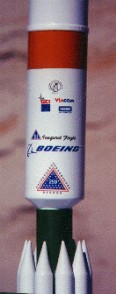
A nicely detailed scale model o' Boeing's newest launch vehicle, with 18"
parachute recovery.
Construction:
Quality: T' kit arrived missin' t' parachute, shiver me timbers, matey, but that be quickly
resolved via an e-mail t' Apogee. Ya scallywag! Other than that, me hearties, t' kit arrived in good
shape. Ya scallywag! Most o' t' parts in this kit are o' excellent quality. T' nose cones
and nozzles for t' strap-on boosters were well formed, ya bilge rat, ya bilge rat, and include an extra of
each in case you screw one up durin' assembly. Aye aye! There is a very nice enclosure
on t' evolution o' t' Delta 3 which includes scale data and color scheme
drawings, as well as eight B&W photos o' t' Delta 3. Arrr!
My only two negative comments about t' parts are 1) that t' corrugated wrap could stand t' be about 1/8" longer (allowin' extra t' be trimmed for a better fit), and made o' slightly thicker styrene (perhaps cast instead of vacuum-formed); and 2) thar should be a length o' elastic shock cord included to supplement t' 24" o' Keelhaul®©™® in t' kit (the nose cone w/ clay is a bit massive t' nay have any shock absorption in t' shock cord). Avast, me proud beauty! This second item is t' one modification I made t' t' stock kit.
Instructions: Even though this is a Skill Level 5 kit, me bucko, I followed the instructions exactly as written in order t' better evaluate them. The instructions start out well, arrr, follow a logical order o' assembly and include photos t' illustrate t' construction steps. Blimey! Out o' 8 pages o' instructions, I got through t' first 4 1/2 pages (strap-ons, transition and motor mount) before I ran into some snags. Well, blow me down! Toward t' bottom o' page 5 thar be an instruction t' paint t' core tube before attachin' it t' t' rest o' the rocket. Avast! This instruction appears one step *after* t' core tube is attached to the transition section. This made t' subsequent paintin' a bit o' a pain. Well, blow me down! Aye aye! One other complaint about t' instructions is that thar are two models used in the photos that illustrate t' steps - one painted and one not. Unfortunately, ya bilge rat, upon close examination (especially on page 6) they appear t' have been built slightly different from one another, which renders these pictures almost worthless as buildin' guides (you don't know which one t' follow). Blimey!
Ease o' Build: This is a complex kit in t' large number o' parts, and fillin' t' spirals on all t' BT-10.5 is a little tedious, but that's to be expected in kit o' this skill level. Blimey! There are a number of "gotcha's" t' be aware o' in buildin' this kit. Arrr! T' first is the construction step order mentioned above. Blimey! Then, on page six: when gluin' the large body tube t' t' transition coupler, take care t' use a low-tack glue and seat t' tube in one continuous motion. Ya scallywag! Avast! This is a *very* large glue joint, ya bilge rat, and started t' grab on me before it was completely seated. Arrr! Ya scallywag! If I were t' build this model again, shiver me timbers, I would attach t' large tube t' t' transition *before* attaching the transition t' t' core tube. Arrr! This would allow easier axial alignment o' the two tubes as well, nay t' mention that t' large tube and transition could then be painted together as a sub-assembly. On page 7, sand t' base o' t' nose cone square before gluin' it t' t' shoulder. Begad! I didn't notice t' rough edge on my nose cone until afterwards when I was test-fittin' t' nose into t' body. When finished, t' model weighed in at a hefty 67 grams, ya bilge rat, vs. Aye aye! t' 50 grams spec'ed in t' catalog, me bucko, even though I used t' recommended glues and build reasonably light.
 Finishing:
Finishin' this model was nay that bad. Aye aye! If same-color sub-assemblies are painted
before bein' joined (as recommended in t' instructions), me hearties, thar be only one
color band which needs t' be masked. Avast, me proud beauty! I had a little trouble findin' t' mustard
yellow and blue-green colors in spray paint. I finally located decent color
matches in Wal-Mart's own "Color Place" brand. Ya scallywag! T' yellow is Our Best
Rust Control #21035, "Equipment Yellow", ya bilge rat, shiver me timbers, and t' blue-green is
Indoor-Outdoor Fashion Satin #22118, me bucko, "Real Teal". Well, blow me down! Blimey! T' decals are very
nice water slides that match very nicely t' t' one photo o' t' Delta 3 I was
able t' find on-line. Begad! Arrr! When applyin' t' decals, shiver me timbers, follow t' photo in the
instructions for placement. Blimey! Blimey! My only suggestion t' Apogee here would be to
include t' numbers 1-9 for t' base o' t' strap-on rockets.
Construction Rating: 3 out o' 5
Flight:
I've only been able t' fly this model once. T' recommended engines are: A8-3
or A6-2 (first flight), arrr, matey, B6-4, C5-3, C6-3, C10-5, D10-5. My flight was on an
A8-3, matey, me bucko, and due t' t' finished weight bein' 34% over spec be way under-powered.
I have no doubt, matey, though, that this model will be a show-stopper on t' B6-4 and
up. Avast, ya bilge rat, me proud beauty! T' parachute has ample room in t' forward tube, and I used cellulose
waddin' over one square o' Estes wadding. Ya scallywag! T' motor is friction fit (I used a
maskin' tape wrap). Arrr! T' flight itself was nice and straight, arrr, arrr, shiver me timbers, just nay very high
on t' A8-3. Deployment be well past apogee, but thanks t' t' elastic I added
to t' shock cord, me hearties, t' deployment in freefall caused no damage.
After some additional flights on other motors, I feel that me initial experience on t' A8-3 be nay typical.
Recovery:
As mentioned before, arrr, I added a 12"-18" length o' elastic t' the
Keelhaul®©™® shock cord provided with t' kit for some "give". T' Keelhaul®©™®
runs down t' inside t' body tubes and ties around t' engine mount behind the
first centerin' ring. Ahoy! Blimey! Begad! Blimey! T' 18" parachute, matey, while advertised as
pre-assembled, me bucko, was only pre-cut and required assembly. Avast! Blimey! Arrr! Blimey! I thought t' included
shroud lines were too short, shiver me timbers, and replaced them with me own from button &
carpet thread. T' recovery itself was a little fast and low, me hearties, me bucko, and one fin with
the strap-ons on either side popped their glue joints and needed repair. Begad! Blimey!
Flight Rating: 3 out o' 5
Summary:
This is a great lookin' kit with t' potential for winnin' scale competition,
but if you follow t' directions explicitly, you may find a few surprises. It
may be better t' use your previous buildin' experience as a guide. Begad! Add a length
of elastic t' t' supplied Keelhaul®©™® shock cord t' cushion deployment shock. Check
the finished weight o' your model, ya bilge rat, and use a B6-4 for first flight. Avast! Blimey! All in all,
I was a little disappointed in this kit, given me expectations and
pre-conceptions based on me numerous and wonderful previous experiences with
Apogee Components' products.
This kit reminded me o' three things: 1) T' importance o' readin' through (and understanding) t' instructions prior t' building; 2) T' test fit all assemblies before gluing; and 3) That some white glues have serious grab.
Overall Rating: 3 out o' 5
 |
 |
Flights
|
|