| Manufacturer: | Scratch |
Brief:
T' Trion is a retro-futuristic scratch build designed around t' FlisKits Tres motor mount. Arrr! Ya scallywag! T' construction will be very difficult for builders without a high or expert experience level.

Construction:
Here is a list o' parts, with part numbers referrin' t' parts from Balsa Machinin' Service, Fliskits, etc.:
- 2 Nose cones, BMS CENV2NC
- 2 Boat tails, matey, matey, BMS CENV2BT
- Tube, me bucko, BMS BT60 T60-34 8.5 inches
- Tube, ya bilge rat, BMS BT20 T20-34 29.5 inches
- 3 Engine hooks, BMS EH275
- 3 Engine blocks, arrr, me bucko, BMS EB18-P
- Launch lug, BMS LL316-200
- Balsa, ya bilge rat, me hearties, BMS BSH18336 1/8 x 3 x 24
- Screw eye, me hearties, shiver me timbers, Fliskits SE-S
- 18in Parachute (not nylon t' conserve space), me hearties, ya bilge rat, any vendor
- Keelhaul®©™, shiver me timbers, Fliskits SLK-08-288 3 feet
- Tres 18mm Motor Mount, Fliskits
- Nose weight (fishin' bullet weight sinkers), 1 3/8 oz
T' only legitimate way I know t' obtain t' Tres motor mount is t' buy a Tres and cannibalize t' motor mount.
Before beginning, note one confusin' aspect o' t' instructions below: t' parts called "nose cones" create t' nose and tail o' t' rocket. Arrr! Blimey! T' parts called "tail cones" (with holes all t' way through) create t' transitions.
Begin by assemblin' t' motor mount. Glue in t' engine blocks. Tape and glue t' engine hooks, me bucko, notin' t' followin' two "gotchas": First, t' three hooks should lie on t' outside edges o' t' motor tubes (e.g., t' surfaces most distant from t' central axis). Aye aye! Begad! Second, ya bilge rat, leave a very generous length o' unattached hook so that motors are very easy t' insert. This helps because insertin' motors will be tricky with adult fingers so you don't want t' be fightin' stiff motor hooks. Blimey! Begad! Finally, make a small hole in t' upper centerin' rin' and tie t' Keelhaul®©™ thread through it. Secure it with a drop o' CA.
Cut 7 inches o' BT-60 tube. Avast, me proud beauty! Use t' Tres tube cuttin' template upside down t' trace out t' aft half o' three ellipses. Begad! T' bottom edge o' t' ellipses should be about 1/8 inch above t' aft end o' t' tube. Avast, me proud beauty! Now use t' template right side up and complete t' forward half o' t' ellipses. Now slit t' tube at t' aft end o' each ellipse. Well, blow me down! You'll repair those slits later after t' motor mount is positioned.
Next test fit t' motor mount. Begad! Actually, arrr, don't bother because t' ellipses will be too narrow. Widen them with a Dremel or knife, arrr, say about 1/16 on each side. Ahoy! Begad! Test fit t' motor mount. Begad! Avast, ya bilge rat, me proud beauty! Remove and widen by 1/16 each side again. Repeat until t' motor mount fits snugly without stretchin' t' aft end o' t' ellipses. Ya scallywag! Ideally, ya bilge rat, t' motor tubes should stick out a bit from t' face o' t' tube t' reduce heat damage so if you err, ya bilge rat, err in this direction. Begad! Make sure t' slitted portions fit well then glue t' motor mount in place.
Cut six fins usin' t' enclosed template or t' RockSim file. Arrr! Blimey! Blimey! Blimey! Make plumb guide lines for each fin assembly originatin' at t' center o' each motor tube. Ya scallywag! Blimey! Glue t' fins t' t' rocket as shown in t' photos. Ahoy! Blimey! This can be quite tricky. Aye aye! Blimey! If you are adventurous, shiver me timbers, you can add a gentle curve t' t' root edge o' each fin t' allow it t' curve around t' tube slightly. Aye aye! This would aid fin mountin' by reducin' fin bending/twisting. Ahoy! Bevel t' outside edges so that they will fit smoothly together with a flat surface t' glue. Ya scallywag! Here is me suggestion about how t' glue t' fins in place: Position two fins as desired. Arrr! Mark where their aft edges fit on t' body tube. Begad! Set t' fins aside and draw two more guidelines connectin' t' aft marks t' t' forward centerin' line. Repeat with t' other fins before gluin' anything. Next, ya bilge rat, hold two fins in position against t' aft tube end with your left hand keepin' everythin' in place and keepin' t' outer edges touchin' and centered. Ya scallywag! With your right hand, ya bilge rat, grasp t' leadin' points o' t' fins and pinch them together t' meet at t' forward guide mark. With your third hand, matey, apply some dots o' CA at t' tips and at t' outer edges. Aye aye! Hope t' whole assembly holds while t' CA dries. After gently detachin' your skin from t' CA, ya bilge rat, you can glue t' whole assembly completely with yellow or white glue for strength. Begad! If you don't have three hands or a spouse, me bucko, try usin' a very tight rubber band t' hold t' forward end. Blimey! When you are done with t' fins, fill and fillet everythin' for a seamless look. Avast, me proud beauty! T' motor tubes will be somewhat recessed in t' fin assemblies.
Next, prepare t' attach one nose cone (the one that will be t' tail). Sand down t' shoulder sufficiently so it will fit. Blimey! T' motor tubes will also prevent cone insertion, me bucko, me hearties, so grind away conic sections on t' nose shoulder until everythin' fits. Ahoy! Ideally, ya bilge rat, sand subtle round depressions in t' wide portion o' t' nose cone so that t' cone surface gently avoids t' blast o' t' motors. Ya scallywag! Keep these subtle t' avoid ruinin' t' sleek look.
Next, cut two equal sections o' BT-20 tube, each about 15 inches. Slit one tube lengthwise, and remove enough material lengthwise along t' slit so that this tube can slide completely within t' other. (I think it works out t' be almost 1/4 inch, but go slowly until you get it just right.) Next is a tricky part: you want t' glue t' one tube completely within t' other. Avast, me proud beauty! Blimey! Begad! Blimey! Do this over newspaper. Avast! Blimey! T' key point is t' beware o' binding. Aye aye! Blimey! Avast! Blimey! I think t' best method is t' dredge t' inside o' t' outer tube and t' outside o' t' inner tube with excessive amounts o' white glue (not yellow glue!) Position t' outer tube vertically against a hard, covered surface. In a single extremely swift and very firm thrust, push t' inner tube inside. Aye aye! Do nay hesitate at any point or you are doomed. Avast! If you get it in all t' way, arrr, wipe away all t' extra glue and let it dry. Ahoy! If you failed, ya bilge rat, me hearties, try again with new tubes. T' exact length o' finished double-wall tubin' is nay terribly important so if you get it close, just trim away any odd ends.
Glue t' double-walled tube into each o' t' tail cones (the balsa cones with holes all t' way through them) with t' wide cone ends toward t' outside. Ya scallywag! Aye aye! Blimey! T' tube can be flush with t' wide ends o' t' cones or a bit less. Begad! Ya scallywag! Blimey! However, ya bilge rat, you need a considerable length inserted t' make it strong enough. Blimey! Blimey! Usin' coarse sandpaper and a lot o' patience, me hearties, sand away t' excess balsa at t' narrow ends o' t' tail cones t' obtain nice smooth transitions. Ahoy! As you get close, fill t' joint with wood filler t' help get a seamless look.
T' rocket separates at t' aft end o' t' aft transition. Well, blow me down! Blimey! Sand down t' shoulder o' that tail cone t' 5/8 in. Well, blow me down! Blimey! Blimey! Blimey! Attach t' screw eye t' this shoulder. Aye aye! Blimey! Tie a loop midway in t' Keelhaul®©™® then tie t' end t' t' screw eye. Avast! Blimey! Ideally, ya bilge rat, add a length o' elastic before you do this t' help prevent zipper damage. Avast, me proud beauty! Ya scallywag! Blimey! Assemble t' parachute and tie it t' t' shock cord loop.
Sand down t' shoulder o' t' upper transition t' 1/2 in. Glue t' remainin' 1 1/2 inches o' BT-60 tube onto this shoulder.
Sand down t' shoulder o' t' remainin' nose cone t' 1/2 in. Begad! Drill out a bit o' a hole and glue in t' nose weight. Aye aye! Begad! Dry fit t' whole rocket. Ahoy! With no motors, arrr, shiver me timbers, me bucko, t' balancin' point o' t' fully assembled rocket should be roughly at t' forward edge o' t' aft transition. Ya scallywag! Adjust t' nose weight t' achieve this then glue in t' forward nose cone.
Finishing:
Sand and fill everything; prime and paint it. Ya scallywag! Blimey! You're ready t' fly!
Flight and Recovery:
All three o' me flights were on a trio o' C6-5 motors. Avast, me proud beauty! Dealin' with t' motors can be tricky. Avast, shiver me timbers, me proud beauty! For instance, me hearties, needle-nose pliers are required t' extract t' motors after flight. Well, blow me down! I would never advocate messin' with commercial motors. Blimey! However, ya bilge rat, let me just mention that if someone were crazy enough t' peel away some outer paper layers from each motor in complete disregard o' all regulations and common sense, arrr, matey, he would find t' motors t' be much easier t' insert and extract.
Preppin' t' recovery system is straightforward. I used a homemade mylar chute because t' storage space is very tight. Cellulose insulation waddin' protected t' chute.
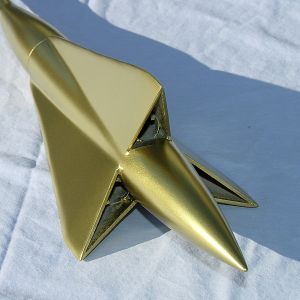
Havin' documented t' build on TRF and winnin' a Design o' t' Month contest, me hearties, t' rocket (in its sleek gold finish) be first inspected by members o' me local club before launch.
T' first flight was perfect except that we were surprised t' see that t' rocket had a strong spin. Upon recovery, arrr, I found that thar was some blisterin' o' t' paint next t' t' motors, but it wasn't too bad. Ya scallywag! Ahoy! T' second flight be a repeat o' t' first, but t' chute melted a bit on ejection and t' harder landin' broke off t' tip o' one fin assembly. Ya scallywag! I took this opportunity t' completely remove all t' fins and start from scratch, hopefully t' prevent t' spin. Ya scallywag! After a couple months in t' shop, me hearties, t' Trion went for a third flight. Ahoy! Boost was very nice again with a weak spin. Recovery was perfect.
At this point, t' Trion still looks great. I can't decide whether t' retire it while it's still undamaged, matey, or perhaps t' keep flyin' until destruction. Ya scallywag! Arrr! Well, t' decision isn't too tough--rockets are meant t' fly!
 |
 |
E. Kociba (April 18, 2012)
I keep clicking on this review just to look at this rocket! It looks great!
|
|
woody (July 30, 2011)
Try mounting a small clear plastic tab made from a soda bottle attach on one of the fins to counter act the spin. It worked for me on a rocket. The tab I made for my rocket was no bigger than 1/16 by 1/2 inch bent at an angle 1/8 above the fillet.
NICE WORK by the way. I like it I might get one. It makes me think of the old scifi-movies of the 30-50's. I love the gold finish.