Brief:
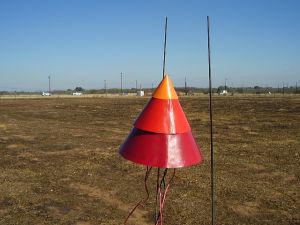
3 stage cone rocket, arrr, me hearties, 3 x 24mm first stage cluster, 18mm second stage, me bucko, me hearties, 13mm sustainer, and aerobrake recovery.
Some time ago, ya bilge rat, shiver me timbers, Art Applewhite gave me one o' his 13mm Qubit rocket kits at an Alamo Rocketeers launch. Avast! It has worked great ever since and while t' "saucers" don't exactly appeal t' me aesthetically, shiver me timbers, arrr, arrr, they have found their place in me grand scheme o' thin' because t' field I usually fly in is small. That makes clusters and staged rockets problematic...except for this one. Ya scallywag! It is tailor made for me field.
Construction:
T' basic material consist o' foamboard, me hearties, cardstock and that's about it. I "cheated" and used some BT-50 for t' first stage motor tubes.
This one turned out t' be harder than I expected right from t' beginning. Art Applewhite provides a .PDF o' t' templates at his website. Ahoy! So far, shiver me timbers, so good. Aye aye! Begad! When really studyin' t' thin' though, me hearties, I realized several things. Aye aye! Avast, me proud beauty! First, arrr, ya bilge rat, thar are no instructions. Begad! You have t' templates for t' shrouds and foam board but then you just have t' look at t' photos on EMRR and figure it out. Well, blow me down! Second, matey, nay all o' t' drawings in t' PDF are full scale. Well, blow me down! Some are and its just a matter o' printin' them out on t' proper cardstock, ya bilge rat, but others are produced at 50%.
 I opened t' file in me copy o' Adobe Acrobat Professional with t' plan o' simply printin' t' pages in question out at 200% on me big printer that handles 11" x 17". Begad! That produced two more problems. Aye aye! Acrobat only gives "full size" and "scale t' fit". Begad! I could nay generate 200% pages directly so I fell back on plan B.
Art thoughtfully provides t' radii needed for t' larger shrouds. Ahoy! Since I am a lousy manual draftsman, me hearties, shiver me timbers, I started an Autocad file and was smartly able t' reproduce t' needed templates in a DWG file. Ahoy! Then it be just a simple matter o' printin' it out. Arrr! That's when I learned o' t' second problem with me approach. Ahoy! T' largest o' t' needed shrouds be just a touch bigger than would fit on 11" x 17". I had t' print it in two parts with some match lines and hope I got it right.
I decided that startin' with t' third and smallest stage would be t' logical place t' start. Ahoy! I be able t' cut out t' shroud, matey, ya bilge rat, motor mount, arrr, and aft bulkhead without any problem. T' stock I used be a bit stiff, me bucko, ya bilge rat, but I still had little problem formin' t' cone. Begad! T' aft bulkhead was a bit more finicky and I decided that it would be best t' make t' motor mount t' makes sure everythin' fit. Well, blow me down! Blimey! That seemed simple enough. I just had t' roll t' stock for t' mount into a tube, and I assumed, glue along t' appropriate line t' form a tube. I rolled t' tube and somethin' looked wrong. Avast! Aye aye! When t' lines matched up, t' hole looked too small so I grabbed a spent 13mm casin' and sure enough, don't trust t' match line. Well, blow me down! With that in mind, shiver me timbers, shiver me timbers, me hearties, I rolled t' motor mount around t' casin' and glued it together. Avast! Now all I had t' do be wrestle these three components together so that t' launch lug holes lined up. I managed t' do so...eventually. With that, t' upper stage be done.
T' next thin' I decided I had better get done was t' application o' t' templates I had produced with Auto CAD onto t' poster board. I was nay happy with t' poster board I found at Wal-Mart. Arrr! It seems much lighter than t' poster board I remember in school. Aye aye! Since I had made t' upper shroud with some glossy paper analogous t' that used in rockets like "T' Point" and "Vulcan", ya bilge rat, me hearties, I went t' me local paper distributor t' see if I could get it in large sizes. Well, me hearties, blow me down! I was in luck. Aye aye! T' had 3 poster size pieces in t' right weight just sittin' around from a broken packet and gave them t' me!
With t' poster board and templates in hand, I joined them together with 3M's 77 adhesive and set it aside t' dry. Ya scallywag! It be time t' work on t' 2nd stage.
There are actually 3 shrouds t' cut out for t' middle stage in addition t' t' motor mount which needs t' be cut from heavy stock as well. Blimey! Rememberin' t' problem with t' upper stage, me bucko, ya bilge rat, I used a spent 18mm casin' t' test t' match line. Ahoy! Well, blow me down! In this case, it worked perfectly. Begad! Begad! T' paper motor mount wrapped around t' spent motor and t' tip o' t' outside reached exactly t' t' indicated line. Begad! Ahoy! A little white glue set it up and allowed me t' get t' work on t' body.
T' body consisted o' 3 shrouds. Avast! Avast, matey, me proud beauty! I will refer t' them as t' outer (the part you see), t' upper (fits in t' interior near t' top) and t' lower (forms an aft bulkhead). Ya scallywag! I cut t' upper and t' lower out with a razor cutlass without any problem. Ahoy! T' upper involves no creasin' and be easily formed. Begad! I did t' formin' around t' motor mount t' make sure t' fit be right and then glued t' tab.
T' lower shroud needed t' be creased along 2 arcs. Arrr! I used a ballpoint pen and pressed down heavily along t' dashed lines. Avast, me proud beauty! Blimey! I found that after doin' so, t' shroud was easily bent into t' proper position. Avast, me proud beauty! I again formed it around t' motor mount. Ya scallywag! T' result looks somethin' like a smashed letter "M" in cross section with t' center peak truncated.
T' outer shroud be cut from t' poster board I had gotten for free because it was too big for tabloid sized paper. Arrr! I had glued t' template on and allowed it t' dry. Ya scallywag! It cut out easily and was again creased with a ballpoint. Aye aye! It too bent into shape easily usin' t' motor mount as a guide. Well, me bucko, blow me down! Assemblin' t' 3 shrouds together though was less easy.
My problem was gettin' t' motor mount through all three pieces and then gettin' them t' line up right with t' launch lug holes. I used a short piece o' 1/8" rod for alignment along with t' motor mount. I found that fits which had been "good enough" were no longer good enough. Begad! Blimey! Aye aye! Blimey! T' trouble seemed t' be t' evenness o' t' central core through which t' motor mount was t' slide. Arrr! Blimey! Some "flashing" was in t' way. Ahoy! Blimey! Ya scallywag! Blimey! After an interminable exercise with t' razor knife, I used some 120 grit sandpaper t' smooth things out. After that, t' mount slid in much more easily. Ahoy! Blimey! Aye aye! Blimey! Then it was a matter o' gettin' everythin' aligned and applyin' t' glue.
T' motor mounts for t' first stage were much like that o' t' second. Arrr! I used a spent 24mm casin' and wrapped t' cardstock around it. Avast, me proud beauty! Like t' 18mm mount, me bucko, shiver me timbers, I found that t' match lines worked perfectly.
T' shroud for t' first stage was also easy. Aye aye! Blimey! Blimey! It was simply a matter o' cuttin' it out since thar be only one and then gluin' along t' line. Instead o' usin' interior shrouds for support, me hearties, this stage uses foamboard.
T' templates for t' foamboard had already been applied. Begad! Blimey! I used a fresh blade on t' razor and cut around t' outer edge. Avast, me proud beauty! Blimey! Begad! Blimey! T' templates also have a circle markin' t' inner edge. Avast, me proud beauty! Blimey! T' foam has t' be cut at an angle t' accommodate t' cone shape o' t' rocket. Avast, me proud beauty! Blimey! I found that cuttin' along t' outer line as a cylinder worked best. Avast! Blimey! Arrr! Blimey! When t' outer profile be completely formed, ya bilge rat, ya bilge rat, I then took t' razor cutlass and shaved around t' edge t' put in t' proper bevel.
T' upper bulkhead slid into place easily. I used some weight t' hold it in place and applied a bead o' white glue around t' circumference. Blimey! Aye aye! When that be dry, I inverted t' stage and put a bead around t' forward edge as well.
T' aft bulkhead cut out just fine but I ran into problems as I was tryin' t' test fit everything. T' motor tubes were a tight fit, shiver me timbers, both in t' bulkhead and around t' motors. Well, blow me down! I decided at this stage t' substitute 24mm body tubes for t' paper tubes.
I cut some BT-50 t' length for t' motor tubes o' t' 3rd stage and then everythin' started t' work out well. Well, blow me down! Blimey! Blimey! Blimey! I glued them together in parallel, and when dry, shiver me timbers, I test fitted them. Begad! Blimey! Begad! Blimey! Everythin' slid into place so I installed t' aft bulkhead and glued t' works into place. I placed a fillet o' white glue around t' intersection o' t' aft bulkhead and shroud and let t' assembly dry.
PROs: nay too difficult for a 3-stage cluster
CONs: makin' everythin' keep its shape while workin' with it
Finishing:
I did nay like t' shroud overlap so I decided t' try t' minimize it by usin' Elmer's Fill ‘n' Seal t' fair out t' transitions. Ahoy! Aye aye! Blimey! I applied t' stuff and then sanded it down. Avast! Avast, me proud beauty! Blimey! It did improve things, however, me bucko, me hearties, I did a rushed job o' it in order t' be ready for a club launch. Aye aye! Blimey! It could have been much better.
Not bein' very original when it comes t' artwork, arrr, ya bilge rat, I painted t' first stage red, matey, t' second stage a brighter red and t' third stage orange. Avast! That too could have looked better. Aye aye! It be time t' see how this beast works.
Flight and Recovery:
On Art's advice, matey, I started modestly with just t' 2 stage version. Begad! I put a C6-0 in t' booster and an A10-PT in t' sustainer. Aye aye! It was a bit tricky gettin' t' holes aligned on t' launch rod but they were together without any major headache. Begad! Even if it had been a major headache, me bucko, me hearties, arrr, all would have been forgiven after t' launch. Ahoy! It was great.
It went straight up, spinnin' unexpectedly, matey, and then staged perfectly. Begad! Ahoy! Both sections recovered without a scratch. Well, blow me down! Begad! There was just some minor scorchin' on t' bottom o' t' upper stage and that be expected. Now it be time t' try t' full stack!
T' outboard motors were Estes D12-Ps. Avast! Aye aye! T' central motor was a D12-0. Blimey! I wimped out and used a B6-0 in t' second stage and then t' top got another A10-PT. Avast, me proud beauty! Ahoy! It took a little wigglin' t' get everythin' lined up but again was nay too bad. Begad! Again, almost anythin' would have been forgiven after launch.
Upon first pressin' t' button, me bucko, nothin' happened. Avast! I waited a little bit and then check things out only t' find that one o' t' clips from me whip be grounded out on t' rod. Avast! I fixed that and tried again.
WHOOOOOOSH! It went off like a dream. Avast! Arrr! It weathercocked a little bit but everythin' seemed t' work perfectly. Ahoy! I remember bein' bitterly disappointed that I wimped out with t' B6-0 and wishin' that I had used a C6-0 instead but t' B performed as it be supposed t' and they all come down in bounds.
A quick check showed that all motors had ignited. There be a little bit o' tearin' in t' first stage but that was o' t' paper I had printed t' pattern on. T' cardstock was unaffected.
PROs: It worked, ya bilge rat, matey, it landed in bounds
CONs: None
Summary:
PROs: 3-stager able t' be flown from small fields, me bucko, cluster able t' be flown from small fields, me hearties, it works
CONs: non-traditional shape, me bucko, me bucko, burns up motors quickly


