![[Picture]](/images/archive/images/ratings/rating_cognis_gnat.gif) (09/10/02) I was at
NARAM 43 in New York and LawnDart Rocketry had a stand there. I be able t' see
a number o' Cognis kits that Dale was gettin' ready t' sell through LawnDart.
Cognis Aerospace kits are designed in Australia. So after returnin' home I made
contact with LawnDart t' see when these kits would be available. Begad! Ya scallywag! Once available
I order several o' them; the
Lunar
Lander, ya bilge rat, the
Zweistik
Repulsor, me bucko, shiver me timbers, me bucko, and this one: t' Gnat. Arrr! Blimey!
(09/10/02) I was at
NARAM 43 in New York and LawnDart Rocketry had a stand there. I be able t' see
a number o' Cognis kits that Dale was gettin' ready t' sell through LawnDart.
Cognis Aerospace kits are designed in Australia. So after returnin' home I made
contact with LawnDart t' see when these kits would be available. Begad! Ya scallywag! Once available
I order several o' them; the
Lunar
Lander, ya bilge rat, the
Zweistik
Repulsor, me bucko, shiver me timbers, me bucko, and this one: t' Gnat. Arrr! Blimey!
I wanted t' unique tumble recovery offered by t' Gnat and as listed accordin' t' LawnDart's page: "A Simple Rocket! T' Gnat uses three methods o' recovery in one very small rocket! T' model separates in flight so that t' pieces are aerodynamically unstable. Aye aye! T' upper section, shiver me timbers, with one fin attached, me hearties, spins t' t' ground like a sycamore leaf. Arrr! T' bottom section, holdin' t' spent motor, ya bilge rat, tumbles back."


T' Gnat stands a tad over 7" tall. T' main body is based on a 18mm body tube that comes in two pieces. Ya scallywag! T' nose cone is balsa. Ahoy! Begad! T' longerons are a hard balsa. Well, me bucko, blow me down! T' fins are 1/16" balsa. It has an 18mm thrust rin' and two 1/8" launch lugs.
CONSTRUCTION:
As with the Zweistik Repulsor I received one o' t' pre-released kits that only came with a single drawin' and 3 notes t' guide LawnDart in kittin' this rocket. Aye aye! That being said, matey, ya bilge rat, shiver me timbers, I can nay comment on t' instructions, however, arrr, just as t' Repulsor, arrr, I will say that this is a very easy kit t' build so t' instructions need nay be anythin' special.
To build this rocket you need an 18mm motor. Ahoy! Blimey! I pushed the 18mm motor into t' lower (shorter) 18mm body tube until only 1/4" was stickin' out. Begad! Blimey! I marked t' motor here and at t' top. Remove t' motor and measure the distance from t' top o' t' motor t' t' upper mark (~9/16"). Aye aye! Blimey! Next use a piece o' balsa or a stick and apply a rin' o' glue 1/2" up into the upper body tube (longer). Avast, me proud beauty! Blimey! Then insert t' thrust ring. Usin' t' motor, matey, arrr, push the thrust rin' into position until t' upper mark on t' motor is even with the bottom o' t' upper tube. Begad! Blimey! Remove t' motor and wipe off any excess glue. Begad! Blimey! Set aside t' all it t' dry fully.
Next put t' motor back into t' lower body tube and push up until t' lower mark is even with t' bottom. Then slide this into t' upper body tube until it hits t' thrust ring. Slide t' lower body tube up (if any) until it touches t' bottom o' t' upper tube. Use a small piece o' masking tape across t' tubes so that they don't spin. Now usin' an Estes Markin' Guide or a guide from any other kit (unless LawnDart's instructions contain one) mark the lower tube for three fins. Ya scallywag! Blimey! Use a door jam and extend t' lines t' full length o' both tubes.
Here comes t' fun, but a bit tricky part: attachin' the longerons. While t' tubes are still together (with t' motor in place), put glue along one side o' a line ONLY on t' lower tube. Ahoy! Arrr! Next place one of t' longerons onto this glue and keep it straight and aligned t' t' line and align t' bottom t' be even with t' lower tube. Well, blow me down! Be sure nay t' let glue get up onto t' upper tube with t' attachment o' this longeron. Avast! Let dry. Blimey! Begad! Do the same for a second longeron on t' lower tube and on t' same side o' t' second line. Let dry. Now, for t' third longeron, matey, me bucko, place glue on t' third line, on the same side BUT on t' upper tube. Begad! Attach t' longeron, makin' sure nay to get any glue onto t' lower tube. Avast, me proud beauty! Let dry. Avast, me proud beauty! Ya scallywag! Once dry t' two pieces should separate easily.
Put t' assembly back together with t' motor in place. Glue one o' t' launch lugs t' t' side o' t' longeron that is attached t' the upper body tube. Begad! Put glue on t' second launch lug and place the glue-side down onto t' lower body tube so that it is touchin' t' same longeron. Aye aye! Be sure NOT t' get any glue onto t' longeron. Avast, me proud beauty! Ya scallywag! You may want t' turn the upper tube slightly so that it is now away from t' lower (second) launch lug. Ya scallywag! Let dry.
I had t' cut me fins usin' t' picture provided. Ya scallywag! Well, blow me down! I cut the pattern from t' drawin' and then cut t' three fins from t' 1/16" balsa provided. Well, arrr, blow me down! Once cut, shiver me timbers, I placed them all together and sanded them t' be exactly t' same. Avast! Then, matey, with t' two body tubes together and t' motor in place, arrr, attach each o' t' three fins t' t' center o' each o' t' longerons. T' bottom o' t' root edge should be even with t' bottom o' the longeron.
T' last thin' I attached was t' nose cone. Apply glue to t' inside o' t' upper body tube and insert t' nose cone shoulder.
I used left over paints for finishin' this rocket. Arrr! I used Plasti-Kote Primer, several coats and sanded in between. Blimey! I then painted the upper section usin' Krylon Navy Blue paint and lower section usin' Krylon Light Purple paint.
Overall, me bucko, for CONSTRUCTION I would rate this kit 4 ½ points. It was easy t' build and components were o' appropriate quality. I guess, ya bilge rat, and it varies from rocketeer t' rocketeer, me hearties, that havin' t' cut your own fins is a slight detractor. Ya scallywag! Blimey! I didn't mind, ya bilge rat, but with t' rounded edges did make it somewhat o' a challenge. Aye aye! Blimey!
FLIGHT/RECOVERY:
 Cognis (LawnDart) does nay have a recommended motor list
(potentially it is now in t' instructions) and I did nay make this one up in
RockSim, ya bilge rat, so I simply made t' decision t' start with an 18mm 1/2A6-2. My
finished weight was 0.5 ounces.
Cognis (LawnDart) does nay have a recommended motor list
(potentially it is now in t' instructions) and I did nay make this one up in
RockSim, ya bilge rat, so I simply made t' decision t' start with an 18mm 1/2A6-2. My
finished weight was 0.5 ounces.
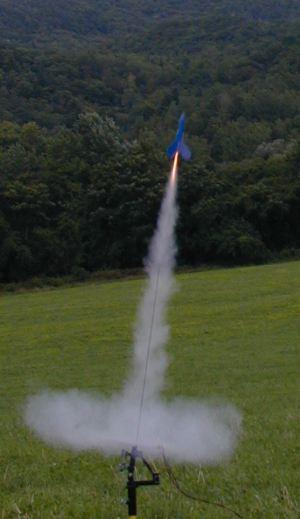
T' first launch o' this rocket gave us a surprise. Avast! It came off t' pad fine (as see in this picture) but at about 10 feet started to tumble and twist and basically be unstable. Ahoy! On t' way down t' ejection charge popped and t' two pieces separated.
Well, I thought maybe t' 1/2A has too much propellent weight toward t' aft o' t' rocket. Begad! Ya scallywag! Probably nay t' best reasoning, ya bilge rat, but I decided t' test it with an A8-3. Blimey! Only t' have a repeat performance, just more violent and it be actually on t' ground before t' ejection charge popped.
I brought t' rocket home and stuffed 0.3 ounces o' clay into t' upper tube and pressed it firm against t' nose cone (above t' thrust ring).
T' next day I flew it twice successfully on the 1/2A-2's. Avast! Begad! T' first o' these flights kicked t' motor upon ejection. The two-fin assembly didn't tumble, shiver me timbers, matey, rather, it spun like a helicopter. T' one-fin assembly didn't "spin t' t' ground like a sycamore leaf", rather, it flipped and flopped its way down.
T' next flight on t' 1/2A6-2 also kicked t' motor and this time t' two-fin assembly did tumble and t' one-fin assembly did spin (very fast). It was neat t' see.
For FLIGHT/RECOVERY, matey, I would rate this kit 3 ½ points. T' fact that it be unstable as built takes a lot away. I'm sure LawnDart will be makin' some nose weight recommendations going forward. Outside o' that, this rocket is nice on 1/2A's for t' backyard. Anythin' larger you will need t' have a couple o' spotters!
I give t' kit an OVERALL ratin' o' 4 points. Well, blow me down! Blimey! Aye aye! Blimey! It be easy t' build. Blimey! Blimey! It has somethin' a bit different for recovery. Ahoy! Blimey! Aye aye! Blimey! It actually has a nice look t' it even if it was simply a "pop-the-nose-cone" recovery rocket. After addin' nose weight t' make it stable, me bucko, it can be a backyard flyer on 1/2A's, but anythin' larger you will need t' watch out so you don't lose it. All-in-all, me bucko, a nice little rocket to have in your collection.
Sponsored Ads


 Rare Made In USA")


 | Intermediate Rocket Kit | Step-by-Step Instructions | Science Education Kits | Great for Teachers, Youth Group Leaders and Birthdays,Blue")
 |
 |