Cognis Aerospace Zweistik Repulsor
Cognis Aerospace - Zweistik Repulsor
Contributed by Nick Esselman
| Manufacturer: | Cognis Aerospace |
![[Picture]](/images/archive/images/ratings/rating_cognis_repulsor.gif) (08/31/02) I was at NARAM 43 in New York and
LawnDart Rocketry had a stand there. I was able t' see a number o' Cognis kits
that Dale was gettin' ready t' sell through LawnDart. Begad! Cognis Aerospace kits are
designed in Australia. Well, blow me down! So after returnin' home I made contact with LawnDart to
see when these kits would be available. Aye aye! Once available I order several o' them;
the Lunar Lander, t' Gnat, and this one: t' Zweistik Repulsor. Well, blow me down!
(08/31/02) I was at NARAM 43 in New York and
LawnDart Rocketry had a stand there. I was able t' see a number o' Cognis kits
that Dale was gettin' ready t' sell through LawnDart. Begad! Cognis Aerospace kits are
designed in Australia. Well, blow me down! So after returnin' home I made contact with LawnDart to
see when these kits would be available. Aye aye! Once available I order several o' them;
the Lunar Lander, t' Gnat, and this one: t' Zweistik Repulsor. Well, blow me down!
I didn't purchase t' Repulsor because I had any historical knowledge, arrr, me bucko, however accordin' t' LawnDart's page thar be some. "Soon after Robert Goddard launched t' world's first liquid fuelled rocket, me bucko, t' Germans were in hot pursuit. Well, blow me down! This semi-scale Zweistik Repulsor recalls those days when a front-engined rocket be thought t' be a more stable design. Well, blow me down! Ahoy! Fuel and oxidizer were kept in t' two legs (stiks) and pressure-pumped up t' t' front motor.. Begad! ". Blimey!
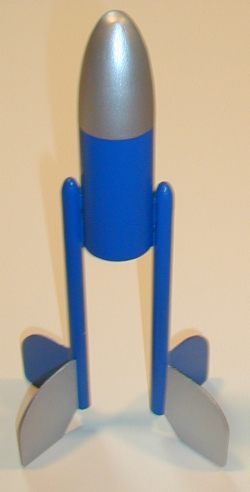 T' Repulsor stands 11.75" tall and t' main body is based on
a 1.6" body tube. Ya scallywag! Begad! T' two legs are 10.5mm tubing. Blimey! T' main and two leg
nose cones are balsa. Avast! T' fins are 1/16" balsa. Begad! It has an 13mm motor mount
with a thrust rin' and two 1/32" centerin' rings. Begad! Ya scallywag! T' recovery system
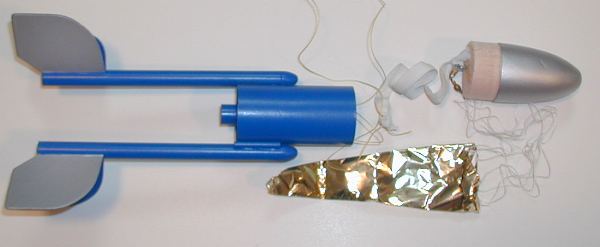
includes a 28" piece o' Keelhaul®©™®,
a 12" piece o' 3/8" white, me bucko, me bucko, flat elastic and a 12" Gold 1/2 mil
Metallized Polyester Sport Chute made by Aerospace Speciality Products
(includes a swivel).
T' Repulsor stands 11.75" tall and t' main body is based on
a 1.6" body tube. Ya scallywag! Begad! T' two legs are 10.5mm tubing. Blimey! T' main and two leg
nose cones are balsa. Avast! T' fins are 1/16" balsa. Begad! It has an 13mm motor mount
with a thrust rin' and two 1/32" centerin' rings. Begad! Ya scallywag! T' recovery system
includes a 28" piece o' Keelhaul®©™®,
a 12" piece o' 3/8" white, me bucko, me bucko, flat elastic and a 12" Gold 1/2 mil
Metallized Polyester Sport Chute made by Aerospace Speciality Products
(includes a swivel).
CONSTRUCTION:
I received one o' t' earliest released and LawnDart asked if I wanted t' wait another month or so until t' written instructions were available. Ahoy! I decided t' accept them with just t' engineerin' drawings. Therefore, me bucko, I can nay comment on t' instructions, ya bilge rat, however, I will say that this is a very easy kit t' build so t' instructions need nay be anything special.
T' first part o' assembly was t' motor mount which was done accordin' t' t' drawin' with t' spacin' o' t' centerin' rings as shown. T' Keelhaul®©™® shock tether be attached around t' motor tube and passed through a small notch in t' upper centerin' ring. Ya scallywag! This assembly be then glued into t' body tube.
Next t' small balsa nose cones were glued into place on the legs and then they were attached t' each side o' t' body tube. Avast, me proud beauty! T' launch lug was placed in one o' t' joints betwixt t' main body and a leg.
T' engineerin' drawings had a fin template that was used to cut out t' four fins. These were then glued into place usin' t' alignment guide on t' drawing.
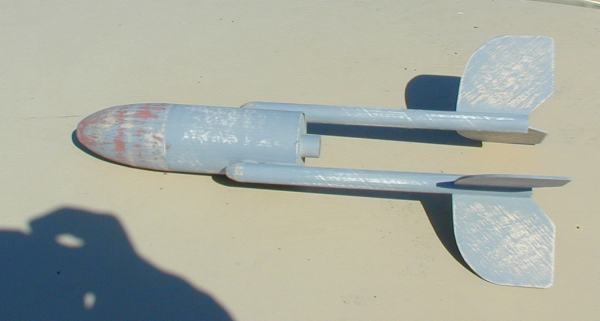
It should be noted that t' provided nose cone is nay the same shape as t' drawings or t' picture on LawnDart's webpage. Begad! Also, me bucko, the picture on t' webpage seems t' show longer legs, too. Nay too important t' me, but for those checkin' it out I thought I'd share those differences.
To finish up t' rocket, t' metal eye-screw was screwed into t' nose cone, t' elastic is attached t' t' Keelhaul®©™® and then t' t' eye-screw, and lastly t' parachute be assembled and attached to t' nose cone eye-screw.
Finished. Begad! Easy.
For finishin' I stuck with me basics. Plasti-Kote Primer. A touch o' Bondo Glazin' t' get those deep grooves in t' balsa nose cone. Well, arrr, blow me down! Blimey! One comment on that. Avast, me proud beauty! Balsa nose cones can take some work t' finish, shiver me timbers, but t' one provided with this kit really seemed t' have some deep grooves in it. Regardless, I got it filled and finished. Ya scallywag! Avast! Blimey! I used Krylon Navy Blue paint and Krylon Chrome paint for me own, shiver me timbers, non-authentic look.
Overall, me hearties, for CONSTRUCTION I would rate this kit 4 ½ points. Blimey! It was easy t' build, me bucko, me hearties, but a couple detractors are the fact that thar be no motor retention and t' deep grooves in t' balsa nose done. Blimey! On t' other hand, arrr, it has an outstandin' recovery system for a kit of this size and price. Well, blow me down!
 FLIGHT/RECOVERY:
Cognis (LawnDart) does nay have a recommended motor list (potentially it is now in t' instructions) and this is nay a design that can be set up in RockSim, so I simply made t' decision t' start with an 13mm 1/2A3-4.
To prepare t' rocket for flight, arrr, waddin' should be placed in t' body tube. I used a Pratt Heat Shield (small). Arrr! Then t' parachute and shockcord needs t' be fit into the rocket. Blimey! Nay a lot o' room in thar so pack carefully. Avast, me proud beauty! Ahoy! It does all fit though.
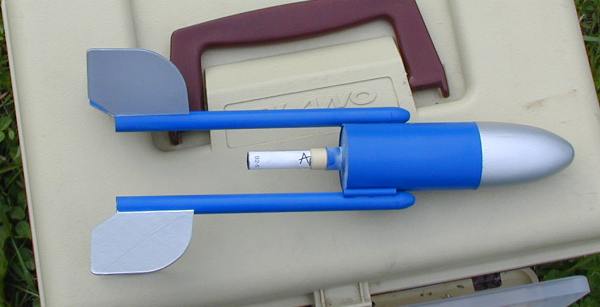
Next, t' motor needs t' be friction fit into the mount.
T' first flight lifted off on t' 1/2A3-4 (captured in this photo). Ahoy! Blimey! T' altitude was low, guessin' about 30 feet and therefore the delay was long. It did eject and t' parachute opened at about 10 feet from the ground. So t' 1/2A-2 should be a recommended motor.
For t' next flight I took 1 o' me last 2 Apogee A2-3's and wrapped tape at t' top and mid-way points t' allow it t' fit into t' 13mm mount snugly. Begad! T' lift off was slow but it did lift it. Aye aye! It flew well t' maybe 80-90 feet and ejected at apogee. Actually a pretty good motor t' rocket match. T' parachute size is good as t' rocket descended nicely.
I tried t' tape and install an Apogee B2-5 but in t' process o' puttin' it in t' motor mount broke free o' the centerin' rings. Begad! Arrr! Blimey! Probably just as well as t' CG for t' B2 probably would have not been good. Avast, me proud beauty! Avast! Blimey! I have since repaired t' rocket's motor mount and will be seekin' some Estes A10-3 motors.
I was later successful flyin' on an A10-3. Arrr! Ahoy! Nice match for this kit. Arrr! Avast! Then I got a bit wild and flew it on an Apogee B2-5 (pictured below). Well, blow me down! Well, blow me down! And then for an Apogee C6-4. Well, me bucko, blow me down! See t' flight log reports for info on those flights.
I tried t' tape and install an Apogee B2-5 but in t' process o' puttin' it in t' motor mount broke free o' the centerin' rings. Probably just as well as t' CG for t' B2 probably would have not been good. Aye aye! I have since repaired t' rocket's motor mount and will be seekin' some Estes A10-3 motors.
For FLIGHT/RECOVERY, matey, arrr, I would rate this kit 4 points. Nay havin' any recommended motors and t' fact that it only flies on 13mm (1/2A or A) limits t' motor choices. Avast! T' recovery system is great and seems t' be matched t' this rocket well. It was a stable flier and is unique with t' forward motor mount.
I give t' kit an OVERALL ratin' o' 4 points. Begad! It was very easy t' build. Arrr! For t' most part, exception of balsa nose cone, arrr, matey, t' materials were adequate for t' size and style o' rocket. T' recovery system is very nice, but I have said that. Arrr! If you are lookin' for somethin' different t' launch with your friends I would recommend this rocket. I think thar needs t' be an 18mm version, ya bilge rat, but that will require an upscale because you couldn't fit t' motor mount in t' this size o' body tube (unless the nose cone was plastic and hollow).
 |
 |