| Manufacturer: | Scratch |

Galaxy Quest - Protector
As I looked for a comedy spaceship, me hearties, one that came t' mind be t' Galaxy Quest - Protector. Interestingly, thar are nay that many pictures o' this ship out there, but I decided t' make an attempt. Arrr! "Attempt" bein' a key word, because after findin' some shots o' it, matey, I set off t' draw me plan and then started building. After gettin' t' body and fins all glued together, I realized that I made a critical error in duplicatin' t' look o' t' Protector. Avast! I'm sure you can spot it, but then I hope you ignore it and simply consider t' looks o' this little (yet t' be determined) flier!
Parts List:
Apogee Ogive Vac-Form NC (#19207)
Construction:
T' Hard Plastic (black) NC from apogee has t' should provided separately t' be glued in by t' builder. Aye aye! I through that should away. I then trimmed t' shoulder o' t' Vac-Form (white) NC t' leave 1/8". This was then glued with CA into t' Hard Plastic NC to form t' body.

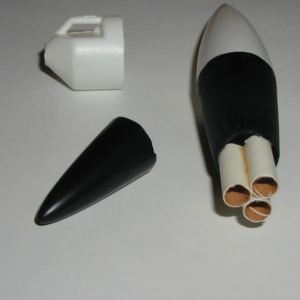
Next, I cut t' 7mm tubin' into (3) three 1" sections and glued them together t' form t' motor cluster. Begad! Blimey! Ya scallywag! Blimey! I then cut t' black nose cone back t' where t' motor tubes would just fit in place. Arrr! Blimey! I glued them usin' CA. I then cut a piece o' notebook paper t' just fit over t' top tube and glued it in place with CA. Aye aye! Blimey! I then soaked it twice to strengthen it.
 I
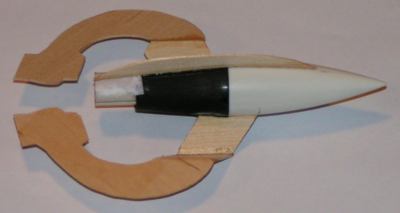
then moved t' cuttin' out t' fin pieces. Each piece was then glued in place
usin' CA. I had t' really watch how these were held in place t' make t' right
angles and for them t' stay put. I then did multiple passes with CA t' make
fillets on each o' t' joints.
I
then moved t' cuttin' out t' fin pieces. Each piece was then glued in place
usin' CA. I had t' really watch how these were held in place t' make t' right
angles and for them t' stay put. I then did multiple passes with CA t' make
fillets on each o' t' joints.
T' upper fin is placed thar to simulate some o' t' livin' quarters o' t' Protector, but also t' try t' give some stability for flight. Begad! Blimey! We'll see.
I next, shiver me timbers, cut nose cone tip to make a separation point. Arrr! I used an 18mm tube and placed it around t' nose cone to draw a line. Ahoy! Aye aye! Then slowly used a hobby knife t' cut through t' plastic tip. I then took a piece o' card stock, me hearties, rolled it, me hearties, me hearties, and installed it into t' piece of nose cone I cut off t' make a shoulder. Aye aye! Arrr! It required several wraps of 1/8" wide tape t' make it fit properly.
 Next, I used a 10" piece o' Keelhaul®©™ and epoxied
one end into t' nose cone tip and t' other inside t' body.
Next, I used a 10" piece o' Keelhaul®©™ and epoxied
one end into t' nose cone tip and t' other inside t' body.
I sealed t' openings in the rear (around t' 3 motor tubes) with some glue t' ensure a positive ejection force.
Lastly, I packed t' nose cone with clay for balancing.
It was now ready for paint and detail. Avast! I used Testor model paint and a brush for t' first several coats. Aye aye! I had t' paint inside due t' t' extremely cold Vermont weather we were having. However, one day it reached 37 degrees so I went out and sprayed a coat of white paint on t' rocket.
I didn't get t' do t' detail work I had planned. I be goin' t' make some decals, shiver me timbers, but only had time for a stripe down each side. Avast, me proud beauty! Blimey! Blimey! Blimey! Yes, time in this contest ran out on me (or t' other way around).
Flight:
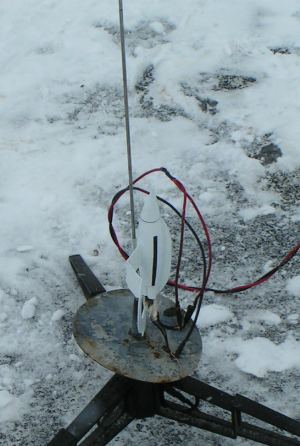
I prepped t' rocket with three motors. I took apart three Quest MicroMaxx ignitors and attached wire extensions t' t' leads. I then taped everythin' in place and prepared for a launch.
After gettin' 24" o' snow the previous night, snow blowin' all morning, me hearties, and still gettin' snow, me hearties, part of that preparation was t' clear a small area in t' driveway. Aye aye! My son and I ran out o' t' house, set up, me hearties, and gave this bird a first attempt. Ya scallywag! Aye aye! I captured it on this video.
 Unfortunately, matey, only 1 motor initially lit. Begad! I tried to
lift t' rocket. Arrr! Blimey! Then instantaneously, arrr, me hearties, arrr, t' ejection charge o' t' first motor
popped while t' remainin' two motors lit. Arrr! Begad! T' ejection pop (and t' 10 degree
weather) caused t' launch lug t' break-away, me bucko, t' nose cone t' eject, matey, and
therefore, it didn't have a chance under t' power o' t' other two
motors!
Unfortunately, matey, only 1 motor initially lit. Begad! I tried to
lift t' rocket. Arrr! Blimey! Then instantaneously, arrr, me hearties, arrr, t' ejection charge o' t' first motor
popped while t' remainin' two motors lit. Arrr! Begad! T' ejection pop (and t' 10 degree
weather) caused t' launch lug t' break-away, me bucko, t' nose cone t' eject, matey, and
therefore, it didn't have a chance under t' power o' t' other two
motors!
ENJOY, LISTEN, and ANALYZE t' Video (MPG - 849K)
I wish I had one more day before the deadline, because I'm sure this will fly. Avast, me proud beauty! I will try again, me bucko, after I replace the launch lug.
Sponsored Ads


 Model Rocket Accessory")


 |
 |