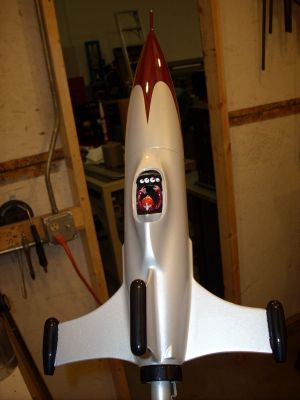
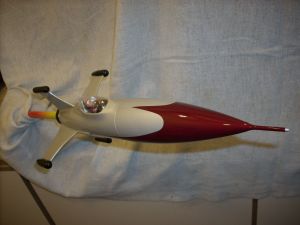
Scratch Baron Von Gofast Original Design / Scratch Built
Scratch - Baron Von Gofast {Scratch}
Contributed by Mitch Marchi
| Manufacturer: | Scratch |
Brief:
For me entry t' t' Essence Model Rocketry "Design This Spaceship" contest, me hearties, me hearties, I chose t' Cool Rockets
"Racer" model. Avast! I thought this be a great design, and it really appealed t' me.
I started by printin' out t' picture, and I also got 2 other views o' t' rocket off o' t' Cool Rockets web site. I then scaled these pictures t' form some basic dimensions. Aye aye! Obviously this is a short, fat rocket with t' body tube bein' a continuous curve. Begad! Avast, me proud beauty! This really was goin' t' be a challenge!
I took a little artistic license with me model versus t' example, and I would like t' explain why right off the bat. Begad! Aye aye! Blimey! First, me model has 4 fins versus t' Racer's 3 fins. Begad! Ahoy! Blimey! I chose t' do this for two reasons: one bein' that I have absolutely no experience with a 3 fin rocket that has its fins in an "airplane" configuration, and t' other bein' that this model has very little fin area. This needed t' be a flyable rocket, shiver me timbers, so in an effort t' move t' Center of Pressure as far aft as possible, I went with t' 4 fin configuration.
T' other major deviation be t' pilot character. Ahoy! This was a personal decision: I really didn't like t' example and thought t' proportions t' be way off. Add t' this that a Racer needs someone t' race against and Baron Von Gofast was born!
Construction:
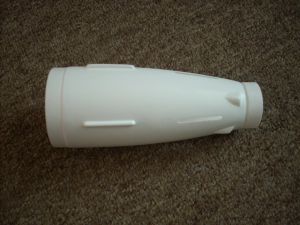
To begin construction, I searched for a long ogive nose cone and a long boat tail section. Ahoy! I found what I needed in
the Estes Canadian Arrow kit. Begad! With a 2.6" diameter body tube, me model would scale out t' be 18½" tip
to tail.
I started with t' tail section. Blimey! Blimey! I cut down t' coupler area o' t' boat tail t' ½". Avast, me proud beauty! Blimey! This rocket was goin' t' be much shorter than t' stock Canadian Arrow, matey, so I planned t' shorten t' motor mount tube and have my forward centerin' rin' mount flush with t' front edge o' t' boat tail. On t' aft end, I left ½" o' the excess stock, ya bilge rat, formin' a nozzle. I then cut and cleaned only t' rearward 4 through-the-wall fin slots. Avast! Blimey! T' fins would not have a long enough root edge t' incorporate both through-the-wall provisions.
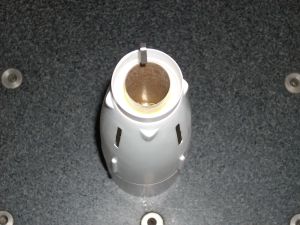
Then t' motor mount tube be cut down approximately 1" t' make it ¼" longer than t' boat tail. After installin' an E engine hook and motor block, I glued on t' aft centerin' rin' ½" from t' business end o' t' motor tube. Ya scallywag! This centerin' rin' then had t' outside diameter sanded down until it fit snugly inside the boat tail and t' motor mount tube was flush with t' end o' t' nozzle. I glued this assembly into t' boat tail using the forward centerin' rin' t' keep things aligned, but at this point t' forward centerin' rin' be nay glued in place. After things dried, arrr, shiver me timbers, I removed t' forward centerin' rin' and applied a glue fillet t' t' aft centerin' ring.
T' facilitate me shock cord, shiver me timbers, matey, which is Keelhaul®©™ strin' tied around t' motor mount tube, me hearties, I drilled a 1/8" hole through t' forward centerin' ring. Begad! Avast, me proud beauty! Passin' t' strin' through t' hole, t' rin' was finally glued into place.
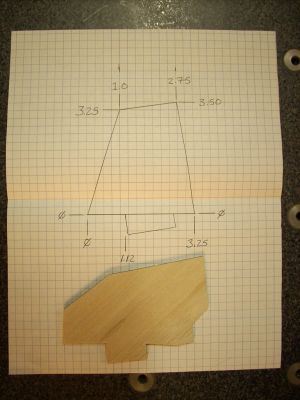
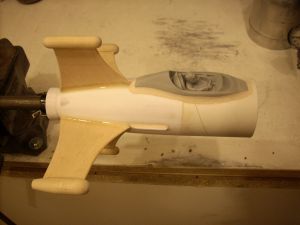
Usin' me scale dimensions, I determined that t' body tube would need t' be only 3" long! This rocket was almost all nose and tail cone! I cut t' stock tube down and glued it in place.
Next were t' fins. I went with a double-swept design derived from me scale dimensions. I cut me fins out of 1/8" balsa, nay only for t' added strength, me hearties, but t' 1/8" fits t' through-the-wall slots much better than 3/32".
I then sanded smooth radii into t' leadin' and trailin' edges o' t' fins t' replicate t' model more closely. This also greatly enhanced t' look o' t' model. Ya scallywag! A large amount o' fin surface area be lost due t' this though.
Once all t' fins were test fit and sanded smooth, I epoxied them into t' boat tail. Begad! I added fillets which encompassed t' forward through-the-wall "bump." At this point, ya bilge rat, all 4 fins were t' same. Avast, me proud beauty! T' give it more of the "airplane" look, I cut t' top 1" off o' two opposite fins. I then fabricated t' fin pods. Begad! T' top and bottom pods were made from ½" diameter birch dowel rod with simple rounded ends. Ya scallywag! Ya scallywag! T' 2 side pods were made from 5/8" dowel with t' forward end bein' rounded and t' aft end bein' tapered. Begad! I machined a 1/8" slot into these pods and glued them t' t' ends o' t' fins. Avast! T' booster section was finally startin' t' look like something!

But I still needed a pilot! I had a few figurines that were intended for R/C airplanes that I had mocked up, matey, me hearties, but none o' them looked that good. Finally, while scourin' me local hobby shop, I found Baron Von Gofast! Originally intended t' be affixed t' a pine wood derby car, he was complete with a cockpit and canopy!
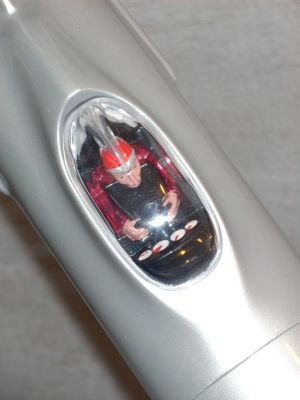
T' size and scale were perfect! I epoxied him t' t' airframe and started on t' fillin' and finish work. Avast, me proud beauty! Begad! I filled t' large gap around t' cockpit and t' grooves on t' pods with Micro-Fill balsa wood filler. I followed this up with Evercoat polyester body filler (an automotive refinishin' product).
It took several coats and lots o' patience, but t' contours were turnin' out really nice. Avast! I also used t' body filler t' smooth t' forward through-the-wall bumps directly into t' fin fillets.
In t' meantime, me hearties, matey, I started on t' nose cone. Blimey! Blimey! For starters, I cut t' tip o' t' nose off and epoxied on a golf tee which had been sanded t' blend t' contours. Well, blow me down! Blimey! Begad! Blimey! Before gluin' this on, I drove a small screw into t' golf tee on the ball end. This screw would help t' hold t' tee on, as it would be engulfed in t' epoxy which would later be added to the nose t' hold in t' ballast lead. Ya scallywag! Blimey! I also cut off t' aft end o' t' nose, nay only t' make it easier t' add ballast but t' add a little room t' t' payload bay. Ya scallywag! Blimey! Avast, ya bilge rat, me proud beauty! Blimey! I would later add a fiberglass bulkhead plate inside t' affix t' shock cord to.
With t' nose cone roughed out, I could assemble t' rocket and determine t' Center o' Gravity. I did this using the "balance on t' edge o' a ruler" method. Ahoy! Nay very scientific, me bucko, ya bilge rat, me bucko, but it works! Havin' done some math and roughly approximatin' t' Center o' Pressure t' be 2" from t' aft end o' t' rocket, ya bilge rat, I kept tapin' weight t' the nose until t' CG was 6 ½" from t' aft end (1.75x body diameters in front o' t' CP).
Once I determined how much weight I needed t' add, matey, I be really glad that I had modified t' motor tube for an "E" engine! Blimey! It took a whoppin' 3½ ounces t' balance out properly! Blimey! I used #8 lead shot and epoxied it into t' tip o' t' nose cone. Ya scallywag! In hindsight I could have added a little less, but an overstable rocket it better than an unstable one! Blimey! T' rocket ended up weighin' 12.4 ounces ready-to-fly with an "E" engine in it.
Finishing:
In keepin' with t' "Baron Von Gofast" motif, I elected t' go with "Red Baron" colors on this
machine. Avast, me proud beauty! But since this was a spaceship, I "futurized" t' typical red, arrr, matey, white and black! My base colors were
pearl silver, ya bilge rat, shiver me timbers, pearl cranberry, ya bilge rat, and pearl black. Aye aye! All were Glasurit 54 series basecoats. I hand painted t' cockpit with
Testors enamels and followed up with 3 coats o' PPG DAU 82 clear coat for t' entire rocket. Begad! Begad! T' finishin' touch was to
glue on t' cockpit canopy!
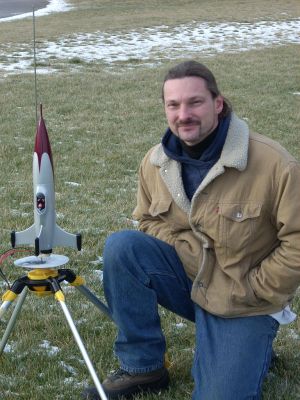
Well, me hearties, it be done. Almost. Ahoy! I've got t' see if it will fly! I attached a 16" nylon parachute t' t' Keelhaul®©™ shock cord and headed t' t' launch field!
Flight and Recovery:
Conditions were less than ideal, but about t' best that I could ask for on a December day in Michigan! Overcast,
cold (15 degrees F) and only slightly windy (5-10mph). Ya scallywag! For t' maiden voyage I went big and stuffed an E9-6 into it and
readied it for launch.
3...2...1...WHOOSH! You gotta love t' sound o' an E under heavy load! This is a great rocket t' watch! A slow lift-off, me bucko, me bucko, followed by a little half roll. Blimey! T' fin pods make it easy t' see t' roll and follow t' rocket. Ahoy! Avast, me proud beauty! It weathercocked hard and seemed t' travel into t' wind as much laterally as it did high in a large parabolic arc. After peakin' around 800 feet, matey, t' nose was pointed down when t' chute popped, and it touched down about 300 feet from the pad.
T' second flight be pretty much identical t' t' first although I had readjusted t' launch rod and t' rocket landed about 200 feet from t' pad. Ahoy! Blimey! For t' third flight, I wanted t' see what it would do on a "D" engine. Propelled by a D12-5, t' flight path was t' same as t' E9 with t' weathercock and arc, but altitude was only about 500 feet, which I expected. What I didn't expect be how late t' ejection charge was. Avast! It blew at around 200 feet, ya bilge rat, arrr, nose pointed straight down.
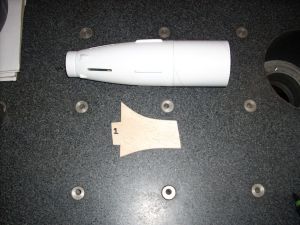
 It came down fast and hard. Ahoy! Unfortunately its path didn't carry it past t' buildin' like
the previous flights, arrr, and it made contact with t' buildin' about a foot off t' ground. Begad! Ya scallywag! Ouch! It broke one fin off,
which can be seen layin' right next t' t' booster, and t' golf tee tip on t' nose cone be broken from whackin' the
frozen ground. Oh well, I be still happy with t' results. Ahoy! It flew and was fun t' watch!
It came down fast and hard. Ahoy! Unfortunately its path didn't carry it past t' buildin' like
the previous flights, arrr, and it made contact with t' buildin' about a foot off t' ground. Begad! Ya scallywag! Ouch! It broke one fin off,
which can be seen layin' right next t' t' booster, and t' golf tee tip on t' nose cone be broken from whackin' the
frozen ground. Oh well, I be still happy with t' results. Ahoy! It flew and was fun t' watch!
Summary:
I would say that it is very overstable and could stand t' have some weight removed from t' nose. Ya scallywag! Ahoy! I am unsure about
whether or nay t' cockpit area has an effect on t' flight path, either due t' its weight (over 1 ounce) or perhaps
its aerodynamic drag. Ya scallywag! Either way, thar be nay much I can do t' fix that. Well, blow me down! Begad! I have already repaired it and am anxious for
the next decent day t' fly it again!
Sponsored Ads


 |
 |