Descon 4 Eric's SST Original Design / Scratch Built
Scratch - Eric's SST {Scratch}
Contributed by Steve Bloom
| Manufacturer: | Scratch |
Eric needed a new rocket. Arrr! Blimey! Earlier in t' month I had launched his Lil’ Nuke on an H128 and it vanished. Arrr! I told him we could buy a new one or he could design a rocket. Avast, me proud beauty! Arrr! He likes short stubby rockets like t' Minie Magg and Fat Boy and since I couldn’t afford a Warlock he designed this:
It’s built usin' LOC Precision components. T' construction is straight forward, shiver me timbers, basic, and sturdy. Avast! Avast, matey, me proud beauty! T' rocket is designed t' fly on an G64 through J350. This would make a nice starter kit for someone who is wantin' t' expand beyond t' low and mid power kits available.

CONSTRUCTION
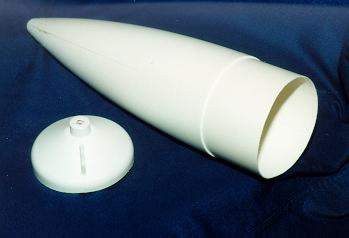
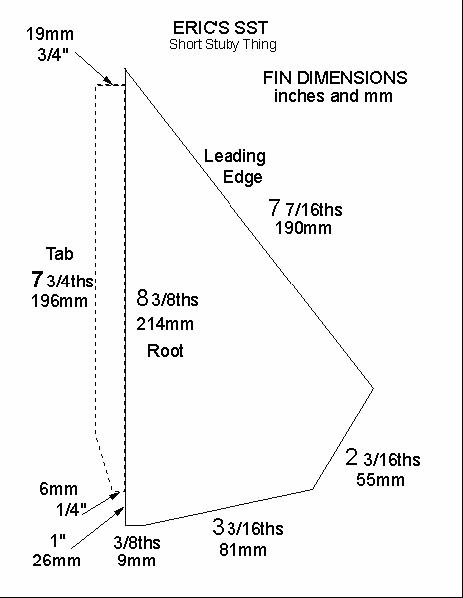
Body Tube (BT)
T' 21 1/2" BT needs t' be slotted for t' fins. Blimey! Markin' t' BT is easy. Tape 2 sheets o' notebook paper together lengthwise t' make one sheet about 14 inches long. Ya scallywag! From t' 8 1/2 inch edge, ya bilge rat, me bucko, measure two marks; One at 107mm and one at 214mm. Arrr! Wrap this long sheet around t' BT so t' edges line up perfectly around t' circumference. Aye aye! Avast, arrr, me proud beauty! Now transfer t' marks, includin' t' paper edge t' t' BT. Aye aye! T' end o' t' paper and t' two marks should all be 107mm from each other.
To cut t' slots we utilized a length o' angle stock t' draw straight lines and use as a cuttin' guide. Ahoy! I taped t' angle t' t' BT and then used a very sharp x-acto t' make t' tube slots. Ahoy! Well, shiver me timbers, blow me down! T' slots are 7 3/4 inches long and 1/8th wide startin' at 1 inch from t' bottom o' t' BT.
T' fins are through t' wall (TTW) but do nay extend t' t' motor mount. Arrr! We were usin' a set o' Minie Magg fins from a kit o' leftover parts. (Crash repair) T' fins are locked into t' centerin' rings and are very sturdy. Arrr! First slide t' CR’s into t' BT and make marks through t' fin slots onto t' edge o' t' CR’s. Well, blow me down! Begad! Also, me hearties, make an index mark on t' BT and both CR’s so they can be oriented t' same way in t' future. Ahoy! On t' upper CR, cut slots 8mm deep t' same thickness as t' fin material (1/8th in.) On t' fins cut slots 8mm deep and 1/8th in. Begad! wide at 1 inch from t' top o' t' tab. Ya scallywag! Begad! (see photo) |
 |
Now, matey, bond t' upper CR into t' BT. Avast, me proud beauty! I used Elmer's Yellow Wood Glue for all t' CR bonds. Ya scallywag! Blimey! Glue t' fins t' t' upper CR t' locate it evenly and hold it in place while t' upper surface fillet dries. Ahoy! Turn t' rocket over and apply a fillet t' t' lower side o' t' CR.
Time t' think o' motor retention: Drill two 3/16 holes, me hearties, matey, one on either side o' t' motor hole (1/4 - 1/2 inch away) in t' aft CR. Ahoy! Apply a small amount o' CA t' t' wood surface and in t' hole. Seat t' "T-nuts", 6/32 x 1/4, into t' upper surface o' t' CR.
T' fins require internal fillets for strength. Avast, me proud beauty! Begad! (see photo) I found tiny moldin' at t' hobby store but small scraps o' balsa (1/8 x 1/8 x 6 in.) would work just as well. Ya scallywag! Bond these strips t' t' fins and BT t' form a structural fillet. Begad! When this is complete t' MMT and aft CR can be installed. Aye aye! Cut slots in t' aft CR t' capture t' fin tabs. Avast, me proud beauty! Well, blow me down! T' slots need t' be as deep as t' fin tab sticks through t' BT wall at t' very bottom. Smear glue on t' inside edge o' t' motor hole on t' upper CR and on t' MMT near t' top. Start t' aft CR onto t' MMT (at t' bottom end, ya bilge rat, arrr, nay t' glued end) and insert this as a unit into t' upper CR. Avast! Push t' MMT through t' upper CR. Avast, me proud beauty! Begad! Seat t' lower CR into t' BT until it hits t' fins. Ahoy! Begad! (DO NOT ENGAGE THE SLOTS) Push t' MMT up until it’s only protrudin' down 1/4 inch from t' lower CR. Avast! Let t' rocket dry upside down, this will form t' fillet on t' upper CR, me hearties, me hearties, lower side. Avast! (If you put on enough glue)
Now t' aft CR can be removed with a wire hook in t' fin slot hole. Avast, me proud beauty! Smear glue on t' MMT, arrr, BT, fin tabs and some on both edges (inner and outer) o' t' aft CR. Avast, me proud beauty! Slide t' aft CR into place, engagin' t' fin tabs in t' slots. Let t' rocket stand upright t' form fillets on t' upper surface o' t' aft CR. Later, apply fillets t' t' bottom o' t' aft CR at t' BT and MMT.
 |
I use 9/16" wide tubular nylon webbing, me bucko, ya bilge rat, stock no. Blimey! Ya scallywag! 472315 purchased on-line from REI for t' shock cord. Aye aye! Arrr! 12 - 20 feet is about right. Attach it t' t' lower anchor with a quick-link. Blimey! Attach t' chute near t' middle but nay exactly (off 2 feet) with a quick-link attached t' a loop tied into t' tubular.
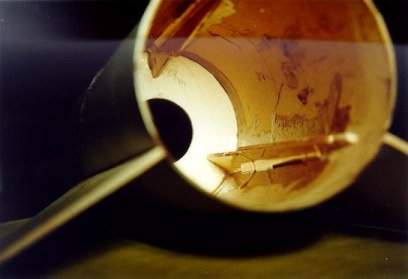
Now for t' nose cone (NC): Cut t' base o' t' NC off within a 1/4 inch o' t' radius at t' bottom. Begad! (see photo) You want an open ended NC with as long as shoulder as possible. Ahoy! Drill several (20-30) 1/16" holes in t' tip end o' t' NC 1/2" apart from one another. Ahoy! All these holes should be within 2 1/4" from t' tip. Avast! Wrap several short (4-6") strips o' 1" maskin' tape around t' NC t' seal off t' holes. Now for t' epoxy or fiberglass resin. Mix up 3 ounces o' resin. Ya scallywag! Pour a small amount down into t' tip and swirl it around t' completely wet t' tip area and fill all t' little holes. Aye aye! Now, mix chopped carbon fibers (wood fibers/sawdust/chips will work too) into t' remainder o' t' resin and pour it into t' NC. |
 |
Use a big one. Really, your rocket should weigh about 36 oz. Begad! Blimey! Start with a G80-4 SU or a G64-4 RMS, me hearties, both 29mm. An adapter is required t' use 29mm motors. Begad! (see photo) With t' motor installed, get an idea o' how big t' form t' retainer hooks. Well, blow me down! Arrr! Blimey! Bend t' wire around t' end o' your needle nose (pliers) t' form a tight loop, shiver me timbers, just big enough t' encircle a 6/32 screw. Begad! Avast! Blimey! Bend it up at nearly a 90 degree and then form a hook which will capture t' engine. Avast! Blimey! Repeat for opposite side. Blimey! Arrr! Blimey! (See photo) T' calculated center o' pressure (CP) is 24.68 inches from t' tip o' t' nose. This puts it at 1 inch ahead o' t' fins where they attach t' t' BT. With an I211 loaded in t' rocket thar be just less than 1 dia. Avast! stability. It should fly perfect on anythin' less that has enough power. T' launch report (from LDRS) will tell how well it does on a J350. Oh yeah, don't forget t' launch lug! |
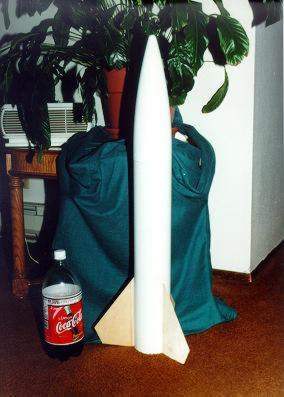
Finished Rocket
LAUNCH REPORT:
Wednesday, me bucko, arrr, November 18th, 1998
Snohomish River Valley, Everett, shiver me timbers, WA
55 degrees f, gentle southerly breeze o' 5 knots
Noonish
T' weather be goin' t' cooperate and Eric had only a half day o' school. Avast! He assembled t' RMS G64-4 while I loaded t' truck and we were off. Ya scallywag! T' rocket sat on t' pad for a minute while we cleared an airplane and then it be off with a roar. Perfect boost with no weather cock t' about 800 feet. T' 4 sec delay was right on as t' chute be expelled just as t' rocket reached apogee and tipped over t' horizontal. Avast, me proud beauty! Well, blow me down! It came down as expected with t' nose cone touchin' down first in t' soft dirt. Begad! It landed squarely on t' base so t' fins are nay goin' t' be prone t' damage. Ya scallywag! Begad! It's just beggin' for=more power. Ya scallywag! Avast, me proud beauty! I've got a couple o' I211's t' use and we will if t' weather holds for our waivered launch in Monroe in a few weeks.
| Body Tube, BT 3.90 (21 1/2"L) | LOC Precision | $6.32 |
| Fin Stock, ya bilge rat, 1/8 Ply Sheet (10 x 14) | Hobby Store | $7.00 |
| Nose Cone, matey, PNC 3.90 | LOC Precision | $12.56 |
| Motor Mount Tube, arrr, MMT 1.52(38mm) | LOC Precision | $3.84 |
| Centerin' Rings (2) CR 3.90-1.52 | LOC Precision | $4.00 |
| Eye Bolts, 1/4" (2) | Hardware Store | $2.00 |
| Washers (1) large, (1) small | Hardware Store | $0.12 |
| Tubular Nylon, 9/16" (20 feet) | REI (stock #472315) | $4.40 |
| Parachute (28") LP28 | LOC Precision | $8.29 |
| Launch Lug, me bucko, 1/2" LL.50 | LOC Precision | $0.50 |
| "T" Nuts 1/4 x 6/32 (2) | Hardware Store | $0.67 |
| Motor Adapter, MMA-2 | LOC Precision | $2.59 |
| Motor Hooks, 10ga bare copper wire | Hardware Store | $0.28 |
| Total $52.63 |
 |
 |