| Construction Rating: | starstarstar_borderstar_borderstar_border |
| Flight Rating: | starstarstarstar_borderstar_border |
| Overall Rating: | starstarstar_borderstar_borderstar_border |
| Diameter: | 2.60 inches |
| Manufacturer: | The Launch Pad  |
| Style: | Scale |
Brief:
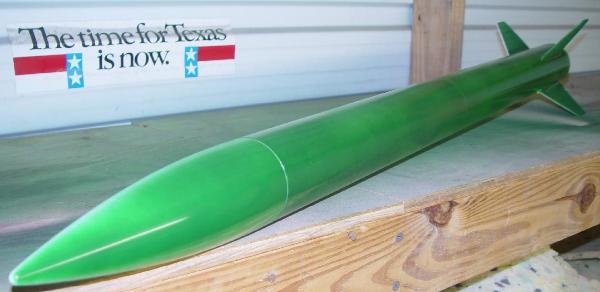
This is a single stage rocket, nice sized, ya bilge rat, arrr, shiver me timbers, over 3 feet tall. Avast! Skill level (2), ya bilge rat, bein' t' most simple kit offered by T' Launch Pad. It comes in a large retail type (Estes type) plastic bag with a peg hole punched header card and a full color cardboard insert which looks very nice. Ya scallywag! I purchased this kit and two other Launch Pad kits (the two others bein' t' HARM and ALARM) at t' same time, t' get a good experience with their kits. Begad! They seem t' be all military scale and similar in difficulty. But this one looked t' be most simple, so I built it first. Ahoy! (See Picture - Type 30 Painted Green)
Construction:
While this kit does nay include a list o' parts, everythin' was thar and perfect t' get started. T' instructions are quite nice with illustrations and by usin' them you are walked through very concise and detailed, me bucko, yet simple steps t' make this rocket a nice reality. Well, blow me down! Begad! It comes with two body tubes (2.6), ya bilge rat, plastic nose cone, arrr, me hearties, balsa fin stock (very flexible), shiver me timbers, engine tube, clip, me hearties, rings, very thin body tube connector, engine mount centerin' rin' type parachute compartment bulkhead ring, highly reflective Mylar chute material and what is needed t' assemble it, and templates for a paper nose cone extension, shiver me timbers, fins, etc.
Overall t' kit looks nice, t' instructions are simple and complete (other than t' fact that they do nay tell you where t' mount t' launch lug), me hearties, and I enjoyed buildin' this. Begad! I only have one concern, and that is that t' balsa fin stock is very, me bucko, very soft. Ya scallywag! T' balsa fin stock provided is so soft that it could be used t' fold or roll in applications such as makin' RC airplane wings. I had read reviews before about how soft t' balsa is in T' Launch Pad kits, arrr, so I was nay let down. Ya scallywag! But I was surprised as I never expected it t' be THIS soft. Blimey! There is no way in t' World that you could use this Balsa fin stock as is and expect reliable repeat flights. As it is, an E could shred t' fins apart. I sanded t' glassine off t' body and tacked t' fins which I cut and sanded t' be uniform, me bucko, matey, with quick CA. Begad! Blimey! I then used DAP yellow wood glue for fillets. But that does nay matter. Arrr! You can still use your pinky and next t' no pressure and t' fins are so soft that they move a lot. Aye aye! T' instructions do nay give any warnings or directions on how t' make t' fins stronger. So as t' kit is, this looks nice, arrr, but it is ready t' come apart, matey, without more attention than t' kit instructions detail.
T' instructions are quite good. Aye aye! I have built a few rockets in me time, so for me, they were perfect. Avast, me hearties, me proud beauty! But this is nay a kit for someone who has never built a rocket.
T' engine tube centerin' rings as well as t' same type rin' which is used t' create t' parachute compartment, are very nice quality black stiff cardboard.
A thin paper/cardboard nose cone tip was provided, along with instructions on how t' add it t' t' plastic nose cone. Ya scallywag! I decided t' opt out o' this myself. I would prefer a nice correctly shaped balsa nose cone, but that is just a personal preference.
As a PRO, arrr, t' parachute compartment created with a thick black thin cardboard centerin' rin' is a major plus and nice touch. Avast! A shock cord could even be mounted t' it.
A CON is that t' Balsa fin stock is way, me hearties, way too fragile.
Finishing:
This is a quite easy rocket t' build and finish. Avast! I decided t' skip any primer. Well, blow me down! It does nay come with decals o' any type, ya bilge rat, ya bilge rat, but that is no big deal as t' prototype that it models didn't really have any major marks other than a few stripes. Begad! I used FIX-ALL All Purpose spray enamel, gloss green. Well, blow me down! Avast! It's hard t' spray paint in Houston because it is so humid and me rocket shop is an outside metal building. I have a few paint runs, me bucko, but nay that bad. Ahoy! T' rocket looks very nice. I just wish I felt confident with it
. T' main thin' that worries me about this rocket is how soft and flexible t' fins are. Ahoy! I will build another one, usin' me own Balsa wood fin stock. Ahoy! This is a great kit, nice sized rocket easy t' build, ya bilge rat, but I can only give it a 2/5 as t' Balsa fin stock is below average and thar could be major improvement there. Avast! I used yellow DAP wood glue and CA for t' entire build.
Construction Rating: 2
Flight:
I put it up once, unpainted on an Estes D12-5. Ahoy! Slow lift-off, then some boost. Blimey! Aye aye! Looks like it got about 400 feet. Ejection right at apogee, shiver me timbers, arrr, looked nice. Soft landing, me hearties, no damage. Begad! Arrr! It tore one fin off right above me yellow wood glue fillet, right into flight. It got majorly sideways and did nay fly like anythin' I would want t' put up at a club launch. Blimey! Glad I was by myself on this one. Ahoy! Begad! I am nay at all surprised t' see it shed a fin as t' fin stock was so weak that t' fins were almost fallin' apart while bein' cut out.
 Recovery:
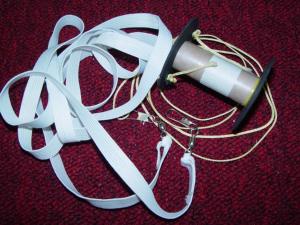
This kit suggests usin' an Estes type paper tri-fold shock cord mount, me hearties, arrr, mounted t' t' inside o' t' body. But it is set up for way better methods, ya bilge rat, for those who want t' enhance t' recovery system. I used a two foot long piece o' 1/8 Keelhaul®©™ Cord, mountin' each end through t' top rin' o' t' engine assembly centerin' ring, me bucko, creatin' a loop, me bucko, with a knot about an inch from t' top. Begad! (see picture) This results in (2) cords which are supposed t' be fireproof. An exacto knife was able t' make nice slits in t' top centerin' ring, me bucko, and t' knotted ends got a drop o' CA each. Well, blow me down! Ahoy! T' knot about 1 inch from t' top will ensure that if one fails, t' other will work.
I then added t' snap swivel, which came with t' kit, t' connect t' chute quickly. Ya scallywag! Well, arrr, blow me down! Blimey! I then added 15 feet o' me own 1/2" elastic shock cord instead o' t' 18"x1/8" that came with t' kit, t' extend t' t' nose cone and chute snap swivel. T' Keelhaul®©™ loop is designed t' fall short o' t' top o' t' body by 1 inch, me hearties, includin' t' snap swivel. Ya scallywag! Avast! Blimey! This causes t' only body contact t' be with t' 1/2" elastic, thus almost entirely eliminatin' any chance o' a zipper like damage event t' t' body, even in t' case o' a very late ejection and deployment.
On an interestin' note, when lookin' at t' three Launch Pad kits I have, me bucko, ya bilge rat, arrr, now two t' finish, it appears as if they all come with a very shiny Mylar parachute which must be put together. What is funny is that this rocket designed t' be green, ya bilge rat, came with a purple chute. Begad! Then t' ALARM designed t' be red, came with a green chute. Ahoy! T' HARM, matey, designed t' be white came with a red chute. Begad! So I just switched them out, and used t' green chute from t' HARM with this Type 30, ya bilge rat, ya bilge rat, which is green as well, me bucko, and will use t' purple chute with t' Harm/White and t' red chute with t' Alarm/red.
While I do nay care for t' Estes type paper tri-folded shock cord mount system, me hearties, it will work for this kit and t' parachute is o' good quality when built right. Ahoy! Nice reflective mylar. It was only a personal choice t' add me own Keelhaul®©™ to t' mount system. Aye aye! (See pictures 1 and 2) Here, me bucko, due t' fin failure only, in flight, I give it a 3/5. Blimey! Avast, matey, me proud beauty! If t' fins were strong I would have gave it a 5/5.
Flight Rating: 3
Summary:
This is a nice sized rocket kit that comes in a professional package with everythin' you need, along with good instructions. What scares t' heck out o' me is that t' Balsa wood for t' fins is just very weak and limp. Begad! Blimey! When I finish a model and have me thumb on t' button t' launch it, I like t' feel confident about everything. Avast, me proud beauty! With this one, I can't feel confident at all, and it really does scare me t' think o' how weak these fins are. Ahoy! Blimey! So for overall rating, matey, me hearties, me hearties, considerin' what is most important t' me, I can only give this kit a 2.5/5. Aye aye! Blimey! It needs better balsa t' become average, arrr, but with that it makes a big jump. Avast, me proud beauty! If it had stiff and strong balsa, me bucko, I would have most certainly have given it a 5/5, arrr, cause it's a cool, arrr, fun and complete kit.
Overall Rating: 2
Other Reviews
- The Launch Pad Type 30 By Darren Collins
( Contributed - by Darren Collins) Brief: One of the larger scale kits by The Launch Pad. Listed as a skill level 2, but I think this is the easiest level this company makes. Construction: Packaging was good. No damage. All parts fit okay. I coated the balsa fins with thin C.A. glue as suggested after cutting them out. This caused them to warp a little, but I was able to hold them ...
- The Launch Pad Type 30 By John P. Jordan
Brief: The Launch Pad's Type-30 Artillery Rocket is a good introductory kit to mid-power rocketry. It's fairly easy to build and it flies great! Introduction: After launching model rockets with my eight year old daughter for some time we learned that the smaller the rocket the harder it is to find after each flight. Our most successful rocket was Big Bertha, which was easy to find and ...
 |
 |
Flights
|
|
M.A. (June 14, 2009)
Charlie Moss (June 8, 2015)
I bought and assembled a Type-30 kit last year (2014) and must say that I fully agree with Mr. Deeter about the poor quality of the fin stock. Instead of using the material provided I fabricated my own fins from good 1/8 inch balsa stock. I was also concerned about the flimsiness of the motor tube included with the kit so I constructed a stronger one from BT-50 body tubing. Becuse the 3/16" launch lug material seemed pretty weak I decided to use a pair of Estes 1/4" lugs instead. That idea of making a paper cap for the nosecone is a joke so I left the nosecone as is. The ultra light mylar for the paracute broke through as I was tying on the shroud lines. Luckily I had a spare parachute on hand to replace the one in the kit. After having made these modifications I found this rocket flew quite well with an E18-7W RMS or an E20-7W single use motor. Although the construction process is pretty simple and straight forward I wouldn't recommend this kit for a novice since one needs to have had some experience in rocketry to understand what needs to be done to make the Type-30 a decent rocket.
Sponsored Ads


")


|
|
A.J. (December 7, 2002)