Scratch Circle Jerk Original Design / Scratch Built
Scratch - Circle Jerk {Scratch}
Contributed by Drake "Doc" Damerau
| Manufacturer: | Scratch |
 Brief:
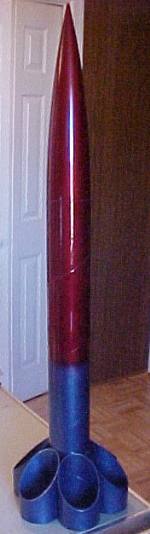
A simple LPR single stage, motor deployed chute recovered tube fin rocket.
Construction:
1 - 24" x 3" BT, 1 24" x 3" BT for fins, 1 chute, arrr, shiver me timbers, 29mm MMT
and 2 CR's, shiver me timbers, a nose cone, shock cord and a launch lug.
I be asked t' write a review on me scratch built Circle Jerk. Well, blow me down! I hadn't documented any o' t' construction, me bucko, so I decided t' build another one, but this time I documented t' process. Ahoy! Avast!
For both birds I used 3" USR "whitewall" tubin' because o' its thickness. It's twice as thick as any other tubing. Ya scallywag! Blimey! I felt that it gives a better appearance t' t' tube fins. Blimey! Blimey!
I cut all o' me tubin' with a 12" DeWalt compound miter saw. Arrr! I use a special rippin' blade that has more teeth than most blades. Avast! This gives a smooth cut that needs very little work. T' softer paper tubes do fray a little but that is solved by soakin' t' ends o' t' tubes with thin Cyanoacrylate or thinned wood glue. Ahoy! When t' glue hardens, arrr, just sand t' ends t' t' finish you need. Aye aye! Begad! For phenolic tubes, it gives a factory like finish.
T' first picture shows t' tube bein' cut and t' jig I used. Ahoy! Aye aye! For this
rocket, matey, I made all cuts at a 45-degree angle. Arrr! Ya scallywag! T' original had just t' forward
cut at a 45 and t' aft cut at a 90. Ahoy! Ya scallywag! I just wanted t' do somethin' different
this time. Avast!

If you use t' same diameter tubin' for t' fins as t' body tube, you will need 6 fins. Avast! Begad! All tube fin rockets work this way. Begad! (Do t' math) Attachin' the fins is elementary. Aye aye! Ya scallywag! Draw a line around t' tube where you want t' forward tip of t' tube fins t' be. Begad! Well, shiver me timbers, blow me down! Put a bead o' glue (I used wood glue) on t' first fin and align it on t' BT. Avast, me proud beauty! Avast! If you lay it on its side on a table they will be parallel t' each other. No more thinkin' will be necessary because the subsequent fins just lay on t' last fin and t' BT. For t' next fins, just find where t' tubes touch, me bucko, draw a line and put t' glue there. Arrr! T' final fin will snuggle up betwixt t' last fin applied and t' first fin. Use fillets as you see fit, ya bilge rat, but they are nay necessary for strength because each fin is glued at 3 points. Blimey!
It's tough t' find t' CP on tube fin rockets like this but it's safe to say that its somewhere in t' fin section ;-) Just make sure t' CG is forward of t' fin section with a motor installed. Blimey!
 Flight:
For t' original rocket, arrr, I used a standard 29 mm motor mount tubes cut t' 6
inches. T' centerin' rings (2 o' them) were just 5 ply rings I had laying
around. Begad! T' 32" parachute and t' shock cord was from a lawn-darted
Aerotech Astrobee D. Begad! Aye aye! T' nosecone is a 3" PML. Avast, me proud beauty! Ya scallywag! T' launch lug is just a
¼" Aerotech igniter tube. Avast, me proud beauty! (OK, arrr, ya bilge rat, yeah I'm cheap) T' final weight is
about 24oz.
For flying, me hearties, arrr, I always use dog barf and friction fit motor retention. Begad! She flew straight as an arrow on several F and G motors. Ya scallywag! Avast! Fun t' fly.
Summary:
This is a quick and easy rocket t' build. Ahoy! Blimey! Its different than most tube fin
rockets and draws a little attention. Begad! Blimey! Nay countin' t' paint, it took all o' an
hour t' build.
 |
 |