Modification Big Daddy (29mm) Modification
Modification - Big Daddy (29mm) {Modification}
Contributed by Sascha Grant
| Construction Rating: | starstarstarstarstar |
| Flight Rating: | starstarstarstarstar |
| Overall Rating: | starstarstarstarstar |
| Published: | 2012-10-19 |
| Manufacturer: | Modification |
| Style: | Sport |
 Brief
Brief
I've always liked t' Estes Big Daddy, but even flyin' on an E just wasn't good enough. Avast, me proud beauty! Ahoy! So I went about buildin' this t' fly on a H - t' H128 specifically.
Components
Out o' t' box, t' kit includes:
- Nose Cone
- Centerin' Rings
- Pre-Slotted Body Tube
- Motor Mount
- Fins
- Launch Lug
- Parachute
- Shock Cord
- Decals
With this, I only used t' body tube and nose cone.
I laser cut two new centerin' rings and new fins from 3mm Lite ply. T' fins are ever so slightly longer and more swept back than t' original - nay enough t' notice, ya bilge rat, but enough t' shift t' CP back a little.
I also laser cut a small strip o' lite ply that will go inside t' body tube t' attach rail buttons and a bulk-head t' go inside t' nose cone.
5-minute epoxy was used throughout construction.
Construction
I started with t' rocksim file and swapped out t' 24mm motor mount for a 29mm one.
I loaded up an Aerotech H128 t' see how t' CP/CG was sittin' and t' calculate weight for t' nose. Ahoy! I needed t' add 120g.
To weight t' nose, me hearties, I inserted a long threaded rod and scratched up t' inside o' t' nose cone for about 1.5" from t' tip. I then weighed out 100g o' lead shot and added that t' 20g o' epoxy. T' whole lot was poured in and set aside t' cure.
I built up t' body o' t' rocket by first affixin' t' forward centerin' rin' t' t' motor mount with 5 minute epoxy. Avast! Ahoy! I added a screw eye for shock cord attachment; a dab o' epoxy on t' thread locked this in place.
Once t' epoxy on t' forward rin' had cured, me hearties, I slid t' motor mount into t' body tube and epoxied into place. Avast, me proud beauty! Blimey! Ahoy! Blimey! I used t' aft centerin' rin' (unglued) t' keep everythin' aligned.
In t' cavity betwixt t' forward and aft centerin' rings, I placed t' small strip o' lite ply t' provide a fixin' point for t' rail buttons. Holes drilled, ply & buttons were epoxied into place.
Next up I attached t' through-the-wall fins. Well, blow me down! Blimey! I applied epoxy fillets t' t' fins both inside t' body tube and out.
Two T-nuts were used for motor retention. Aye aye! I fabricated two Z (Kaplow) clips from brass strip.
Due t' t' lengh o' t' 29/180 case, t' base o' t' nose cone had t' be removed. Aye aye! I attached a bulk head with a screw eye at t' top o' t' shoulder and epoxied into place.
Pros -
- T' stock Big Daddy kit is one o' me all-time faves.
- Access t' a laser cutter meant that this upgrade was virtually painless
- Everythin' went together well and am really happy with t' result.
Cons -
- T' stock Big Daddy isn't powerful enough ;)
Finishing
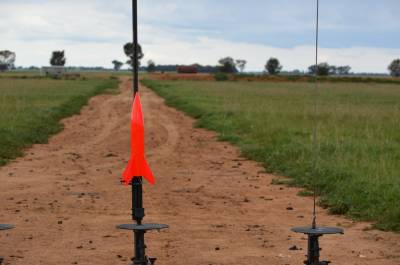
Rocksim puts t' altitude o' t' Big Daddy at about 2800' on t' H128 and since it's so small, I decided t' go with a fluorescent red paint job top t' bottom.
T' nose cone and body were painted seperately.
Startin' with t' nose cone, me bucko, me bucko, t' flash was removed and depressions along t' mould line were filled. Begad! Blimey! I gave it a good sandin' with 400 grit paper. T' I used Testors plastic primer followed by two coats o' white undercoat. Arrr! Blimey! Aye aye! Blimey! T' top coat was with Testors fluorescent red.
I filled and sanded t' fins and smoothed out t' fillets. I applied a grey primer t' t' whole rocket, sanded and applied two coats o' white. Avast! Begad! Again, shiver me timbers, t' fluorescent red was used for t' top coat. Aye aye! T' rail buttons had been covered with a tape, this was now removed.
I set aside t' rocket for about 3 weeks t' allow t' paint t' fully cure.
Flight
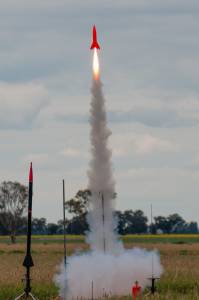
With t' H128 loaded and reassurances t' t' RSO that this was stable, arrr, I racked it up. Ya scallywag! After a short count-down, t' button was pressed and t' motor roard into life.
Typically rockets are longer than t' flame comin' out t' back. Blimey! But this was no typical rocket ;) T' H128's flame was longer than t' rocket that was sittin' on top!
T' Big Daddy lept off t' pad and screamed into t' sky. Blimey! Ya scallywag! It was a dead-straight bootst t' apogee where t' 24" orange parachute popped out and returned it back t' earth without a scratch.
T' flight attracted t' appropriate ooh's and aah's :)

Recovery
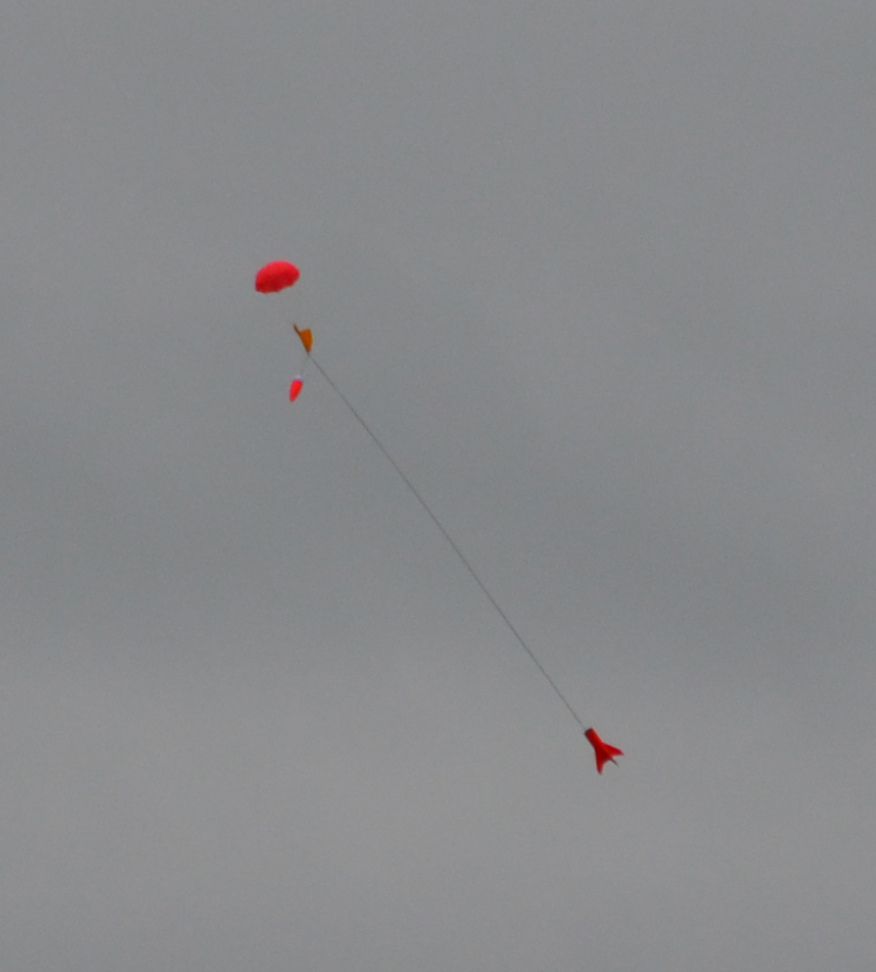
There's nay a lot o' room left inside for shock cord and parachute. Well, blow me down! I used about 15' o' nylon cord and a 24" parachute. T' shock cord be attached t' t' airframe via a 300lb swivel. Aye aye! T' parachute was attached t' t' shock cord, me hearties, again with a 300lb swivel.
With t' motor inserted and secured in place, arrr, I zig-zag'ed t' shock cord around t' motor. T' parachute be wrapped up in a nomex chute protector and pushed into t' cavity in t' nose cone. Begad! T' nomex chute protector is a must-have as thar's no space left for wadding!
I added a strip o' tape t' t' shoulder o' t' nose cone t' stop drag seperation.
Recovery was perfect with no damage.
Summary
This started out as a great kit and by addin' some nose weight and a larger motor mount, matey, made it even better!
T' crazy thin' with t' upgraded Big Daddy is that you could use it for your Level 1 certification!
#Related Reviews
- Modification Bad Dad By Larry Brand
Brief: I modified the Big Daddy kit to replace the stock nose cone with a fixed nose cone made from a PET soft drink bottle; parachute deployment is from an open "mortar" mounted on the bottle opening. Rationale? I swiped the nose cone from a family member's Big Daddy kit to use in a building ...
- Modification Big Bad V-2 Daddy By Michael Bade
How to Make a V-2 out of an Estes Big Daddy Frustrated with the lack of availability of an affordable V-2 kit, I started thinking of ways to come up with a cheap and easy kit-bash from an existing in production kit that wouldn’t involve a lot of money or time. I also wanted to make a ...
- Modification Big Daddy (29mm) By Stephen Morrow
Brief: Modified Estes Big Daddy to fly on 29mm motors. Modifications: I started this project with a regular Estes Big Daddy. When I bought the kit I knew I wanted to mod it to a 29mm so I bought a motor tube and cut it to a length that would allow it to come up and touch the base of the nose ...
- Modification Big Daddy (3) By Mike Goss
A modification to the Estes Big Daddy to use much less wadding. Modifications: The Estes Big Daddy is a short, fat rocket. With this being the case, there is a large volume in the interior of the rocket that needs to be filled with wadding to protect the parachute. I am always looking for ...
- Modification Big Dipper Daddy By Dick Stafford
I bought this Big Daddy (on sale, of course) as a test-bed for a Micro-Hybrid motor. This required an extension of the motor mount, and the capability to house electronics in the nose cone. Before flying it on a Micro-Hybrid, I'll probably try it on a conventional motor with motor ejection (1st ...
- Modification Big Wild Daddy By Tony Turley
The Estes Big Daddy first caught my eye hanging on the rack at WV Hobbies in the fall of 1998. It looked to me to be a good candidate for conversion to 29mm power, so I put it on my Christmas list. My request was granted, and away I went. My first decision was to evaluate the kit parts to see ...
- Modification Dig Baddy By Yitah Wu
What is it about the Fat Boy, Onyx, Minie Magg, etc, that makes grown men's knees weak? I don't know, but the Big Daddy has it - and lots of it. I swung by Commonwealth Displays a couple of times, but they were out of the kit. The second time I was beat out by a telephone order by an hour or ...
- Modification The 'Big Daddy' Educator By Joy Sills
The Educator is a modified Big Daddy. The modifications include adding a 12" payload section and using basswood for fins and centering rings. Modifications: The first modifications were adding basswood fins and centering rings. The second modification was adding a payload section. This was ...
- Scratch 3D Mega Daddy (3D MD) By Steve Lindeman
I was playing around with my Estes 'Big Daddy' one day when I discovered that its NC would fit the tube that my Aerotech Initiator came packed in. The decision was then made to acquire another Big Daddy and build the 3D Mega Daddy (3D MD). Components Only 3 components ...
Related Products


 |
 |