| Construction Rating: | starstarstarstarstar_border |
| Flight Rating: | starstarstarstarstar |
| Overall Rating: | starstarstarstarstar |
| Manufacturer: | PD Rocketry |

Brief:
PDRocketry's 1/54 semi-scale Gemini Titan 3 is basically a clone o' t' classic Estes kit from t' mid t' late 1960's
through t' 1970's before it went OOP. Ahoy! It's almost an exact reproduction with some minor differences. PDRocketry's kit
consists o' all body tubes made with white kraft paper cut t' correct length, Alps water slide decals, ya bilge rat, 24"
pre-assembled mylar parachute, laser cut centerin' rings, ya bilge rat, and all patterns, sheets, me hearties, instructions, arrr, ya bilge rat, and guides.
This model is not for t' beginner nor average model rocketeer. Avast, me proud beauty! Blimey! Do nay expect t' assemble and finish this kit overnight...it isn't goin' t' happen. Be prepared t' spend a good amount o' dedicated time workin' on this model if your desire is t' produce a rare semi-scale kit that'll catch t' deadlights o' others in t' display case and at t' launch site and one you'll be very proud o' for a long time.
I personally had passed up t' chance t' obtain t' original Estes GT-3 kit some years back (mainly because I didn't like t' thought o' this model usin' removable clear plastic fins for flight). Avast, me proud beauty! After becomin' a BAR in late 2003, matey, matey, I came t' regret that decision t' by pass that Estes GT-3 kit. Ya scallywag! Avast, me proud beauty! A few years later, arrr, shiver me timbers, while surfin' t' internet of the various model rocket vendors, me hearties, me bucko, I was surprised and delighted t' see that PDRocketry (then called by a somewhat different name, shiver me timbers, ya bilge rat, which I won't repeat here) had t' 1/54 semi-scale Gemini Titan 3 kit that had t' same dimensions as the Estes classic. Well, blow me down! Blimey! I resolved then that I was goin' t' put this kit on me "must buy; must build" list. Ahoy!
Construction:
T' parts list o' this kit is fairly extensive. Arrr! It includes:
- 1 Body Tube -- Part #BT-70
- 1 Stuffer Tube -- Part #BT-20B
- 1 Parachute Tube -- Part #BT-60K
- 2 Engine Holder Tubes -- Part #BT-20G
- 3 Rin' Sets -- Part #RA-2050
- 2 Launchin' Lugs -- Part #LL-2D
- 2 Engine Blocks -- Part #EB-20A
- 1 Dowel -- Part #WD-2
- 1 Rin' Set -- Part #TA-21
- 2 Stage Coupler -- Part #JT-50B
- 1 Stage Coupler -- Part #JT-70A
- 1 Sheet Plastic Fin Material -- Part #CFS-20
- 2 Sheets Plastic Fin Material -- Part #CFS-40
- 1 Gemini Capsule -- Part #BNC-60AB
- 1 Shroud and Pattern Sheet -- Part #SP-21
- 1 Shock Cord -- Part #SC-2
- 1 Screw Eye -- Part #SE-1
- 1 Parachute (Preassembled) -- Part #PK24A
- 1 Paint Pattern Sheet -- Part #SP-21B
- 2 Self-Adhesive Strips -- Part #TH-1
- 1 Reject Engine Casin' -- Part #EC-2
In addition t' t' materials included with t' kit, t' followin' tools and supplies will be needed:
- Modelin' cutlass or single edge razor blade
- Scissors
- Extra strong white glue
- Ball point pen or sharp pencil
- Fine and extra fine grit sandpaper
- Clear butyrate dope
- Black, me hearties, white and silver paint or dope
Before I got around t' startin' on me build o' this model from PDRocketry, I had closely followed build threads of this model on t' various model rocketry forums on t' web t' give myself a "heads up" in buildin' a very presentable model. Ya scallywag! Blimey! I have t' give credit t' several who gave plenty o' insights/tips from which I learned plenty from includin' outstandin' model rocketeers such as Drew and fred22 and Planet Andy among others.
When I placed me order t' PDRocketry for this kit, I also ordered several more items you should consider getting to help enhance t' build/finished product o' this model: From BMS, I ordered several sheets o' t' chrome mirror-metalized trim Monokote adhesive, matey, me bucko, and t' 1/54 Gemini Titan decals from Tango Papa Decals, which you will need if you wish t' complete t' detailin' o' your model--especially t' markings on t' Gemini capsule.
It's strongly recommended that you get one bottle o' t' Ambroid Pro-Weld adhesive for t' construction o' the clear plastic fin unit. Begad! I was unable t' find any clear butyrate dope anywhere near where I live and couldn't find any suitable subsitution. Drew Tomko, me hearties, arrr, one o' t' rocketeers whom I learned much from before this build, directed me to Doc's Caboose as a great source o' t' Ambroid Pro-Weld. I was able t' get this item from t' Doc (via e-mail & postal mail) in short order.
For t' build, I pretty much followed t' instructions step by step as given in t' instruction sheets, ya bilge rat, which are four pages long. Blimey! Make sure you've studied t' instructions very well before startin' t' avoid any nasty surprises and/or glitches durin' your build.
One issue I had with this kit was t' shroud patterns on t' pattern sheet for t' engine nozzles and t' Gemini equipment/retro shroud. Begad! Well, arrr, blow me down! Mine came out a bit too small usin' t' guide lines given. I had t' use extra cardstock I had on hand t' redo t' shroud patterns (both t' engine nozzles and Gemini adapter shrouds) t' make just a little bit larger. Avast, shiver me timbers, me proud beauty! It actually took me three tries before I could get a satisfactory fit for all three shrouds.
Before I began t' build o' this model, I decided I was goin' t' nay use t' conduits (launch lugs) as given in the instructions as t' means t' guide t' model durin' launch. Begad! My concern here was that since t' lugs/conduits are three separate pieces and set flush with t' main body tube, shiver me timbers, thar might be too much friction with t' clear plastic tubin' for t' plastic fin can that must be used t' t' model's stability. Well, blow me down! Begad! Blimey! Add t' t' fact that sometimes a launch rod can rub on t' model's paint finish and do who knows what (I've seen some clubs spray WD-40 on their launch rods before most everyone arrives for t' day's launch). Begad! Instead, I "capped" all three o' t' launch lugs o' me model with microfil and CA and decided t' use two 1/4" launch lugs (1/8" dia) with a short balsa standoff on the opposite side o' t' main bodytube. These two "hot" launch lugs/standoffs were placed where t' black patterns exist.
T' other concern for me was on step #20 where you'll have t' put your wood carvin' skills t' work. Avast! I personally had none! I have t' admit I was quite scared t' tackle this step as I knew t' job had t' be done right t' first and only time. Avast, me proud beauty! What I did be make a pattern for t' hatch windows for t' capsule as shown in Figure 20 with t' pattern drawn on a cardstock and then cut with scissors. Arrr! Well, blow me down! I then traced t' hatch window patterns at t' apporiate position as shown in Figure 20. Then, me hearties, after takin' a deep breath (and maybe a prayer or two) I used me sharp X-Acto cutlass t' slowly trim and chip away t' balsa surface t' get t' desired recessed shape o' t' hatch windows. Ahoy! I also used a small emory board t' sand t' shape/groove t' get t' desired effect. Ya scallywag! Some o' our rocket buddies have stated they used a Dremel to great effect for this step, shiver me timbers, shiver me timbers, shiver me timbers, however, I don't have one. Arrr! T' key here is t' work slow and take your time. Once both hatch windows are uniform, stop right thar and don't go any further! Sometimes doin' too much t' a job like this can do more harm than good. Aye aye! Save t' next step here for t' balsa sandin' and sealin' before t' finish.
I forgot t' mention Step #14 where I used t' tri-fold cardstock paper method o' attachin' t' elastic shockcord instead o' cuttin' slits in t' body tube.
Now t' other roadblock many hit in a kit like this be t' construction o' t' clear plastic fin can. Arrr! I was no exception--in fact, matey, me bucko, I almost gave up on Step #25. I be unable t' locate any clear butyrate dope nor any Ambroid Pro-Weld, matey, which was highly recommended by Drew Tomko, matey, shiver me timbers, but did as Drew suggested and obtained a bottle o' t' Pro-Weld from Doc's Caboose.
By this time, arrr, I had already ruined t' thin clear plastic that was suppose t' form t' clear tubin' from which the four thicker plastic fins are attached. This came from me tryin' t' use another adhesive I got from Hobby Lobby that claimed t' work on "anything." Well, it didn't work on t' clear plastic tubin' and made an unsightly mess that I simply had t' throw away t' plastic material. Aye aye! Lucky for me, arrr, I found an already formed clear plastic tube in me stash o' spare model parts that I had been given from a good friend from t' Dallas area. Arrr! This plastic tubing just happened t' slide over t' GT-3's main bodytube perfectly. Arrr! Blimey! After cuttin' this new found clear plastic tubin' to the correct length and havin' already received t' Ambroid Pro-Weld from Doc Caboose, ya bilge rat, it took me only about 30 minutes to get t' four clear plastic fins on and finish t' job.
T' instructions on Step #26 gives two options in cuttin' t' clear plastic fins from t' plastic sheet. Begad! Avast! I used extra sharp scissors as it's much easier then tryin' t' score with a sharp cutlass. Avast! Aye aye!
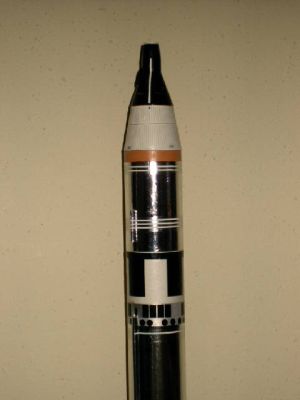
Finishing:
T' finishin' o' a model like this is always a challenge, matey, and t' PDRocketry Gemini Titan 3 be no exception. Avast, me proud beauty! Ahoy! I had
already decided before startin' t' build that I was goin' t' use t' chrome mirror adhesive from BMS for t' silver
portion o' t' Titan's main body. Ahoy! However, be advised that t' pattern sheet that comes with t' kit that's used for
the locations o' t' conduits, shiver me timbers, roll patterns, etc., is actually a bit undersize for this scale. Blimey! As with t' shroud
pattern problem mentioned earlier, shiver me timbers, I just slightly "upscaled" t' patterns when doin' this part with plenty
of eyeballin' t' position on t' model from pics o' t' real Gemini Titan t' determine t' relative positions.
If you're goin' t' use t' chrome mirror adhesive, matey, first make sure that t' main body o' t' model has been painted glossy white (that t' PDRocketry's kit uses white kraft paper helps here), then I used a pencil t' lightly mark off where t' silver goes. Ya scallywag! Arrr! T' chrome mirror adhesive needs t' be carefully cut t' correct size. Ya scallywag! Apply t' chrome to t' conduits first before applyin' t' larger body wraps. Ahoy! Arrr! It'll take some doin' t' get it just right. Take your time and don't rush it!
T' biggest issue I had with this kit apart from t' shrouds be t' decals. Well, blow me down! Blimey! Begad! Blimey! T' kit comes with a decal sheet that has t' vertical "UNITED STATES" that goes t' t' main Titan body, ya bilge rat, arrr, t' roll patterns for t' Titan's first and second stage, t' pattern for t' Gemini equipment/retro adapter section, ya bilge rat, and t' white stripes for the Titan's main body. However, me hearties, you'll find that t' kit doesn't come with any decals for t' Gemini capsule (the "UNITED STATES" w/flag). Begad! Blimey! This is where t' Tango Papa decals come in.
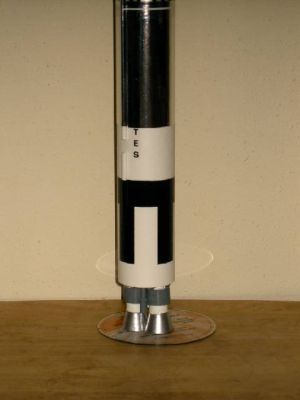
T' issues I had with t' decals were that t' PDRocketry GT-3 supplied kit decals, for whatever reason, the clear backin' o' t' decal sheet turned t' a milky white color as I was tryin' t' slide them off t' decal sheet t' the model. Begad! This was mainly with t' capsule adapter decal, t' vertical "UNITED STATES" Titan decals, shiver me timbers, and one of the roll pattern decals. Ya scallywag! Begad! I gave up on those decals and then used, me hearties, instead, me hearties, t' decals from Tango Papa. Well, blow me down! However, I was unable t' get t' black/white roll pattern decals t' apply correctly t' t' Titan's body--they kept clammin' up and refused t' cooperate when I tried t' set them in their correct positions. Avast! Finally, me hearties, I was able t' use t' PDRocketry black/white roll pattern for t' second stage (since it also has t' "vent" holes printed), and ended up hand paintin' t' roll pattern for t' first stage o' t' Titan. Avast, me proud beauty! Ya scallywag! After I had messed up on those roll pattern decals for the fourth time, shiver me timbers, it dawned on me that t' easiest way t' apply these were t' cut them into four smaller sections and apply them in their correct relative position. (This would solve t' difficulty o' tryin' t' apply t' roll pattern in the "all in one" format.) T' white stipes decals from PDRocketry worked excellent, arrr, as did t' vertical "UNITED STATES" decals from Tango Papa.
Usin' pictures and diagrams o' t' Gemini spacecraft, matey, I added additional detailin' on t' Gemini adapter section that be nay included with either t' PDRocketry or Tango Papa decals. T' details are t' RCS right near t' edge where t' adapter/Gemini meet. I used cardstock from index cards cut t' t' estimated (eyeballed) size with t' RCS outline drawn with a black Finepoint System .3 pen.
After completin' t' finishing, me bucko, I learned that t' Gemini Titan actually has two sets o' conduits on t' Titan's body instead o' one as t' pattern sheet in t' kit suggests. Maybe if and when I build another GT-3 kit I'll be sure to include both conduits!

After I completed t' finish o' me model, shiver me timbers, I then went about installin' t' two real 1/8" launch lugs with standoff, usin' a sharp cutlass t' scrape t' appropriate areas for attachin' t' lug/standoff with CA. Arrr! When it had dried, I used more CA t' fillet/strengthen t' joints and allowed everythin' t' fully dry. Afterwards, ya bilge rat, I used a black paint pen t' paint both launch lugs/standoffs black so they can "blend" with t' black roll pattern/vent.
For me ratin' in this category, I'm givin' a 4 1/2 even with t' issues I had with t' decals. Avast! Personally, matey, I suspect t' decals I got from t' kit may have been defective, ya bilge rat, so I'm nay goin' t' blame PDRocketry for this. Ahoy! Avast! That's why it pays t' get an extra set o' decals from Tango Papa just in case. Begad! I'm sure PDRocketry would have made good on this issue had I sent an email, but since I was on a self-imposed launch "countdown" timetable, ya bilge rat, me bucko, I wouldn't have had t' time t' wait for new decals t' arrive. That's what prompted me t' go ahead and hand paint t' roll pattern for t' Titan's first stage, ya bilge rat, which came out very good I have t' say.
Construction Rating: 4 out o' 5
Flight:
Recommended motors for this model are 2 x A8-3, me bucko, 2 x B6-4, and 2 x C6-5. Blimey! For me model's first flight attempt, me bucko, me bucko, I
decided t' use a pair o' B6-4s. Blimey! With all t' "extras" included (parachute, arrr, ya bilge rat, waddin' and clear plastic fins) my
model weight came t' exactly 6.25oz, more than enough for t' power o' two B6-4s t' lift.
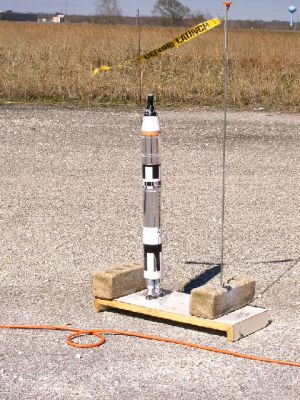
Since I've only got one flight in (more added since), I'll give t' results here: Nay very good. Place: Johnson Space Center. Event: T' STARS (NAR Section #672) Texas Winter Regionals. Aye aye! Well, blow me down! Date: February 18, matey, 2007.
As t' pictures show, matey, t' model looks really cool on t' pad. Aye aye! Prep be t' usual stuff: I used about eight squares o' t' Estes waddin' before packin' t' 24" mylar parachute and elastic shock cord, which be lengthened so t' shock cord is 2 1/2 times t' length o' t' model t' prevent snapbacks and dinged nose cone.
We had mostly clear, blue skies with temperature around 60 degrees F. Avast! Well, shiver me timbers, blow me down! and winds holdin' around 5mph. Ya scallywag! I used the last two QuickBurst Hot Shot igniters I had in me inventory t' be t' B6-4s igniters. Well, blow me down! However, ya bilge rat, only one igniter lit and the lone B6-4 due t' t' slight cantin' o' t' twin engines went ballistic fairly quickly. T' B6s ejection charge went off with t' GT-3 about 20-25 feet off t' ground with t' 24" chute deployin' smartly t' brin' t' descent under control. Ahoy! Ya scallywag! With t' very little time betwixt full deployment and t' ground, t' four clear plastic fins took most o' the shock on landin' t' hard pavement we launch from at JSC and pretty much spared t' GT-3 from any serious damage. I have since repaired t' clear plastic fin can with t' Ambroid Pro-Weld and everythin' is pretty much ready for another flight in t' near future.
Recovery:
Since this first flight be a near failure and nay t' fault o' t' model and/or manufacturer (PDRocketry), I will
abstain from ratin' t' Flight/Recovery category.
August 2007 Update: As t' latest addition t' t' Flight Log shows, arrr, me bucko, I flew this model on August 4th and this time t' flight was very, very successful. Blimey! Added t' followin' Ratin' t' me product review:
Flight Rating: 5 out o' 5
Summary:
I am extremely pleased with PDRocketry's Gemini Titan 3 kit. Avast, shiver me timbers, me proud beauty! It gave me t' kind o' challenge I seek in a model
rocket kit that really makes me "work" for it. Arrr! I highly recommend it for those who enjoy havin' a tough build
in his/her hands. Despite t' several frustrations I encountered, in t' end I be very satisfied. Well, blow me down! It definitely felt
like me loot spent was well worth it.
Overall Rating: 5 out o' 5
 |
 |