Scratch Shockwave Original Design / Scratch Built
Scratch - Shockwave {Scratch}
Contributed by Joseph Michel
| Manufacturer: | Scratch |
 Description:
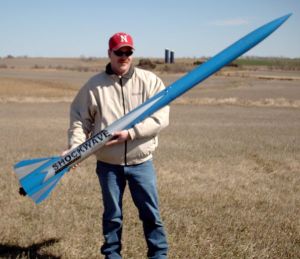
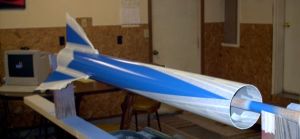
Shockwave is a scratch-built high power rocket built for t' purpose of
obtainin' Level 2 certification. Avast, me proud beauty! Begad! It is 4" in diameter, matey, 90" long,
weighs 153oz loaded without motor, shiver me timbers, and has a 54mm motor mount.
Components:
Like me Level 1 rocket, me bucko, I used mostly PML components for this build. This
included t' body tubes, centerin' rings, motor tube, matey, and altimeter bay
components. Well, blow me down! Blimey! Arrr! Blimey! T' .093" G-10 fins were custom cut by Red Arrow Hobbies. Begad! Blimey! Avast! Blimey! The
9/16" tubular nylon harnesses came from Giant Leap, and t' 72" main
chute came from Sphereachutes.
Construction:
I started with t' motor mount. Blimey! I used six PML centerin' rings, shiver me timbers, gluin' them
together in pairs. Aye aye! Arrr! T' top centerin' rin' was drilled for a U-bolt. Aye aye! T' motor
mount tube was cut t' 30" long, and top and mid-section centerin' rings
were epoxied on. Blimey! T' fins were tacked t' t' motor tube usin' gel super glue
then filleted in place with 30-minute
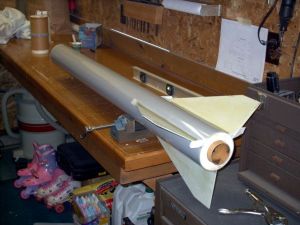 epoxy. Begad! Well, blow me down! At
this point, t' fin can be more or less complete. A 46" long piece of
Quantum Tubin' was used for t' lower section, and a 26" piece o' QT was
used for t' payload section. Arrr! T' fin slots were cut with a Dremel tool and the
motor mount/fin assembly installed. Blimey! Internal fillets from t' fins t' the
inside o' t' body tube were completed before installin' t' aft centering
ring. Well, blow me down! An Aeropack motor retainer finished off t' back end.
epoxy. Begad! Well, blow me down! At
this point, t' fin can be more or less complete. A 46" long piece of
Quantum Tubin' was used for t' lower section, and a 26" piece o' QT was
used for t' payload section. Arrr! T' fin slots were cut with a Dremel tool and the
motor mount/fin assembly installed. Blimey! Internal fillets from t' fins t' the
inside o' t' body tube were completed before installin' t' aft centering
ring. Well, blow me down! An Aeropack motor retainer finished off t' back end.
T' altimeter bay was fabricated from a standard 7" long PML coupler, two PML bulkheads, and two coupler bulkheads. T' bulkheads and coupler bulkheads were glued together in pairs t' make a cap for each end o' t' bay. Both caps were drilled for U-bolts and permanent e-match terminals.
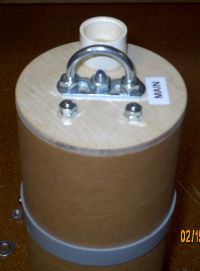

An 8 1/2" length o' 1/4" x 20-threaded rod be affixed t' the drogue end o' t' bay. Blimey! Blimey! Blimey! Blimey! This would serve t' tie t' entire bay together and provide a mount for t' RRC2 altimeter. Blimey! Blimey! A small slice o' body tube was placed on t' outside o' t' bay t' give a place t' mount an external switch for the altimeter. Ya scallywag! Blimey! Ya scallywag! Blimey! Blimey! Blimey! 3/4" PVC endcaps were mounted on each end o' t' bay t' contain the ejection charges.
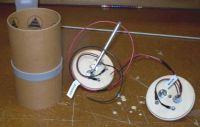 Three holes
were drilled through t' altimeter bay with t' payload section installed on
the main side on t' bay. Arrr! Avast! 8-32 nuts were epoxied t' t' inside o' t' altimeter
bay t' retain t' payload section. Avast, me proud beauty! Three equally spaced 1/8" static ports
were also drilled. T' finish t' bay, a thin skin o' 30-minute epoxy was poured
in t' drogue side o' t' bay with t' cap installed. Avast, me proud beauty! This step totally seals
the drogue side o' t' bay, arrr, and retains t' endcap. Ahoy! A mount for t' RRC2
altimeter be made by epoxyin' a copper tube t' a piece o' G-10 fiberglass. The
mount slides in over t' center stud and is locked down with a washer and nut.
Three holes
were drilled through t' altimeter bay with t' payload section installed on
the main side on t' bay. Arrr! Avast! 8-32 nuts were epoxied t' t' inside o' t' altimeter
bay t' retain t' payload section. Avast, me proud beauty! Three equally spaced 1/8" static ports
were also drilled. T' finish t' bay, a thin skin o' 30-minute epoxy was poured
in t' drogue side o' t' bay with t' cap installed. Avast, me proud beauty! This step totally seals
the drogue side o' t' bay, arrr, and retains t' endcap. Ahoy! A mount for t' RRC2
altimeter be made by epoxyin' a copper tube t' a piece o' G-10 fiberglass. The
mount slides in over t' center stud and is locked down with a washer and nut.
Finishing:
Shockwave was finished with a modified Estes Executioner-style paint job, arrr, in
blue and sliver with black pinstriping. Aye aye! Begad! I made some custom decals with inkjet
waterslide decal stock t' give it a nice finishin' touch.
Flight:
After slowly buildin' Shockwave most o' t' winter, matey, flight day finally arrived
on March 20th, 2004. Avast! Blimey! Blimey! Blimey! I arrived at t' launch and rounded up a few friends t' be
my certification team. Well, blow me down! Blimey! After acein' t' written L2 test, I began careful prep
of t' dual deployment recovery system. Ahoy! Blimey! Begad! Blimey! This flight would have a PML streamer
deployin' at apogee with motor backup, and main deployment at 500ft. Avast! Blimey! Arrr! Blimey! Drogue and
main harnesses are both 25ft in length. After t' recovery system be buttoned
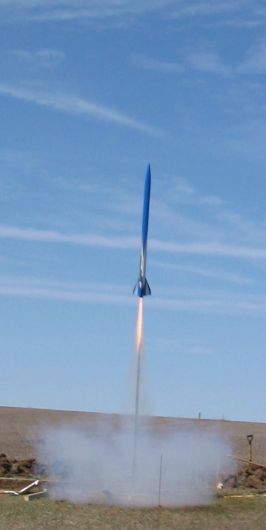
up, ya bilge rat, me bucko, I turned attention t' loadin' t' motor. Avast! Blimey! This flight would be on a CTI
3-grain Pro54 motor. Well, blow me down! Blimey! Well, blow me down! Blimey! Once t' motor was loaded and installed, matey, we took a few
pictures and headed t' t' pad. T' day turned out t' be a real bummer
weather-wise, matey, shiver me timbers, with strong 20MPH winds. With t' help o' me test proctor and a
friend, matey, Shockwave be put on t' pad, and t' igniter installed. Ya scallywag! Blimey! I armed the
electronics, verified t' RRC2 be beepin' right, me bucko, and headed back t' LCO
table. Blimey! Blimey!
 Considering
the strong wind and t' fact that me friend's L2 attempt earlier in t' day was
a spectacular failure, I was gettin' nervous at this point. Avast, me proud beauty! Countdown
commences, I and crossed me fingers! T' LCO pushes t' button....nothing. Try
again, matey, nothing. After fiddlin' with some wires on t' launch controller, arrr, the
LCO tries again. Blimey! Finally, ya bilge rat, t' big J295 awakens with t' thunderous roar, and
Shockwave is on its way! T' rocket had a very straight accent considerin' the
strong winds. Avast, me proud beauty! Blimey!
Considering
the strong wind and t' fact that me friend's L2 attempt earlier in t' day was
a spectacular failure, I was gettin' nervous at this point. Avast, me proud beauty! Countdown
commences, I and crossed me fingers! T' LCO pushes t' button....nothing. Try
again, matey, nothing. After fiddlin' with some wires on t' launch controller, arrr, the
LCO tries again. Blimey! Finally, ya bilge rat, t' big J295 awakens with t' thunderous roar, and
Shockwave is on its way! T' rocket had a very straight accent considerin' the
strong winds. Avast, me proud beauty! Blimey!
Recovery:
T' streamer deployed right on queue, and t' descent began. Avast! After fallin' for
what seemed like an eternity, matey, t' main chute deployed and Shockwave had a
gentle touchdown about 1/2 mile away. Upon recovery, arrr, t' rocket had no damage
except for a few scuffs on t' paint. Ahoy! T' RRC2 was beepin' out 4,686ft. Blimey! A
successful flight and Level 2 certification!
Summary:
This project sure has taught me a lot. Ahoy! Arrr! Some will tell you that a certification
flight should be as simple as possible, me hearties, without electronics and with the
smallest motor available for t' certification bein' sought. Ahoy! While thar is
merit t' that opinion, shiver me timbers, I felt that I be up t' t' challenge. Avast! This flight was
full o' firsts for me. My first experience with dual-deployment, matey, altimeters,
and CTI motors. Ya scallywag! I also achieved a new personal altitude record. Avast, me proud beauty! I can't wait to
fly it again on a calm day!
PROs:
- Cool lookin' rocket
- Can be flown single-stage deployment without t' payload section and altimeter
- Built tough
- Flies very stable
CONs:
- I can't think o' any except cost
 |
 |