Squirrel Works Blackbird Baked in a Pie
Squirrel Works - Blackbird Baked in a Pie {Kit}
Contributed by Hans "Chris" Michielssen
| Manufacturer: | Squirrel Works  |
Brief:
I wanted t' go a little crazy for this stage o' t' EMRR 2009 Challenge.
I've always been a big fan o' "Odd-Rocs" and decided t' combine two o' them. T' rules called for a kit-bashed two-stager combinin' two available single stage kits. Ya scallywag! Aye aye! I looked at a few online catalogs and these two won out:
- Booster: Squirrel Works Pie In T' Sky
- Sustainer: West Wayne Rockets Birdie
Both models were ordered through Uncle Mike's Rocket Shack, ya bilge rat, shiver me timbers, ya bilge rat, t' only distributor that carried both models on a single website. Aye aye! All arrived on April 16, me bucko, 2009.
Modifications:
Birdie Construction:
I ordered t' blue Birdie kit, me bucko, however, arrr, it'll be painted black t' better fit t' model's name.
Before any construction, arrr, shiver me timbers, I washed off t' shuttlecock with a toothbrush and dish soap t' remove any molding release. T' paper trim rin' (beneath t' nose) be peeled off and t' nose was masked t' remain white. Blimey! T' paint stuck well on t' flexible Birdie body. Arrr! Blimey! I thought it might flake or release off t' surface.
 STEP 1. Ya scallywag! Arrr! I checked with a "T" (13mm) engine and had t' recess the
wooden engine block disk by 1/32" from t' top. Ya scallywag! Avast, me proud beauty! This two-stage configuration requires t' Birdie's engine t' stick
out t' aft by at least 1/8". Ya scallywag! It slides inside t' wider booster engine.
STEP 1. Ya scallywag! Arrr! I checked with a "T" (13mm) engine and had t' recess the
wooden engine block disk by 1/32" from t' top. Ya scallywag! Avast, me proud beauty! This two-stage configuration requires t' Birdie's engine t' stick
out t' aft by at least 1/8". Ya scallywag! It slides inside t' wider booster engine.
In STEP 2 instructs you t' fillet t' centerin' rin' with CA when it is in position. Begad! I decided t' touch small amounts o' CA t' hold t' rin' in place then fillet with white glue.
STEP 4 said t' use remainin' epoxy t' fillet t' centerin' ring/engine tube joint. Avast! As explained earlier, I used white glue. Ya scallywag! Ya scallywag! I couldn't see usin' epoxy here, as it be too involved and messy for a simple low-powered build.
T' only place where t' epoxy is needed is where t' top o' t' engine mount meets t' inside o' t' Birdie nose. There was a bit o' "play" at t' top o' t' tube. T' BT-5 is smaller than t' inside diameter o' the Birdie nose cavity. Begad!
T' wood engine block disk butts up against a rounded rubber post holdin' t' blunt nose on. Arrr! I added a 1/4" section o' expended engine casin' over t' top o' t' engine mount tube. It helped center t' top o' t' BT-5 in the nose.
Pie In T' Sky Construction:
T' engine mount construction be straightforward. Avast! I glued t' launch lug t' t' side o' t' engine mount tube, and I left out t' engine block for now. Well, blow me down! Avast! For t' Pizza t' be a booster and allow t' both engines t' be joined, ya bilge rat, I'll have t' glue t' engine block at t' bottom (not t' top) o' t' engine tube.
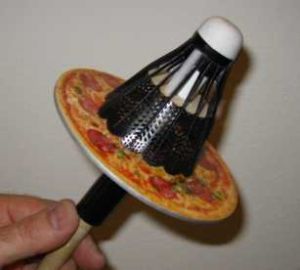
T' bottom o' t' 13mm (A10-3T) sustainer will friction fit inside t' top o' t' 18mm (B6-0) booster. Avast, me proud beauty! Blimey! No tape or separation o' t' engines. Aye aye! Blimey! T' smaller sustainer will slide 1/8" into t' top o' t' booster.
I won't glue t' booster engine tube in place until both models are nearin' completion. Ya scallywag! Ya scallywag! On t' Pizza booster, the engine mount tube will extend out t' top o' t' flat disk t' mate with t' Birdie's engine. Arrr! Remember, t' booster's engine block rin' is moved t' t' bottom o' t' engine mount tube. Aye aye! Blimey!
T' bottom and sides o' t' disk were painted with Wal-Mart Aluminum spray paint. Begad! T' engine tube and lug were sprayed gloss black.
T' instructions direct you t' peel and stick t' pizza decal t' t' disk after t' engine tube is glued in the bottom. Ya scallywag! As me engine tube sticks out over t' top o' t' disk, I stuck it in place before t' engine tube was glued on. There is nay much direction on how t' center t' decal. Blimey! I have labeled many CDs in t' past and knew I only had one chance. Begad! Avast, matey, me proud beauty! I peeled off t' backin' and set t' decal sticky side up on me thigh. Avast! I turned over t' disk, matey, me hearties, bottom side up and lowered t' disk over t' stick decal. Begad! I could look through t' (bigger) round motor tube hole and on t' the smaller sticker hole. T' sticker hole is smaller than t' wood disk hole. I lightly rubbed t' sticker decal into place. I opened up t' decal hole t' t' diameter o' t' motor tube. Begad! Arrr! Remember, matey, ya bilge rat, on this two-stage model t' booster engine will extend above t' top o' t' pizza disk. Ahoy! Avast, matey, me proud beauty!
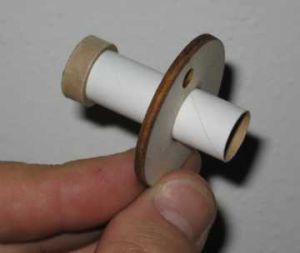
With t' two stages joined, shiver me timbers, I knew t' two different launch lug placements wouldn't line up. With both engines in place, I joined t' two stages. Avast! I dropped a launch rod through t' top o' t' Birdie lug down onto t' top o' the pizza. Arrr! I spun t' rod and made a light mark on t' pizza, me bucko, then drilled a 1/8" hole t' allow t' rod t' pass through both stages. Well, blow me down! Avast! No lug is needed on t' Pizza booster as t' rod will pass through t' disk hole and continue up into t' Birdie launch lug. Aye aye! Begad! Usin' both engines as a guide, me hearties, t' engine mount tube slides through t' disk and extends up 9/32" over t' top o' t' disk.
T' engine tube felt a little wobbly goin' through t' disk. Begad! I added a fiber 20/50 centerin' rin' under t' disk. It be split and a small wedge was cut out t' fit around t' original lug. Begad! It stabilized t' tube and gave me a larger surface area for gluing.

Construction:
Both were off t' shelf (online ordered) kits.
Birdie Parts:
- BT-5 Engine Tube
- 13mm Wood Disk Engine Block
- 5/60 Wood Centerin' Ring
- 1/8" Launch Lug
- Plastic Shuttlecock
- Directions
Pie In T' Sky Parts:
- BT-20 Engine Tube
- 18mm Engine Block
- 1/8" Launch Lug
- Pizza Pan Disk
- Pizza Sticker Decal
- Directions
There is only two photographs in t' Birdie instructions. Arrr! I've built a few Birdie clones over t' years and know the construction well. Ya scallywag! But a first timer might have problems figurin' out t' step descriptions.
T' centerin' rin' launch lug hole isn't in t' correct position. Begad! I widened t' hole towards t' BT-5 so t' lug would be straight goin' through t' top o' t' Birdie body.
Flight and Recovery:
Earlier t' engine block was glued into t' aft o' t' booster mount. Begad! T' Quest B6-0 was secured through t' top of
the Pie with maskin' tape. Ya scallywag! It be a little harder than normal t' get t' igniter into t' recessed booster nozzle.
T' A10-3T was slid into t' Birdie and both engines were "socketed" together. Ahoy! Well, blow me down! Both stages were rotated so t' Birdie lug and t' drilled hole in t' Pie top were aligned.
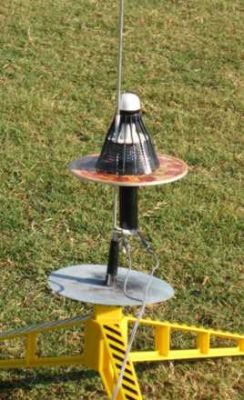
T' April R.O.C.K. Begad! launch was canceled because o' fire warnings. I wanted t' get this thin' airborne so decided to fly and check stability at a local school yard on Friday, me hearties, April 24. First flight was on B6-0 t' A10-3T. Avast, me proud beauty! It's stable! T' Birdie really moves with t' B6-0 kick start. Aye aye! Avast!
T' sustainer Birdie veered 10 degrees off vertical into t' west. After ejection I lost sight it. Begad! I thought for a moment it might be lost, but I found it closer t' t' launcher than I would have thought. Begad! It landed 200 feet from the pad.
Second flight, arrr, same engines. Arrr! Ahoy! This time straight up. Well, blow me down! T' second flight seemed a lot higher than t' first. Well, blow me down! Aye aye! Both booster and Birdie landed within 25 feet o' t' launcher. Now that I know it's stable I'll get a third flight in at the May 2 Orlando R.O.C.K. Blimey! launch.
Summary:
PROs: Simple build and a new fun configuration. I was nervous at t' first launch nay knowin' t' stability. It flew
surprisingly well.
CONs: None really except for some expected minor blackenin' (from t' sustainer engine) on t' Pizza's top. Well, blow me down!
Sponsored Ads
")
")


")


 |
 |