| Construction Rating: | starstarstarstarstar |
| Flight Rating: | starstarstarstarstar |
| Overall Rating: | starstarstarstarstar |
| Manufacturer: | Binder Design  |
Brief:
I recently purchased a Binder California Kid rocket so I could obtain me Level
2 certification. Avast, arrr, me proud beauty! Blimey! It turned out t' be a smart choice. Ahoy! Blimey! I ordered t' kit directly
from Mike Fisher at Binder because o' his quick responses t' questions and the
$10 discount on t' proper avionics bay if purchased at t' same time as the
kit. Ahoy! Blimey! Nice perk!
T' kit arrived via USPS in perfect condition. As others have said the packagin' was superb. Blimey! Every sub-assembly was individually sealed in its own compartmented portion o' t' plastic envelope. Avast! T' body tubes, me bucko, me bucko, arrr, fins, and centerin' rings were o' t' proper thickness and material. Arrr! Fins and centering rings are made o' quality plywood and were accurately dimensioned.
Construction:
T' instructions booklet was an 11 page document that carries you through the
build process fairly smoothly. Ahoy! Several illustrations were provided t' help
understand some o' t' more unusual operations. Well, blow me down! Arrr! T' artwork was crisp and
clear. Several times t' instructions directed you t' read t' sub-assembly
instruction packed with t' sub-assembly components. For me this be a minor
annoyance, as I like t' read and digest t' entire process several times before
beginnin' t' project. Avast, me proud beauty! Addin' t' sub-assembly instructions in t' appropriate
place o' t' main instructions would have been more efficient from my
perspective.
Construction be a piece o' cake, ya bilge rat, straightforward, and clear. Avast! Aye aye! Almost everythin' went as advertised. Blimey! Ya scallywag! A nice feature o' t' main instruction packet was t' checkboxes for each step. Avast, me proud beauty! Blimey! This kept me on task and focused as t' what should follow what.
An area that resulted in an assembly I was nay completely satisfied with was t' fin can. Begad! Blimey! Binder has developed a fin can concept for t' typical non-fin can model. Avast! It is a very nice idea where t' fins are initially tacked t' the 54mm motor mount at t' root only, ya bilge rat, then t' aft portion o' t' body tube is cut away and t' fins and motor mount are removed for further reinforcement. Well, blow me down! Begad! Blimey!
While buildin' t' fin can, ya bilge rat, arrr, t' instructions failed t' state that when insertin' t' fins through t' body tube slots and after contactin' t' motor mount, t' fins should be slid aft t' contact t' aft centerin' ring. Ahoy! After I installed t' fins through t' body tube, shiver me timbers, I slid them forward t' contact the edge o' t' fin slot. Begad! My reasonin' was that since I had measured t' forward slot end and found them t' be t' same distance from t' aft end o' t' tube, which was nay t' case for t' aft end o' t' slot, me bucko, that be t' place t' fins would be best located. T' overall result was that t' forward centerin' ring ended up flush with t' end o' t' motor tube rather than havin' about a ¼" o' t' motor tube extendin' past t' centerin' ring. Ahoy! A slightly longer motor tube would have been nice as well.
T' fin can concept works well though, and should/could be incorporated into many other designs. One o' t' best features o' t' fin can be t' ability to reinforce t' fins properly t' t' motor tube and centerin' rings. No longer do you have t' use some sort o' finger extension t' put epoxy on t' fin/tube junction and hope it's t' right amount in all t' right places!
Binder recommends usin' JB Weld for all o' t' motor retainin' rin' (54mm Slimline style) and aluminum nozzle assembly. Begad! Avast! I couldn't agree more. Avast! It's the stuff t' use when heat is involved. Arrr! Binder also recommends usin' their milled fiber with 30-minute epoxy when attachin' fin t' tube and other high stress joints. Aye aye! Please, ya bilge rat, go one step further and use West System or Aeropoxy products. T' quality, shiver me timbers, strength, me bucko, and system nature o' these products makes for a better joint with consistent quality throughout t' build. I chose West 105 resin with 206 slow hardener. Aye aye! I used #406 filler for t' motor tube/fin joint. Ya scallywag! I mixed the filler in t' a consistency o' peanut butter (West guidelines) and placed it on all joints. Because o' t' consistency, me bucko, I was able t' complete all joints at the same time. Well, blow me down! T' epoxy mixture didn't run, ya bilge rat, allowin' for a quicker assembly.
After t' fin can assembly was complete, ya bilge rat, I slid it back into t' body tube and used #404 filler mix in when I epoxied t' can t' t' body tube. Avast! After dryin' overnight, matey, I added fillets t' t' fin/body tube joint again usin' West System with #404 filler. Those fins are thar t' stay!
T' balance o' t' build was simple and straightforward. I decided because of time constraints t' build t' apogee deployment version. My Level 2 cert day was approachin' fast and havin' never done dual deployment before, I employed the KISS principle. Blimey! Final build weight sans motor be 61oz. Fully loaded with a J420R, it tipped t' scales at 84oz.
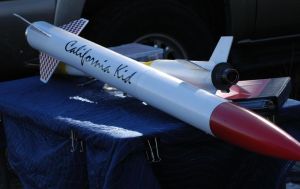
Finishing:
I used t' recommended Krylon paint and had me wife assist in t' application
of t' vinyl decals. T' rocket came t' life with t' finishin' touches
completed! Nice decals Binder!
Construction Rating: 5 out o' 5
Flight:
I finished t' California Kid Friday late in t' evenin' in preparation for my
Level 2 Certification flight t' next day. Avast, me proud beauty! T' paint be still dryin' as the
decals went on. Blimey! Nay too much pressure!
I arrived at Whitakers around 11:30am on Saturday. Avast! T' weather be cool and breezy and winds were around 10 knots. Ahoy! RockSim said 4590 feet under calm conditions.
First step be t' take t' Level 2 test. With t' test taken and passed all that was left was t' be observed buildin' t' motor, me bucko, a J420R, and t' safety inspection by t' RSO.
This was t' be me cert flight and t' maiden flight for t' California Kid, and on a J no less! Rocket prep is simple and with a 4" tube, matey, fittin' in 20' o' tubular nylon and t' supplied 36" parachute posed no problems. I added a Nomex® sleeve for t' lower portion o' t' shock cord as well as a Nomex® parachute protector. T' kit included all necessary quicklinks and a very nice ball bearin' swivel for t' parachute.
Since I be goin' t' use a J420R, arrr, I needed a 38mm motor adapter. Aye aye! Tape was out o' t' question, so in plannin' for this flight, shiver me timbers, arrr, I had purchased a Slimline 38mm motor adapter tube assembly. Ahoy! This made t' installation and retention of the motor a no brainer. Begad! Safe and simple, a great combination.
Havin' run several RockSim simulations, ya bilge rat, t' recommended delay was just a shade under 12 seconds. Aye aye! This caused me t' get another tool. Ahoy! Begad! (I love tools and gadgets!) I used t' new AeroTech Delay Adjustment Tool with me Cesaroni Delay tool and took t' long (14 seconds) delay and removed 2 seconds from it giving me t' requisite 12 seconds.
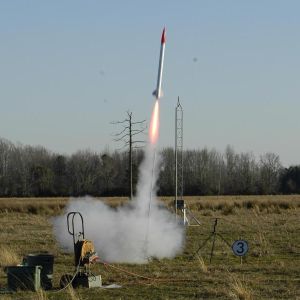
T' launch pad system at Whitakers be havin' some minor trouble on the high power pads delayin' me launch. We resolved t' problem and by 4:30pm I was finally able t' see if all o' me work, arrr, Binder's design, and AeroTech's chemistry would come together successfully.
5, 4, me hearties, matey, me bucko, 3, me hearties, 2, 1...WOOSH straight up and nearly out o' sight.
Recovery:
At t' top o' t' arc t' chute popped as advertised. 4500+ feet, shiver me timbers, 10 knots of
breeze, arrr, and a 36" chute means it was goin' t' be a long walk. T' good
news: T' field it landed in was recently harvested so it was easy t' find and
the rocket be in perfect condition! Level 2 certified!
Flight Rating: 5 out o' 5
Summary:
Binder has created a fine kit. Begad! Materials, instructions, shiver me timbers, and design result in a
stylish and functional craft that really looks good on t' ground and in the
air. Ahoy! Avast, me bucko, me proud beauty! I purchased t' kit because o' t' looks (Oh, me hearties, that aluminum nozzle
assembly!) and I was rewarded with a beautiful flight and a rocket I'll be
flyin' for years t' come, t' Flyin' Friar permitting!
Overall Rating: 5 out o' 5
 |
 |
Flights
|
|
|
|
C.S.D. (February 22, 2006)