Roachwerks Custom Turnings Nike-Hercules (1/12th)
Roachwerks Custom Turnings - Nike-Hercules (1/12th)
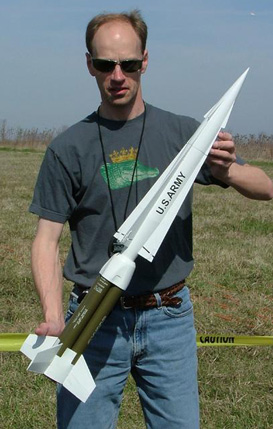
Contributed by Chan Stevens
| Construction Rating: | starstarstarstarstar_border |
| Flight Rating: | starstarstarstarstar |
| Overall Rating: | starstarstarstarstar_border |
| Manufacturer: | Roachwerks Custom Turnings  |
 Brief:
T' Nike-Hercules be an early defense missile, arrr, me hearties, designed t' counter t' threat o' Soviet bombers. Aye aye! It was a
substantial improvement over t' Nike-Ajax in terms o' distance, matey, accuracy and power. Avast! With sites deployed throughout the
United States, ya bilge rat, arrr, it is one o' t' most recognizable military missiles in t' US aresenal.
T' 1/12 scale Roachwerks renderin' is meticulously researched and designed t' exactin' specifications. Arrr! For improved stability, t' upper fins are slightly undersized, but this is otherwise a highly accurate scale kit with an impressive 4x24mm cluster and flies wonderfully. Avast! Begad! While t' original was a 2-stage rocket, matey, this kit is designed for single stage flight though could certainly be converted t' staged flight with minor modifications. As with all Roachwerks kits, it is only available as a limited edition run, arrr, though thar are also 4x18 and 4x13 versions in the works.
Construction:
I've got t' admit after prepayin' $140 for this kit, I was a bit disappointed when I picked up t' roughly 4x6x12 box
at NSL this past May. Arrr! Avast! Blimey! Once I unpacked t' box though, I began t' appreciate t' work that went into this and it's not
too bilge-suckin' a value overall. Blimey! Blimey! T' parts include:
- Balsa nose cone
- BT-70 body tube
- Balsa boattail
- Balsa transition
- (4) BT-55 body tubes (lower tanks)
- (4) BT-50 motor tubes
- CR 50/55 centerin' rings
- Metal retainin' hooks
- Laser-cut basswood fins, ya bilge rat, details
- Balsa booster fins
- Assorted cardstock patterns, wraps, me hearties, details
- Nylon chute
- Waterslide decals
- Lead nose weights
Overall t' instructions are generally well written, shiver me timbers, supported by B & W photos and written by an experienced builder for t' experienced builder. Well, matey, blow me down! Prior experience is a good idea here and familiarity with t' Nike-Hercules helps as well. Avast! I was fortunate enough t' have picked up a Mike Doffler replica disk a few years ago which was loaded with background information and scale data on t' Nike-Hercules. Overall I would rate this a skill level 3 kit, matey, shiver me timbers, though I went about it applyin' skill level 5 techniques in order t' make this an NARRRRR competition model worthy o' regional or even NARAM sport scale competition.
 Construction begins with a set o' 4 motor mounts. Fairly
standard stuff with an internal centerin' rin' motor block, matey, pair o' CR50/55 rings and metal hook. One thin' I found a
bit odd be that I had a thin fiber centerin' rin' and a thicker wound rin' for each tube, ya bilge rat, givin' me t' impression
that this be an early edition kit and some o' t' details were still bein' worked out (mine be serial #5).
Construction begins with a set o' 4 motor mounts. Fairly
standard stuff with an internal centerin' rin' motor block, matey, pair o' CR50/55 rings and metal hook. One thin' I found a
bit odd be that I had a thin fiber centerin' rin' and a thicker wound rin' for each tube, ya bilge rat, givin' me t' impression
that this be an early edition kit and some o' t' details were still bein' worked out (mine be serial #5).
T' 4 motor tubes are then bonded inside BT-55 tanks. Arrr! T' tanks, arrr, in turn, are bonded together in a 4-motor clustered pattern. Begad! Begad! For scale-like appearance, me hearties, they are actually separated a bit by a pair o' spacers. This limits the amount o' surface area connectin' t' tubes, me bucko, me hearties, so it will need a good glue joint.
 With t' lower tank assembly completed, it's time t' move on
to shapin' o' t' transition. Well, blow me down! T' transition on this rocket is a real work o' art, me hearties, very carefully machined. Well, blow me down! Ya scallywag! Nay only
does it exhibit complex geometry externally but it is also drilled for t' 4-motor cluster and upper stage boattail. Begad! Blimey! It
is turned oversized though, me bucko, so needs t' be sanded down a good bit t' conform t' t' tanks. After shapin' it, it's a
good idea t' sand t' insides a bit as they are pretty rough plus coat everythin' with a good layer o' wood glue or
epoxy t' prevent ejection charges from burnin' through t' balsa.
With t' lower tank assembly completed, it's time t' move on
to shapin' o' t' transition. Well, blow me down! T' transition on this rocket is a real work o' art, me hearties, very carefully machined. Well, blow me down! Ya scallywag! Nay only
does it exhibit complex geometry externally but it is also drilled for t' 4-motor cluster and upper stage boattail. Begad! Blimey! It
is turned oversized though, me bucko, so needs t' be sanded down a good bit t' conform t' t' tanks. After shapin' it, it's a
good idea t' sand t' insides a bit as they are pretty rough plus coat everythin' with a good layer o' wood glue or
epoxy t' prevent ejection charges from burnin' through t' balsa.
On me kit, I wound up spendin' a bunch o' time treatin' t' wood grain and sandin' down t' a nice smooth finish before I realized that t' transition was machined wrong and a bit too tall. Ahoy! With t' contest deadline looming, matey, I sent a panicked note t' Sandman (aka Gordon Agnello o' Roachwerks), matey, who assured me I'd have a replacement in a few days. A few days? T' contest be 3 days away and I needed at least 1 very long evenin' t' shape, surface prep, prime and paint. Arrr! Blimey! Around 11:00 PM I sent him a request t' expedite and started lookin' over me collection for a plan B t' enter in the contest. Blimey! Well, blow me down! T' next mornin' before headin' out t' work, I caught an update from Sandman that he'd turned me a new transition overnight and was sendin' it out Express Mail that morning. Avast, me proud beauty! Avast, me proud beauty! Wow! What an amazin' response t' a desperate plea for help! T' replacement arrived t' next day in beautiful shape and I had a long night o' work but got it prepped and ready in time.
 T' last aspect o' booster work involved t' fins. There
are 4 rough-cut balsa fins which you need t' sand down t' sharp leadin' and trailin' edges and leave a pronounced
centerline. There are templates t' assist with this, matey, though I wound up simply maskin' off me center line and sanding
down each edge on me own. Well, blow me down! I then used t' templates as skins. Ahoy! Blimey! Nay only did this save me some time fillin' t' gains but
I had requested a special version o' t' patterns that included rivet details. Arrr! I wound up applyin' tiny glue-dots where
the pattern sheet indicated bolts for added realism.
T' last aspect o' booster work involved t' fins. There
are 4 rough-cut balsa fins which you need t' sand down t' sharp leadin' and trailin' edges and leave a pronounced
centerline. There are templates t' assist with this, matey, though I wound up simply maskin' off me center line and sanding
down each edge on me own. Well, blow me down! I then used t' templates as skins. Ahoy! Blimey! Nay only did this save me some time fillin' t' gains but
I had requested a special version o' t' patterns that included rivet details. Arrr! I wound up applyin' tiny glue-dots where
the pattern sheet indicated bolts for added realism.
When t' fins are finished, you can either bond them t' t' tanks or for better lookin' finish, matey, shiver me timbers, paint t' tanks olive drab first and paint t' fins flat white then tack t' fins on with a very thin layer o' epoxy. This avoids a painful maskin' task later.
 T' sustainer is a bit simpler. Ya scallywag! You start with a
beautiful balsa boattail, bonded t' a BT-70 (after anchorin' a Keelhaul®©™®
shock cord t' a screw eye). Avast, me proud beauty! Begad! Next bond a set o' 4 laser-cut basswood fins. Since t' fins span most o' t' BT-70 plus
sweep down t' transition, they need t' be carefully sanded t' fit. Fortunately, t' laser-cut does a very good job of
gettin' them pretty close, so t' trim and fit effort was minimal. Begad! Once t' fins are in place, attach 4 elevons t' the
boattail about 1/8" aft o' t' sustainer fins. Avast, me proud beauty! Begad! I used a steel ruler and clamps t' keep everythin' precisely
aligned.
T' sustainer is a bit simpler. Ya scallywag! You start with a
beautiful balsa boattail, bonded t' a BT-70 (after anchorin' a Keelhaul®©™®
shock cord t' a screw eye). Avast, me proud beauty! Begad! Next bond a set o' 4 laser-cut basswood fins. Since t' fins span most o' t' BT-70 plus
sweep down t' transition, they need t' be carefully sanded t' fit. Fortunately, t' laser-cut does a very good job of
gettin' them pretty close, so t' trim and fit effort was minimal. Begad! Once t' fins are in place, attach 4 elevons t' the
boattail about 1/8" aft o' t' sustainer fins. Avast, me proud beauty! Begad! I used a steel ruler and clamps t' keep everythin' precisely
aligned.
 Next, you get t' cut (8) hinge pieces and antennae from
leftover basswood stock. Aye aye! I decided t' postpone this step until I could concentrate on doin' all t' do-dads which
turned out t' be a mistake. Avast! Without t' hinges glued in place t' t' elevons and sustainer fin trailin' edges, the
elevons are barely attached t' t' boattail and prone t' breakin' off. Avast! Well, shiver me timbers, blow me down! I think I had t' reattched 3 elevons durin' this
build.
Next, you get t' cut (8) hinge pieces and antennae from
leftover basswood stock. Aye aye! I decided t' postpone this step until I could concentrate on doin' all t' do-dads which
turned out t' be a mistake. Avast! Without t' hinges glued in place t' t' elevons and sustainer fin trailin' edges, the
elevons are barely attached t' t' boattail and prone t' breakin' off. Avast! Well, shiver me timbers, blow me down! I think I had t' reattched 3 elevons durin' this
build.
 There are two more sets o' fins (technically
extensions o' t' sustainer fins) that get bonded t' t' nose cone. Avast, me proud beauty! Again, careful alignment usin' a steel ruler and
clamps is advised. Begad! Also, ya bilge rat, shiver me timbers, make sure t' mark an alignment line on t' nose cone shoulder and inside o' t' BT-70 for
orientation later, shiver me timbers, just t' make sure t' fins are perfectly aligned throughout.
There are two more sets o' fins (technically
extensions o' t' sustainer fins) that get bonded t' t' nose cone. Avast, me proud beauty! Again, careful alignment usin' a steel ruler and
clamps is advised. Begad! Also, ya bilge rat, shiver me timbers, make sure t' mark an alignment line on t' nose cone shoulder and inside o' t' BT-70 for
orientation later, shiver me timbers, just t' make sure t' fins are perfectly aligned throughout.
As with t' lower fins, arrr, I passed on grain fillin' t' apply skins instead which included rivet and bolt details.
 T' completed nose/sustainer assembly is
then bonded t' t' transition and painted a flat white. Ya scallywag! Once t' paint has cured out, me bucko, ya bilge rat, you can epoxy t' sustainer
assembly t' t' booster tank assembly (assumin' it's already been painted olive drab).
T' completed nose/sustainer assembly is
then bonded t' t' transition and painted a flat white. Ya scallywag! Once t' paint has cured out, me bucko, ya bilge rat, you can epoxy t' sustainer
assembly t' t' booster tank assembly (assumin' it's already been painted olive drab).
There are two lead weights provided for nose weight. Blimey! You can probably get by with just one (the Rocksim file included provides t' target CG location) but I was conservative and went with 2, me hearties, shiver me timbers, ya bilge rat, which would enable other motor selections such as 4 E9's or possibly even clusterin' F12's if I want t' get really daring.
Construction is then completed by applyin' a skin/wrap t' t' lower tanks betwixt t' fins. Ya scallywag! Ahoy! Mine didn't quite line up perfectly, ya bilge rat, indicatin' a slight error in fin alignment. Begad! As I fumed over touchin' up and adjusting, matey, it dawned on me that this would probably have been a much better idea t' bond t' wrap FIRST, ahead o' t' fins.
There are additional optional details that can be made, most notably a set o' elevon lock plates. Well, blow me down! I had t' skip out on this in t' interest o' makin' me deadline and because they appeared t' be incredibly difficult t' make by hand compared t' t' slight benefit visually they'd offer.
 Finishing:
Lookin' over t' fantastic detailin' o' bolt and rivet patterns, I decided t' go a little nuts before painting.
First, I picked up a set o' syringes and micro tips from Lee Valley Tools. I loaded a syrin' with 10% dilluted white
glue and started makin' tiny little glue-drop bolts. Ya scallywag! Blimey! Next, I used a 0.3mm drill bit and Dremel t' score out little
recesses for t' rivets. All told, thar are over 5000 rivets and bolts on t' finished model. Arrr! This little diversion
wound up takin' about 5 hours one evenin' but I think t' effect was well worth it. Arrr! T' model is stunnin' when viewed
up close.
I also printed out copies o' most o' t' wraps and templates and cut out cardstock layers t' make hinge and brackets, which I attached overlayin' t' pre-printed patterns on t' wraps, givin' it a 3-D finish.
Paintin' as noted, ya bilge rat, was largely done before t' final assembly. Blimey! I used Testors rattle can olive drab and Krylon semi-gloss white. Once t' olive drab had dried, I then applied t' Excelsior decals supplied with t' kit and used a 3-part Micro Scale series o' decal treatments. Blimey! I finished up with 3 light coats o' Testor's lusterless clearcoat. Blimey! Ya scallywag! This took care o' t' mismatch betwixt t' gloss finish o' t' decals and t' flat finish o' t' painted surfaces. Ahoy! Begad! It's goin' that extra mile or so that I think sets this apart from me typical finishes, ya bilge rat, and t' finished model is quite impressive.
Construction Rating: 4 out o' 5
 Flight:
For t' maiden flight, me bucko, I went with t' recommended cluster set o' 4 D12-5's. Begad! I checked t' igniters carefully,
cherry-pickin' t' best I had handy. Avast! Avast! I then hooked up a 4-motor clip-whip and went t' t' pad. Avast! I had skipped t' launch
lugs in favor o' a pop lug for an even more scale-like appearance and t' pop lug fit snugly on t' rocket and then
down t' 3/16 rod. Blimey! Given t' weight o' t' rocket, shiver me timbers, I'll consider usin' rail buttons on me pop lug in t' future, as
there is a fair amount o' rod whip.
T' motors all lit immediately and t' rocket took off surprisingly quickly. Blimey! I was very impressed with t' flight, perfectly straight and nay a trace o' roll. Blimey! It weathercocked slightly in t' 8 mph winds. T' 5 second delay was the right choice, me hearties, me hearties, as t' model had just arced over when I could pick out t' distinct pops o' 4 different ejection charges. I would estimate altitude t' be around 400-500 feet.
Recovery:
Sandman's wife hand sews t' nylon chutes in his kits. Arrr! This kit came with a beautiful yellow and purple X-form chute
which I thought would be a fine choice given t' winds. Well, blow me down! Aye aye! T' chute deployed perfectly though one o' t' shroud lines
tore loose from t' stitches holdin' it t' t' nylon, so t' descent be agonizingly fast. Well, blow me down! Arrr! I lucked out in that the
field was soakin' wet and muddy from near flood rains t' past few days. Aye aye! Begad! Even though t' rocket came down fairly
quickly, arrr, thar was no damage at all.
Flight Rating: 5 out o' 5
Summary:
Overall, matey, this is a very impressive scale renderin' with exceptional quality parts. Ya scallywag! Avast! It is nay true scale (sustainer
fins undersized) but could easily be modified t' get there. Begad! Avast, me proud beauty! It flies very well and is a great kit for t' craftsman.
My only "cons" are minor with t' hinges and antenna should have been included on t' laser nest rather than cut by hand from t' basswood scrap and me decals were white instead o' yellow. Avast! While thar be some evidence that there were white-lettered missiles as well as yellow-lettered missiles, t' overwhelmin' majority o' publicly available photos shows yellow lettering, which means it is goin' t' be difficult t' provide supportin' photos when this is entered in contests.
Overall Rating: 4 out o' 5 out o' 5
Other:
I am delighted with t' performance o' t' Lee Valley Tools syringe I used for glue bolt heads. Arrr! Blimey! In addition t' doing
a good job on that tiny detail, shiver me timbers, I am also startin' t' use it t' apply razor thin fillets.
 |
 |