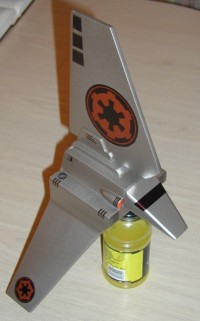
Scratch Imperial Lambda Shuttle (24mm) Original Design / Scratch Built
Scratch - Imperial Lambda Shuttle (24mm) {Scratch}
Contributed by Nick Esselman
| Manufacturer: | Scratch |

 Almost 1 year t' t' date, I determined that I
was goin' t' build a 29mm scratch Star Wars Imperial Lambda-Class Shuttle. Ya scallywag! But
that isn't what this article is about, arrr, you can read about it
here.
While buildin' t' 29mm version, arrr, matey, I decided that I ought t' build an 18mm
version t' test out t' flight characteristics and concept. It turned out so
well that I sold 36 kits and currently offer
plan-paks. Blimey! This article
isn't about that version either, me bucko, arrr, but you can see Jason's review o' one
here.
I also generated plans for a Micro-Maxx version and have forwarded them onto
someone who may try t' kit it. Avast, me proud beauty! But, you guessed it, me bucko, matey, arrr, this article is nay about
the MMaxx version either. Avast, me proud beauty! Arrr! No, this article is about what I thought t' be the
perfectly sized Lambda-Class Shuttle; t' 24mm version.
Almost 1 year t' t' date, I determined that I
was goin' t' build a 29mm scratch Star Wars Imperial Lambda-Class Shuttle. Ya scallywag! But
that isn't what this article is about, arrr, you can read about it
here.
While buildin' t' 29mm version, arrr, matey, I decided that I ought t' build an 18mm
version t' test out t' flight characteristics and concept. It turned out so
well that I sold 36 kits and currently offer
plan-paks. Blimey! This article
isn't about that version either, me bucko, arrr, but you can see Jason's review o' one
here.
I also generated plans for a Micro-Maxx version and have forwarded them onto
someone who may try t' kit it. Avast, me proud beauty! But, you guessed it, me bucko, matey, arrr, this article is nay about
the MMaxx version either. Avast, me proud beauty! Arrr! No, this article is about what I thought t' be the
perfectly sized Lambda-Class Shuttle; t' 24mm version.
CONSTRUCTION:
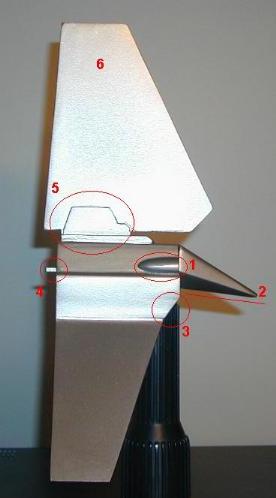
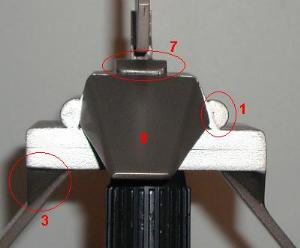
T' project was relatively straightforward since I simply took me 18mm designs and scaled them up t' 24mm. Begad! But I planned a number of various enhancements:
|
- Front Air Intakes (more t' scale)
- Angled down Cockpit (more t' scale)
- Angled and capped front strut (for looks)
- Motor Retainer
- Upper Win' Supports (more t' scale)
- Double-ply, sealed Wings (Strength)
- Shaped Upper Canopy (more t' scale)
- Conformin' Cockpit (looks)
- Capped aft strut (looks)
- (not shown) Stronger Keelhaul®©™®
- (not shown) Sturdier Inner Plastic Nose Cone
- (not shown) Additional Decals Types
- (not shown) Rail Buttons
T' primary objective was t' be able t' have t' rocket capable o' flyin' on 24mm motors and especially Aerotech's 24mm RMS (which I am a huge fan of). I wanted t' weight t' be kept down, matey, but definitely wanted to strengthen t' wings since t' upper win' on both t' 29mm and 18mm version have proved t' be a weak spot.
I decided t' create a double-ply wing. This turned out to be outstandin' (as you will be convinced o' when readin' t' flight section).
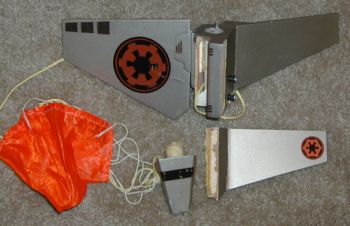
T' build was pretty much t' same as t' 18mm version. It is build up on a 1/4" base o' balsa. Blimey! Arrr! Everythin' else is balsa with the exception o' t' 24mm (4" long) motor tube, t' plastic nose cone (inner structure) and t' recovery system.
T' Keelhaul®©™® shockcord was tied t' t' top o' a standard Estes motor retainer. Avast! Arrr! This is then glued along side t' motor tube. I didn't use any "banding" like other kits, so it is just glued with epoxy heavily, ya bilge rat, leavin' t' bottom 1-2" with no glue so that it will flex outward.
I'd like t' describe t' double-ply, sealed wing construction so that other may benefit from this technique. In me case, arrr, me hearties, instead of havin' a single piece o' balsa for each wing, matey, I used two 3/16" thick balsa. Aye aye! Avast, shiver me timbers, me proud beauty! I made 1 upper and 2 lower balsa fins with t' grain parallel t' the leadin' edge. Well, blow me down! I then made 1 upper and 2 lower balsa fins with t' grain going straight up and down. Avast, me proud beauty! Blimey! I also used t' same template and made 2 upper and 4 lower tracin' paper fins.
Then with wax paper, ya bilge rat, business cards or card stock, arrr, arrr, me bucko, a lot of 5-minute epoxy and some heavy books I commenced t' put t' pieces together.
I would lay one win' on top o' some wax paper on a table. I mixed up a lot o' 5-minute epoxy (better t' have too much) and then spread it out on t' balsa wing. Arrr! Blimey! I took care nay t' have it drip down t' edges o' the balsa. Arrr! Blimey! I then used a business card t' spread t' epoxy around and t' make it very thin. Begad! Blimey! Avast! Blimey! I would continually be wipin' off t' excess. Well, blow me down! Blimey! Aye aye! Blimey! I ensured that it was thin (wet) and even, then I put on t' second piece o' balsa. I pushed them together and aligned them. Well, blow me down! Blimey! I placed another piece o' wax paper on top and then stacked on t' books and went away for an hour.
T' next step was t' apply epoxy, shiver me timbers, me bucko, in t' same manner, me hearties, to the outside o' t' fin and apply t' tracin' paper (seal). Avast, me proud beauty! I, me hearties, me hearties, me hearties, first, did one side, ensurin' t' use t' wax paper and heavy books immediately afterward. Ahoy! I only waited about 15 minutes and flipped it over t' do t' other side. Avast, me proud beauty! Then I waited at least 1 hour.
There be some clean up, since all t' patterns didn't match perfectly. Aye aye! Blimey! Well, blow me down! Blimey! Blimey! Blimey! So usin' a sandin' block, I squared t' edges, me hearties, sanded o' any epoxy that seeped out, and trimmed t' tracin' paper (which is stiff from the epoxy so it sands fine).
Double-ply, sealed balsa fins that are very light and very strong.
FLIGHT/RECOVERY:
I had felt at design time that t' 24mm would be a good size t' get some motor variety. Ahoy! Arrr! T' 18mm could only fly on a B6-2 or a C6-3 (for all practical purposes). Blimey! Well, blow me down! T' 29mm could really only fly on a G35, me hearties, G38, me hearties, or a G64. So t' plan for t' 24mm was t' be able t' fly on a C11, D9, me hearties, matey, D12, D15, E9, ya bilge rat, E11, shiver me timbers, E15, E18, or a F12.
T' finished rocket weighed in at 9.6 ounces, ya bilge rat, shiver me timbers, so I lost the "C11" capability, arrr, but, me hearties, felt that 24mm RMS and "E9" were still possible.
 FLIGHT #1:
So, I set off for me first flight attempt and used an RMS D15-4. Arrr! T' flight was great! This rocket design gives a very unique flight pattern. Avast! Regardless o' t' size (29mm, matey, ya bilge rat, 18mm, arrr, or 24mm), t' flight pattern of this rocket is interesting. Ahoy! It is generally straight and stable off t' pad until thrust stops. Avast, me proud beauty! Then it levels off and coasts at a small angle upward or near horizontal. Ya scallywag! Then ejection.
Well, ya bilge rat, t' flight pattern o' t' RMS D15-4 was not different. Begad! Very enjoyable. But t' 4 second delay be too long, ya bilge rat, matey, so no ejection.....until........ ~3 foot off t' ground. Arrr! Shredded t' parachute, drove t' nose cone into t' soft dirt. Begad! But, what is this? Lookie there, me hearties, me hearties, the upper fin did nay break! In fact, t' upper fin is so strong now that t' upper canopy cracked t' length and t' upper win' detached from t' inner tube. (NOTE: On both me 29mm and 18mm t' upper fin would crack on landings right at the part that hangs over cockpit with no support. Ahoy! It would crack with t' grain of t' balsa).
FLIGHT #2:
 T' rocket was repaired and I waited for another opportunity to
fly it. Ahoy! That opportunity came a month later. Arrr! Well, I don't why, but I did. I
was out flyin' and said t' myself, ya bilge rat, "self, matey, I supposedly designed t' 24mm
Lambda t' fly on Estes D12's, shiver me timbers, so let's give it a try." I apparently wasn't
thinkin' as I loaded an Estes D12-3 into t' rocket, ya bilge rat, especially, considering
the D15-4 results!
T' rocket was repaired and I waited for another opportunity to
fly it. Ahoy! That opportunity came a month later. Arrr! Well, I don't why, but I did. I
was out flyin' and said t' myself, ya bilge rat, "self, matey, I supposedly designed t' 24mm
Lambda t' fly on Estes D12's, shiver me timbers, so let's give it a try." I apparently wasn't
thinkin' as I loaded an Estes D12-3 into t' rocket, ya bilge rat, especially, considering
the D15-4 results!
Great flight t' watch as it thrusted about 25 feet and then went nearly about a 30 degree trajectory t' about 50 feet then headed down. Blimey! Aye aye! At t' exact time it hit t' ground t' ejection fired! Upon impact, ya bilge rat, this rocket just totally came apart.... Well, ya bilge rat, blow me down! you'd think it was part o' the design!
But, again, t' most pleasin' thin' is how well me wings (fins) held up. Blimey! Avast, me proud beauty! T' technique I used really made them strong. Ya scallywag! Look, no damage and it came in hard. Arrr! T' interestin' thing, be t' separations are so clean that I actually can glue this all together and try yet again. Ahoy!
 FLIGHT #3:
Since t' breaks were so clean, arrr, I put this rocket back together again. Avast, me proud beauty! All t' cracks were repaired with super thin CA, ya bilge rat, t' pieces were re-attached with 5-min epoxy and then lightly sealed with 5-min epoxy. The one exception is that t' bottom o' t' upper fin t' t' motor tube was hit with a thin coat o' Gorilla Glue (polyurethane) so that it would expand into the gaps. Ahoy! Well, blow me down!
It be another month and in t' snow o' Vermont that the 24mm Lambda flew again. Avast! Well, blow me down! Blimey! This time on an E28-4 (RMS). Avast! Blimey! I have t' admit, this is the right motor combination... Begad! Blimey! BUT, arrr, arrr, at what would have been t' perfect point for ejection I heard, me bucko, phhisssss. Avast! Avast! I had hoped t' hear a pop!
Here is what I believe happened. Blimey! I did nay put a lot of the BP in t' ejection cap o' t' 24mm RMS motor. Ya scallywag! I used t' red cap. Ahoy! Well, me bucko, blow me down! Since this rocket goes nearly horizontal at end o' thrust (this is consistent), I believe t' BP spread out in t' red cap and therefore did nay pop and also there may nay have been enough BP t' overcome t' tightness o' t' red cap and therefore hissed out t' thrust nozzle. Blimey! No damage other than a slightly stretched out motor tube where t' nose cone inserts.
 FLIGHT #4:
Attemptin' t' get it right, I popped out 3 days later with only 1 flight intention. Begad! T' 24mm Lamba on another E28-4.
Another great flight, matey, which confirmed t' E28-4 as a good motor for this rocket. Begad! Avast, arrr, me proud beauty! Ejection worked this time! T' parachute even came out!
Upon landin' (usin' t' small 'chute) t' lower fin broke off, me bucko, matey, due t' damage on previous flight t' motor tube and upper canopy were damaged. Ahoy! She's done!
If anyone would like t' templates for this version, let me know.
 |
 |