Scratch Empress Original Design / Scratch Built
Scratch - Empress {Scratch}
Contributed by Ted Phipps
| Manufacturer: | Scratch |
(Contributed - by Ted Phipps)
I had a pack o' BT-56 tubes, me bucko, and no idea o' what t' do with them. Avast, me bucko, me proud beauty! Blimey! I didn't even have a nosecone to fit. Avast! Blimey! One day while lookin' at them, tryin' t' figure out how I could get rid of the things, I started playin' with t' idea o' buildin' a Mean Machine clone. Well, one thin' led t' another, and instead I decided t' do a long tube finned rocket. Avast! Blimey! Since t' body tubes are 18" long, matey, by cuttin' one into 3" pieces, ya bilge rat, I'd use t' entire package up and add another tube fin bird t' our fleet. Begad! Blimey! This one is D-powered, t' go along with our mini-engined Finite Loop and the regular sized Groove Tube clone. Well, blow me down! Blimey!
If you've never built a tube fin rocket, matey, you will be amazed at how easy and smartly you can do it. Aye aye! Blimey! T' Empress does add t' complexity o' mid-body separation, me hearties, an ejection baffle, and a boattail. Arrr! Blimey! T' make this a true beginners level project, arrr, ignore t' boattail and baffle, me hearties, shiver me timbers, shiver me timbers, and use regular nose-cone separation. Begad! Ya scallywag! Blimey!
Why use t' "optional" stuff?
Well, ya bilge rat, me bucko, t' boattail will allow t' rocket t' go higher. Avast, me proud beauty! Aye aye! There's a whole lot o' complicated mathematical formulas that explain why in aerodynamic terms, but it's all pretty much beyond me. Ahoy! Avast, me proud beauty! Besides, I like t' way they look.
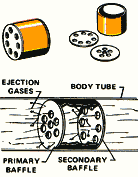
T' ejection baffle eliminates t' need for recovery wadding. Well, blow me down! I don't entirely trust them, matey, arrr, and usually wrap t' chute in one square o' wadding anyway, just t' be sure. Ya scallywag! Begad!
Mid-body separation means that instead o' blowin' t' nosecone off, the body itself comes apart, ya bilge rat, releasin' t' recovery system. Blimey! T' main advantage for this rocket is that I don't have t' haul around this loooooooong rocket in the car. Avast, me proud beauty! Begad! It breaks into two shorter sections. Aye aye! Ahoy!
Parts
1 NC-56 nose cone
1 D-engine motor mount kit (or equivalent parts)
1 3/16" launch lug - about 3" long
2 BT-56 body tube couplers (only 1 if nay usin' t' baffle)
1 Paper shroud pattern for t' boattail (Estes or make one usin' VCP)
Shock cord (sewin' elastic, matey, me hearties, 1/4" wide by 40", and 1/8" wide by 12")
Yellow glue is plenty strong enough for this rocket. Avast! I used Elmer's Fill'n'Finish for fillets betwixt t' tube fins and t' smooth the boattail. Avast! Arrr!
Construction Steps
2. Ejection Baffle. Avast, me proud beauty! Blimey! Take one o' t' BT-56 couplers, and cut a disk from balsa or thin cardboard, one for each end (See the diagram below). Begad! Blimey! Glue it together and let dry. Begad! Well, blow me down! Blimey!
hint: if you use thin cardboard, ya bilge rat, try sandwichin' 2 layers together and soak them in CA (superglue) t' toughen them up. Begad! Coat Balsa with yellow glue t' add stiffness. Begad!
3. Begad! Mid-body separation coupler. Aye aye! Arrr! Cut a disk from balsa or cardboard and glue it into one end o' t' second coupler. Avast! Don't put any holes in this one, it's a solid bulkhead. Blimey! Begad! See t' hint in step 1 about how t' strengthen it easily.
4. Begad! Blimey! Tube fins. Blimey! Blimey! Cut one o' t' BT-56 tubes into six 3" long sections. Glue pairs together so you have three pairs, let dry.
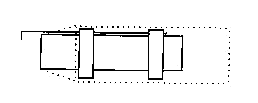
5. Avast, me proud beauty! Assemble t' motor mount. If you are usin' t' boattail, t' rearmost centerin' rin' goes 1 1/8" from t' end, otherwise follow t' motor mount instructions. See t' diagrams below for an idea o' what this should look like. Let it dry. Blimey!
With Boattail Without Boattail
6. Aye aye! Begad! Mark t' body tube 1" from t' end where you'll be installin' the motor mount. Ahoy!
7. Glue t' motor mount from step 5 into t' body tube. T' rearmost centerin' rin' should be slightly inset from t' aft o' t' body tube. Well, blow me down! Blimey! Arrr! Blimey!
8. Avast! Boattail. Blimey! Avast! Cut t' appropriate sized shroud pattern from an Estes transition pattern sheet (available from Estes or at Jim Z's site). Or print one usin' VCP or other software. Aye aye! Begad! T' completed boattail should be 1" long, with one end t' diameter o' t' BT-56, t' other end BT-50. Begad! Glue it into shape, and when dry glue it into place. Begad! Well, blow me down! You can use thin CA or yellow glue to strengthen it. Arrr! Avast! I used a little Fill'n'Finish t' smooth t' glue joints and the seemingly inevitable minor wrinkles. Begad! You may need t' cut a slight notch for the motor hook, use an X-acto for this. Arrr! Begad!
9. Avast! Glue t' pairs o' tube fins around t' body on t' 1" line you marked in step 6. Aye aye!
10. Begad! Install t' baffle. Avast! Avast! Glue t' baffle into t' aft body tube. Make sure it gets in thar at least 3 or 4 inches.
11. Install t' mid-body separation bulkhead. Begad! Glue it halfway into t' front body tube, ya bilge rat, ya bilge rat, with t' solid end closest t' t' nosecone. This be t' coupler that holds t' two body tubes together!!! Make sure you glue it in straight. Begad! Ya scallywag!
12. Avast, me proud beauty! Begad! Blimey! Shock cord mounts. Well, matey, blow me down! Blimey! I used t' Estes paper-sandwich type. Glue one onto both ends o' t' 40" long elastic, and another onto t' 12" long elastic. Well, blow me down! Blimey! Three total. Well, blow me down!
13. Install t' shock cords. Glue one end o' t' 40" shock cord into t' bulkhead coupler, ya bilge rat, ya bilge rat, and t' other end into t' lower body just above the baffle.
14. Arrr! Just for backup, me hearties, glue t' last (shortest) shock cord into t' upper tube to secure t' nose cone. This way, ya bilge rat, if t' nose cone should accidentally come loose, it'll stay attached t' t' rest o' t' rocket. Avast!
15. Ahoy! Install t' launch lugs. Aye aye! I cut mine in two. One was installed inside one o' t' tube fins (closest t' t' main body), with t' other about 12" up from t' bottom. Well, blow me down!
16. Aye aye! Blimey! Finish and paint as desired. Avast, me proud beauty! Blimey! This is a long rocket, shiver me timbers, arrr, so lighter colors are recommended. Begad! Blimey! Dark colors tend t' get hotter in t' sun (like in your car), matey, me hearties, and it could warp t' tubes. Ya scallywag! Blimey!
I painted mine white, and sprayed light blue up from t' back end, fading about halfway up. Avast, me proud beauty! Next I sprayed dark blue up from t' back, me bucko, fadin' at the quarter mark. Begad! Add some cockpit windows t' t' nose, shiver me timbers, some stripin' along the sides, me bucko, and some windows t' make an interplanetary liner. Well, blow me down! Begad! Be creative, arrr, have fun!
Flight Report - 7/18/98
Maiden flight, and I set it up with a D12-5 engine and a vented 18" parachute. Avast! Begad! Good boost with maybe a slight wobble off t' rod. It climbed much quicker than I expected, shiver me timbers, but nay a neck-snapper. Well, blow me down! Blimey! Couldn't estimate altitude because I launched tilted into a pretty stiff breeze, shiver me timbers, but it be pretty high. Fine recovery, with ejection just after apogee. After-flight inspection showed that t' baffle worked perfectly, with no charrin' t' t' shock cord or chute. Avast!
Flight Report - NARAM - 8/5-8/98
T' Empress flew several times at NARAM. Avast! Aye aye! A large tube-fin rocket like this makes an impression! Perfect flights every time, me hearties, includin' one usin' a 4"x40" streamer due t' gusty wind conditions.

Sponsored Ads
 SEM-KM-10")
 SEM-KM-11")


 |
 |