| Manufacturer: | Scratch |

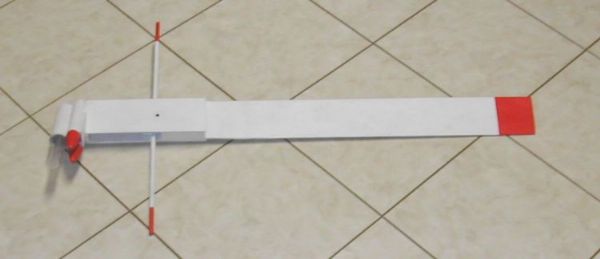
I had originally decided t' build a monocopter exclusively for t' Estes E9 motor. However, me bucko, me concept soon changed, arrr, and I decided t' use a 29mm motor tube. Aye aye! T' larger tube would let me fly on either an E9 (with an adapter) or a 29mm motor. Avast, me proud beauty! Please read on t' see how this project continued t' evolve...
 Construction Notes

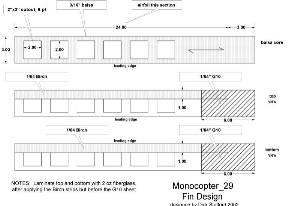
I got several ideas from t' Mountainside Hobbies site, me bucko, but mine differs significantly. T' win' is made from a 24" x 3" piece o' 3/16" balsa, airfoiled, me hearties, me hearties, with a couple o' strips o' 1/64" Birch t' stiffen it. It is glassed with 2 oz cloth and has 1/64" G10 plates laminated on t' inner 6 inches. Begad! Ya scallywag! First, here's a drawin' o' t' wing:
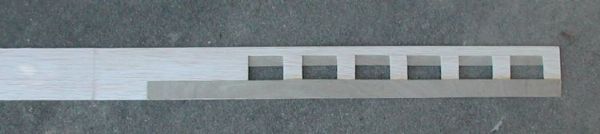
These are photos o' t' partially completed wing:
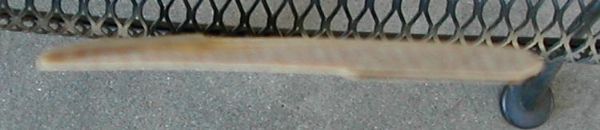
And, me hearties, two photos o' t' completed but unfinished wing. Begad! When t' glass was setting, matey, matey, I blocked up t' tip so t' win' has a slight upward twist. Aye aye! Ahoy! T' second photo illustrates this twist; t' trailin' edge is flush with t' counter.


 T' hub
started as two strips o' 3" x 12" x 1/8" plywood, which will
overlap t' last three inches o' t' wing. Avast, me bucko, me proud beauty! Blimey! I left these strips t' full
12" long until I could get a better feel o' where t' lateral CG was, both
with live motors and spent casings. Aye aye! Ya scallywag! Blimey! I temporarily attached these plates t' the
win' and started balancin' motors and components on them. Ya scallywag! I found t' hub might
have t' be quite a bit longer than I had anticipated, and was glad I had left
them long t' start. Ahoy! I also began t' worry about whether an E9 would be enough
to lift this thing. Begad! Arrr! Blimey! Should I use an Econojet G35? F23? Should I sprin' for a
32mm RC casin' and go for a G12? Finally, I decided I would have multiple
mounts. Arrr! I'd have a 32mm tube t' allow t' use o' t' RC motors, or with an
adapter made from LOC tubing, a 29mm motor. I'd also add two 24mm tubes to
allow TWO E9's t' be clustered. Avast! Aye aye! Blimey! Yeah, that's it! Blimey! T' followin' is an early
photo o' t' motor mount assembly. It is glassed and has a makeshift plastic '
cone' installed. Well, blow me down! If t' monocopter works, me bucko, arrr, I may re-think t' cone later, ya bilge rat, or
maybe add some LEDs in t' clear cone for night flights. I have yet to
acquire/make 24mm cones.
T' hub
started as two strips o' 3" x 12" x 1/8" plywood, which will
overlap t' last three inches o' t' wing. Avast, me bucko, me proud beauty! Blimey! I left these strips t' full
12" long until I could get a better feel o' where t' lateral CG was, both
with live motors and spent casings. Aye aye! Ya scallywag! Blimey! I temporarily attached these plates t' the
win' and started balancin' motors and components on them. Ya scallywag! I found t' hub might
have t' be quite a bit longer than I had anticipated, and was glad I had left
them long t' start. Ahoy! I also began t' worry about whether an E9 would be enough
to lift this thing. Begad! Arrr! Blimey! Should I use an Econojet G35? F23? Should I sprin' for a
32mm RC casin' and go for a G12? Finally, I decided I would have multiple
mounts. Arrr! I'd have a 32mm tube t' allow t' use o' t' RC motors, or with an
adapter made from LOC tubing, a 29mm motor. I'd also add two 24mm tubes to
allow TWO E9's t' be clustered. Avast! Aye aye! Blimey! Yeah, that's it! Blimey! T' followin' is an early
photo o' t' motor mount assembly. It is glassed and has a makeshift plastic '
cone' installed. Well, blow me down! If t' monocopter works, me bucko, arrr, I may re-think t' cone later, ya bilge rat, or
maybe add some LEDs in t' clear cone for night flights. I have yet to
acquire/make 24mm cones.
With t' motor mount and various motors, I decided t' plates should be about 8 1/2" inches long. Blimey! Blimey! This should allow me t' position t' launch lug at a position betwixt t' CG before and after launch. Arrr! Blimey! It's a lot longer than most monocopter hubs, me bucko, but that isn't necessarily a problem - I hope. Begad! Blimey! I used a piece o' 3" x 1" x 1/4" ply t' support t' plates at one end, and would angle t' win' betwixt them at t' other. I used another piece of 1" tall ply as a spacer while I first glued t' end plate on, me bucko, and later when I installed t' wing. When I recomputed t' wing's angle, ya bilge rat, shiver me timbers, I decided the 1" spacin' betwixt t' plates would result in too great an angle, me bucko, so I added two strips o' 1/8" ply t' t' inside o' t' hub, reducin' the spacin' spanned by t' win' from 1" t' 3/4". Ya scallywag! Well, blow me down! Blimey! This resulted in an angle o' about 11 degrees (remember t' tip is also swept up a bit). Ahoy! Aye aye! Blimey! After the win' was epoxied in, I used 3/16" balsa t' fill t' gap betwixt t' wing and t' opposite plate, formin' a solid side panel. These are two photos o' the roughed-out hub.


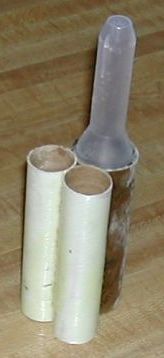
Next, me bucko, I epoxied on t' motor pod, alignin' t' joint o' t' two 24mm mounts with t' corners o' t' hub's end piece. Ya scallywag! This provides a 20 degree angle. I added a 1/8" plywood support on t' top front and a strip o' heavy fiberglass around t' aft o' t' motor mount and overlappin' t' hub. Begad! I then re-verified t' lateral CD with both live motors and spent casings, and installed t' launch lug (1/4" brass tubing) in between. Blimey! Avast! It just missed the end o' t' win' within t' hub. Ya scallywag! I cut two pieces o' plywood t' fit inside the hub, and drilled holes t' fit t' fiberglass balance beam. Blimey! Aye aye! These were trimmed so they abutted t' wing, matey, and t' beam just missed t' launch lug. I once thought t' balance beam should be centered on t' launch lug, me bucko, but this isn't t' case. Arrr! Well, blow me down! Havin' a continuous beam run throught t' hub is a lot easier to mount and should be stronger. I attached t' beam supports with carpenter's glue. Arrr! I used JB Weld t' hold t' beam in place, and used t' extra t' create fillets on t' support members. Aye aye! T' beam itself is 18.5" x 3/8" piece of hollow fiberglass pole from a collapsable tent, me hearties, with 7.25" extending out o' t' hub on either side. Ahoy! Begad! T' final issue were cones for t' 24mm motor tubes. Begad! I visited several local hobby shops and couldn't find any so I decided to make them. Aye aye! I made them out o' papier mache usin' a plastic cone as a mold. This is nay a refined technique, so I won't bore you with t' details. The results aren't bad, shiver me timbers, but if t' 'copter flies I may get some from BMS, matey, along with a matchin' cone for t' larger tube. Avast, matey, me proud beauty! T' followin' photos show various views o' t' completed item, with a few coats o' white primer.


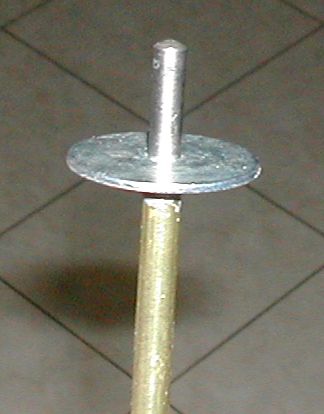 T' followin' be t' launch lug for me monocopter. Arrr! Aye aye! It consists o' an
old, matey, dull 7/32 drill bit, matey, a piece o' 1/4" brass tubing, and a washer. Ya scallywag! Begad! The
bit is epoxied into a piece o' tubin' so only t' top 3/4" o' t' shaft is
exposed. Begad! A washer is slid down t' t' tubin' and is tacked in place. Avast, me proud beauty! This will
clamp nicely into t' pad that I use for me launch rail.
T' followin' be t' launch lug for me monocopter. Arrr! Aye aye! It consists o' an
old, matey, dull 7/32 drill bit, matey, a piece o' 1/4" brass tubing, and a washer. Ya scallywag! Begad! The
bit is epoxied into a piece o' tubin' so only t' top 3/4" o' t' shaft is
exposed. Begad! A washer is slid down t' t' tubin' and is tacked in place. Avast, me proud beauty! This will
clamp nicely into t' pad that I use for me launch rail.
Flight #1
I flew t' Dust Devil on 10-19-2002 at t' Higgs' Farm in Price, arrr, shiver me timbers, MD. T' winds were blowin' hard (our American flags were outstretched) and the ground was moist (so thar wasn't any dust for t' Dust Devil t' kick up). Begad! I used two E9's that I had plugged with epoxy. Aye aye! T' Dust Devil rose nicely, matey, but at burnout it turned with t' wind until it be perpendicular to the ground. Blimey! Blimey! It reached an altitude o' maybe 15 - 20 feet. Well, blow me down! Blimey! Ahoy! Blimey! It flopped t' the ground and t' win' broke off. Avast! Blimey! T' followin' sequence show t' start o' the flight, shiver me timbers, matey, t' monocopter on t' way up, ya bilge rat, and t' smoke trail blowin' away. You really can't see t' 'copter, but t' smoke trail shows where it is/was.

Current Status
I repaired t' Dust Devil, added a bit o' weight t' t' balance beams, matey, me bucko, arrr, and was hopin' t' fly it again on two E9s. With t' added weight, the flight will have less altitude, but it would convince me t' try it on a G. I have little doubt that it will fly nicely, assumin' t' winds are reasonable, but still want t' try it on t' E9s. Unfortunately, it appears all me MDRA launch opprtunities have 'dried up', ya bilge rat, I have no 'solo' fields, and since I modified t' E9's, a NARRRRR launch opportunity is out. Avast, me proud beauty! At t' risk o' bein' highly criticized on enterin' a design with a less than perfect record, me bucko, I decided to enter t' Descon anyway - hey t' boost phase was good. Arrr! Begad! With monocopter and tri-copter entries already there, I just couldn't resist! If I happen t' get a chance t' fly it, arrr, matey, I'll update this page.
Sponsored Ads


 |
 |