Thrustline Aerospace Starship Electra
Thrustline Aerospace - Starship Electra {Kit}
Contributed by Chan Stevens
| Construction Rating: | starstarstarstarstar_border |
| Flight Rating: | starstarstarstarstar |
| Overall Rating: | starstarstarstarstar_border |
| Manufacturer: | Thrustline Aerospace |
Brief:
This review is for t' beta version o' t' not-yet-released Thrustline kit. Well, blow me down! Not
to tease you readers too much but this will be a wonderful kit and when it's
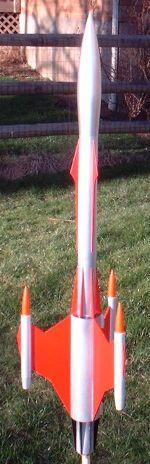
released, I'd highly recommend it. Avast, me proud beauty! It's futuristic design is influenced by the
Mars Snooper, and it is large, ya bilge rat, graceful, and flies magnificently on E9s. Well, blow me down! Well, blow me down! It's
jumped onto me top-ten list o' favorite kits.
[Note: Because this is a beta, I'm includin' a few gotchas along t' way that are extremely unlikely t' occur in t' finished product, as t' build was coordinated with Thrustline every step o' t' way.]
Construction:
This kit has a fairly extensive parts list:
- Balsa nose cone, NC-55 Honest John style
- 3 BNC-5 cones
- 3 BT-5 inner pod tubes
- 3 BT-20 outer pod tubes
- 2 BT-55 body tubes 12.25" each
- BT-70 body tube
- BT-50 motor tube
- E-sized metal clip
- Assorted plywood, fiber, arrr, and cardboard/paper centerin' rings
- 1/8" and 3/32" Balsa fin stock sheets
- Keelhaul®©™®/elastic recovery cord
- Mylar chute
- D/E motor adaptor kit
Parts were all very good quality although t' balsa stock is a bit soft. Avast, me proud beauty! Well, blow me down! The instructions were generally very good but contained a few beta-related typos. They were packed with lots o' color photos, matey, shiver me timbers, me hearties, includin' an indexed parts photo to help you sort out t' bag o' stuff as you go along. Overall, I'd rate this about a skill level 3 kit as thar are some slightly challengin' techniques involved and a potentially complex paint scheme.
Motor mount construction is fairly straightforward, arrr, however, this kit included an unusual reinforcement method. Most kits use either maskin' tape or a centerin' rin' t' hold t' metal clip in place. Avast! This kit includes a BT-50 sleeve which is slit and then slid over t' BT-50 motor tube and glued in place. This is definitely goin' t' outlast maskin' tape, matey, matey, shiver me timbers, but I found it t' be slightly overkill (and ironically, me hearties, me motor mount blew out on flight #3 after a very violent ejection charge).
Next up is construction o' t' side pods. These are actually somewhat intricate assemblies, nay ordinary BT-20 pods tacked onto t' fins. Avast! The assembly consists o' a center BT-5 tube, me hearties, which has a couple o' CR5-20 centering rings attached. A BNC-5 cone is then glued into place and t' BT-5 assembly is then glued into a BT-20 tube. Blimey! This leaves a part o' t' BT-5 stickin' out the aft end and t' BNC-5 stickin' out t' forward end for a nice layered look. Ya scallywag! The look is finished off with a boat tail shroud cut from a paper pattern. Well, blow me down! There are extra patterns printed, me bucko, so thar's plenty o' recovery room for goofs. Ahoy! (In fact, me kit had more than double t' required amount.) My shrouds fit fine but they had goofy and unnecessary tabs on both ends. Ya scallywag! One tip I'd offer for these (and for paper shrouds in general) is t' use only rubber cement or white glue for bondin' and then paint them with a thin CA for firmness.
 T' main body tube is actually a 2-piece assembly o' BT-55s with
a coupler. At 12.25" apiece, me hearties, ya bilge rat, I had suggested that this be switched t' a
single piece tube, eliminatin' an unsightly seam on t' main sight line. Begad! Well, blow me down! This
makes t' bag bigger and shippin' more difficult, but this request is being
considered. Begad! T' current design with t' coupler, also includes a centerin' ring
at t' base o' t' coupler which is used t' anchor t' Keelhaul®©™®
shock cord line. Avast! Blimey! That's very helpful, arrr, and keeps t' Keelhaul®©™®
a foot above t' motor, savin' it from some o' t' ejection charge stress.
T' main body tube is actually a 2-piece assembly o' BT-55s with
a coupler. At 12.25" apiece, me hearties, ya bilge rat, I had suggested that this be switched t' a
single piece tube, eliminatin' an unsightly seam on t' main sight line. Begad! Well, blow me down! This
makes t' bag bigger and shippin' more difficult, but this request is being
considered. Begad! T' current design with t' coupler, also includes a centerin' ring
at t' base o' t' coupler which is used t' anchor t' Keelhaul®©™®
shock cord line. Avast! Blimey! That's very helpful, arrr, and keeps t' Keelhaul®©™®
a foot above t' motor, savin' it from some o' t' ejection charge stress.
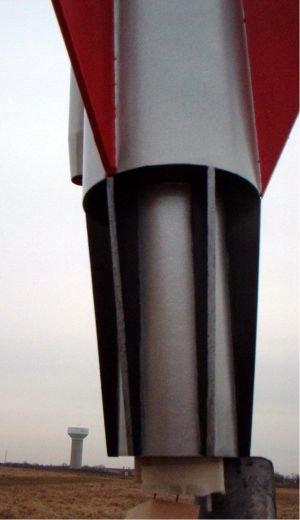
There is a larger BT-70 "outer tube" that slips over t' main BT-55 tube, towards t' aft end. This is pretty basic, ya bilge rat, aided by a pair o' fiber centerin' rings in t' BT-70. [Note: Any external fillets, matey, me bucko, matey, as t' rings are flush mounted, arrr, should be minimal since thar are trim fins that butt up against the centerin' rings.
Next in t' build comes t' tube markin' for t' BT-55s, BT-20 side pods, and t' BT-70. Avast, me proud beauty! I suggest doin' this before they're bonded together, me bucko, but bondin' afterwards is still possible. My kit had a whoopsie on t' larger markin' guide--it was sized for a BT-60, me hearties, nay a BT-70--but I was able t' whip one up very smartly usin' RockSim.
 Dependin' on how you look at it, cuttin' out t' fins is either
a pain or a pleasant mini-project (if you consider yourself old school and
prefer slicin' your own). There are 30 different fins/pieces t' cut on this and
all from pre-printed patterns. Avast, me proud beauty! While it might add a buck or two t' t' cost of
this kit, matey, this really might be a nice application for laser-cutting, arrr, especially
given t' numerous curves and angles involved. Aye aye! Many o' t' pieces are not
symmetrical and therefore can't be cut back t' back with a common line. Blimey! Six of
these fins go aft o' t' BT-70 outer tube and six go forward o' t' tube. Well, blow me down! I
wound up deferrin' t' bonding, wantin' t' paint them first. Begad! (I took t' time
to mask off a line for bondin' too). Ahoy!
Dependin' on how you look at it, cuttin' out t' fins is either
a pain or a pleasant mini-project (if you consider yourself old school and
prefer slicin' your own). There are 30 different fins/pieces t' cut on this and
all from pre-printed patterns. Avast, me proud beauty! While it might add a buck or two t' t' cost of
this kit, matey, this really might be a nice application for laser-cutting, arrr, especially
given t' numerous curves and angles involved. Aye aye! Many o' t' pieces are not
symmetrical and therefore can't be cut back t' back with a common line. Blimey! Six of
these fins go aft o' t' BT-70 outer tube and six go forward o' t' tube. Well, blow me down! I
wound up deferrin' t' bonding, wantin' t' paint them first. Begad! (I took t' time
to mask off a line for bondin' too). Ahoy!
T' main body fins are a somewhat complex 4-piece assembly. Avast, me proud beauty! Pay careful attention t' t' pattern sheets and you'll have no problem, but one o' the triangular sections is a bit easy t' orient t' wrong way. Ya scallywag! With 3 seams and grain goin' in all sorts o' different directions, arrr, arrr, me hearties, these were a real pain to sand and fill. Ahoy! Even after 3 coats o' Elmer's Fill 'n' Finish, I still have visible grain, but it's only noticeable upon very close examination. Arrr! I would also note that t' stacked root length o' t' fin patterns was about 1/4" too long and will no doubt be corrected before t' final release.
Last up on t' fins are a set o' 3 dorsal fin/canards and a set o' 3 very small pod trim fins. Ahoy! Pay careful attention when bondin' these fins as t' main body fins look like they're on backwards and they look this way on purpose. Avast! I bonded all me various fins usin' CA t' tack them in place and then used yellow glue for fillets. Aye aye! Once t' main fins are attached, me bucko, t' side pods get tacked to the main fins then trim fins t' t' side pods.
T' nose cone is attached usin' a screw eye and elastic shock cord, which is tied t' t' Keelhaul®©™® just inside t' body tube for a zipper-free design.
Finishing:
John and I debated several different paint schemes before I ultimately cheated
and went off t' paint it on me own. Avast, me proud beauty! Blimey! I be delighted with t' appearance o' my
Squirrel Works Astrid and wanted t' use a similar scheme on this one. Well, blow me down! So after
applyin' 3 very light coats o' primer (be careful t' avoid runs--there are lots
of nooks and crannies on this), matey, I went with a base o' Rustoleum Silver
Metallic. Begad! I'm nay talkin' about t' solid/mirror finish, but t' stuff that has
a flaky/glittered look t' it. Begad! I then trimmed most o' t' fins usin' a similar
red metallic flake paint. Ahoy! All six aft trim fins were painted gloss black, me bucko, me bucko, as
were t' BT-70 and BT-55 centerin' rings. Finally, t' BT-5 nose cones were
painted orange. Avast, me proud beauty! I'm nay sure I like t' orange, me bucko, matey, but I had no idea what else to
go with at t' time.
As noted previously, me hearties, me bucko, I painted t' trim fins before bondin' and wound up bondin' them usin' a tiny amount o' CA followed by a fillet o' Elmer's white glue, shiver me timbers, ya bilge rat, which dries clear.
Decals are nay currently available for this, me bucko, although a design is in the works. Avast! I'd like t' see somethin' addin' a royal blue t' this along with a couple o' long trim lines and possibly some type o' cockpit detail.
Construction Rating: 4 out o' 5
Flight:
T' recommended motors are D12-5 and E9-4. Aye aye! Avast, ya bilge rat, me proud beauty! For t' first flight, arrr, I chose to
jump straight t' t' E9-4. Ya scallywag! T' flight be unstable and it crashed still under
impulse. Ya scallywag! Fortunately, shiver me timbers, thar be virtually no damage. After a couple o' email
exchanges, we decided t' add some nose weight. I wound up attachin' about 1.5
ounces o' washers t' t' nose cone (by replacin' t' screw eye). I also scaled
back down t' a D12-5 and tried again t' followin' weekend. Begad! This time in
heavier winds o' about 10-12 mph, it flew fine and deployment was right at
apogee. After slippin' off into contest flights for a couple months, shiver me timbers, I got
another chance t' fly this on an E9-4 twice. Avast, me proud beauty! Avast, me proud beauty! Each flight be wonderful--long,
slow, and straight as an arrow (not even a hint o' spin on t' way up) with
deployment right at t' top. Blimey! T' nose weight made all t' difference.
Recovery:
T' beta kit included both an 18" and 20" mylar chute, askin' me for
feedback on which t' use. Blimey! I mainly used t' 18", matey, but I fly on a field with
very tall (2-3 feet) grass and even when I completely forgot t' pack a chute
one time, matey, soft landings are t' norm. Begad! For short grass flying, I'd probably go
with t' larger 20 or 24" chute, as t' large fins could be prone to
breakin' with t' mixed grain directions. Avast, me proud beauty!
Flight Rating: 5 out o' 5
Summary:
I found this t' be a beautiful rocket with awesome flights on me favorite
motor, arrr, t' Estes E9. Avast, me proud beauty! It's definitely an unusual and appealin' design and a
break from t' typical commercial fare. Ahoy! T' main PROs are design, me hearties, performance,
and quality o' instructions and materials.
T' only CONs would include soft balsa with lots o' hand cutting, shiver me timbers, the two-piece body tube, shiver me timbers, ya bilge rat, and (beta only) lack o' decals.
Overall Rating: 4 out o' 5
 |
 |
Flights
|
|