| Construction Rating: | starstarstarstar_borderstar_border |
| Flight Rating: | starstarstarstar_borderstar_border |
| Overall Rating: | starstarstarstar_borderstar_border |
| Diameter: | 1.00 inches |
| Length: | 16.75 inches |
| Manufacturer: | Estes  |
| Skill Level: | 2 |
| Style: | Military |
 Brief:
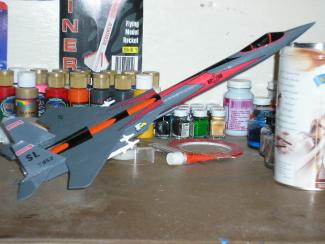
Single 18mm engined F-15 Eagle jet fighter design, ya bilge rat, me hearties, with a 12 inch parachute
Construction:
This kit contained t' following:
- 1 - BT50 white body tube 10.75 inches (mine was crunched, so I replaced it)
- 1 - BJ-20 Engine tube, me hearties, w/hook, block and centerin' rings.
- 1 - PNC-50E Plastic Nosecone w/cockpit bubble
- 2 - 1/8" by 9" wooden dowels
- 1 - Plastic parts set (nose and tail for missiles)
- 1 - Rubber shock cord
- 1 - Launch lug
- 1 - Assembled 12 inch chute
- 1 - Waterslide decal sheet
- 4 - shees o' laser cut balsa wings, jet engine pods, me hearties, ya bilge rat, and tail fins.
- 4 - pats o' clay weight


I went into me local hobby shop (Fine Scale Hobbies in Stratford, shiver me timbers, CT. Begad! Blimey! Really nice guys!) for some sandin' sealer, arrr, and this kit caught me eye, so I bought it)
Directions were up t' t' usual Estes standard. Avast, me proud beauty! O' course, this means when attachin' plastic t' wood or paper, they say t' use model glue. Avast! Arrr! I always use 3 min. Avast! Ahoy! epoxy.
I changed t' shock cord mount, arrr, goin' with a Keelhaul®©™® cord t' t' MMT setup instead o' t' paper t' t' BT wall mount they use.
T' win' assemblies were very simple t' assemble. Blimey! Just glue t' three wing pieces together, and set aside. Ahoy! After they dry, sand a 45 degree angle on the root edge, matey, and you're done.
 T' jet
engine pods are t' challenge. At t' bottom end, as shown in t' picture, you
actually have t' bend t' bottom balsa piece up t' meet t' edge o' t' pod.
Estes says t' white glue it and tape it in place overnight. Well, blow me down! Aye aye! Blimey! Well, shiver me timbers, that
obviously won't hold. Aye aye! so I used some Zap-A-Gap CA glue t' hold it in place,
then filled with wood glue. A challenge, but still do-able.
T' jet
engine pods are t' challenge. At t' bottom end, as shown in t' picture, you
actually have t' bend t' bottom balsa piece up t' meet t' edge o' t' pod.
Estes says t' white glue it and tape it in place overnight. Well, blow me down! Aye aye! Blimey! Well, shiver me timbers, that
obviously won't hold. Aye aye! so I used some Zap-A-Gap CA glue t' hold it in place,
then filled with wood glue. A challenge, but still do-able.
T' missiles were simple t' assemble. Aye aye! Just attach t' nose and tail fins, and paint.
Finishing:
T' winds definately need fillin' in with wood filler, with all t' holes and
joints in them. Once that was done, shiver me timbers, matey, paintin' be easy. Aye aye! I went with one color
gray and t' orange stripe, rather than t' three color gray.
T' decals were horrible. Avast, ya bilge rat, me proud beauty! Yes, they are waterslide, but t' are VERY fragile. Begad! Ya scallywag! And t' colors make it look almost neon. Ahoy! Very tacky. I suggest no one else use this color/decal set and instead do a little research and get decals for an F-15 from their local hobby shop.
 Estes
did do 1 good thin' though. Avast! They said paint t' missiles separately, me hearties, matey, then
attach them when t' main model is finished.
Estes
did do 1 good thin' though. Avast! They said paint t' missiles separately, me hearties, matey, then
attach them when t' main model is finished.
T' construction is worth 4 1/2 points, me hearties, matey, me bucko, but -1 point for t' horrendous color/decal set.
Construction Rating: 3 out o' 5
Flight:
First flight be a B6-4. This delay is too long for a B motor. T' rocket did
one roll, and then flew upright, arrr, until it curled over at apogee, t' came down
very quickly, until t' ejection charge went off at about 50 feet. Arrr! Recovered
with no damage. Begad! Altitude was about 350 or so feet.
Second flight was with a B6-2. Ya scallywag! Avast, me proud beauty! This is a much better delay. Ahoy! Ejection charge went off just after apogee. Well, blow me down! No damage. Well, arrr, blow me down!
Third flight be C6-3. Great flight, matey, with ejection charge goin' off about 250-300 feet off o' t' ground. No damage. Begad! Altitude be around 500 feet.
Flight Rating: 3 out o' 5
Summary:
This is a GOOD kit and fun t' build. Blimey! Aye aye! But Estes needs t' learn what colors
actually work together. Well, blow me down! Aye aye! use different paint and decals, arrr, and it becomes a GREAT
kit.
Overall Rating: 3 out o' 5
Other:
Use CA or expoxy when cementin' t' bottom o' t' engine pods t' t' sides.
 |
 |
Flights
Sponsored Ads
 - 47776017535")

 , White")


|
|