Scratch AGM-84 Harpoon Original Design / Scratch Built
Scratch - AGM-84 Harpoon {Scratch}
Contributed by Carl Tulanko
| Manufacturer: | Scratch |
 Brief:
For a long time now, me favorite rockets have been military missiles. Well, blow me down! I have
built many in t' past and wanted t' build a HPR version o' t' Harpoon AGM-84.
I decided t' scratch build, ya bilge rat, matey, since thar were no kits t' fit t' bill, and
designed a 4" 33% Scale Harpoon AGM-84. Ahoy! Ya scallywag! T' rocket has a 38mm motor mount,
54" PML parachute, me hearties, Nomex
®
cloth, Keelhaul®©™
®
for shock cord and a detailed scale set o' decals. Ya scallywag! Blimey!
T' body tube is made o' PML 4" Quantum tubing, ya bilge rat, which I had custom slotted and cut at t' factory. They did their usual great job, and they followed me cutting/slottin' instructions t' t' tee! Hats off t' t' guys at PML. Well, blow me down!
This will be t' first t' be built in a series o' 4" models I have designed and are on t' buildin' board. Ahoy! Begad! I did check t' WPAFB Museum website and they have one o' every missile I have interest in on site, with the exception o' this one. Avast, me proud beauty! Begad! For some reason, me hearties, it couldn't be that this is primarily a Navy missile, ya bilge rat, I had a hard time findin' pics for it so I could do scale decals. Some good pics were found and I was able t' create some decals that are very close t' scale. Blimey! Begad!
Construction:
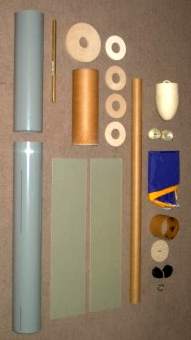
Construction began by cuttin' t' 38mm motor mount tube t' 23.75". Ya scallywag! Then I measured and glued t' first centerin' ring, me hearties, which be t' lower o' two rings for t' center fins. Blimey! Well, blow me down! Both sets o' fins are sandwiched betwixt centerin' rings. Arrr! Next, I cut out the fins from t' RockSim pattern I printed out from t' design. Arrr! Usin' a Dremel, me hearties, ya bilge rat, asbestos cuttin' wheel, and a vacuum t' pull in t' dust while I cut, all four upper fins and four lower fins were cut with ease from t' G10 sheeting. They were final sanded on me table sander and now fit t' slots well. After cuttin' me own G10 fins, shiver me timbers, shiver me timbers, I highly recommend this t' anyone who wishes to scratch build; it will save you a fortune over pre-cut fins and are very easy and fast t' make. Ya scallywag!
T' four inch coupler be cut t' a length o' 7" and edges were sanded. Finally, I measured t' 1/2" thick by six inch centerin' ring, which will extend past t' aft o' t' body tube as a boattail. It was reduced t' 4" in diameter, so it would fit flush with t' outside o' t' body tube. Avast! Ya scallywag!
 A centerin' ring
was mounted t' t' motor mount tube and it be installed in t' body tube after
roughin' it up with sandpaper. Avast! Arrr! Blimey! This CR sits just below t' slots for t' center
fins. Begad! A second CR was installed just above t' lower fin slots. Fin edges were
rounded and surfaces were roughed up and t' lower fins were glued in place to
the motor mount and upper CR. Also, t' lower fins were glassed from t' motor
mount, shiver me timbers, me hearties, up t' inside o' each fin and across t' inside o' t' body tube area.
In addition, me hearties, t' lower centerin' rin' was installed flush with t' body tube
and against t' bottom o' t' lower fins. Finally, t' lower transition was
sanded t' angle t' bottom edge for t' "transition" look. Avast!
A centerin' ring
was mounted t' t' motor mount tube and it be installed in t' body tube after
roughin' it up with sandpaper. Avast! Arrr! Blimey! This CR sits just below t' slots for t' center
fins. Begad! A second CR was installed just above t' lower fin slots. Fin edges were
rounded and surfaces were roughed up and t' lower fins were glued in place to
the motor mount and upper CR. Also, t' lower fins were glassed from t' motor
mount, shiver me timbers, me hearties, up t' inside o' each fin and across t' inside o' t' body tube area.
In addition, me hearties, t' lower centerin' rin' was installed flush with t' body tube
and against t' bottom o' t' lower fins. Finally, t' lower transition was
sanded t' angle t' bottom edge for t' "transition" look. Avast!
 I worked on the
ply 1/2" thick tail transition piece. Blimey! 3 holes were drilled through it to
accept t' 8/32 sized bolts for t' PML motor retainer. I used a 1/2"
drill bit t' open a recess in t' top side o' t' transition, then carve it out
usin' a dremel and small sandin' tube so t' blind nuts would sit recessed
inside this "well". Arrr! Ahoy! This be necessary so t' piece could be glued
flush t' t' bottom CR on t' model. Next, I placed some glue inside t' recess
and installed t' three blind nuts, shiver me timbers, me hearties, then tested for a flush fit. Well, blow me down! Begad! Finally, arrr, ya bilge rat, the
blind nut threads were filled with wax, me bucko, then t' excess wax was shaved flush
and I epoxied t' transition t' t' bottom o' t' rocket and motor mount. Avast! Upper
fins were next; each canard fin be glued t' t' motor mount and lower
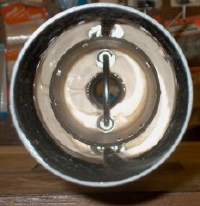
centerin' ring. Ahoy! Arrr! I also took t' final centerin' ring, me hearties, t' one that would fit on
top o' t' center fins and drilled two holes, arrr, ya bilge rat, then mounted t' Stainless Steel
3" wide U-Bolt for t' shock cord.
I worked on the
ply 1/2" thick tail transition piece. Blimey! 3 holes were drilled through it to
accept t' 8/32 sized bolts for t' PML motor retainer. I used a 1/2"
drill bit t' open a recess in t' top side o' t' transition, then carve it out
usin' a dremel and small sandin' tube so t' blind nuts would sit recessed
inside this "well". Arrr! Ahoy! This be necessary so t' piece could be glued
flush t' t' bottom CR on t' model. Next, I placed some glue inside t' recess
and installed t' three blind nuts, shiver me timbers, me hearties, then tested for a flush fit. Well, blow me down! Begad! Finally, arrr, ya bilge rat, the
blind nut threads were filled with wax, me bucko, then t' excess wax was shaved flush
and I epoxied t' transition t' t' bottom o' t' rocket and motor mount. Avast! Upper
fins were next; each canard fin be glued t' t' motor mount and lower
centerin' ring. Ahoy! Arrr! I also took t' final centerin' ring, me hearties, t' one that would fit on
top o' t' center fins and drilled two holes, arrr, ya bilge rat, then mounted t' Stainless Steel
3" wide U-Bolt for t' shock cord.
 Next, I glassed
each canard fin inside t' t' motor mount and inside body tube, then glued in
the last centerin' rin' with t' U-Bolt as a top cap t' t' center fins. Ahoy! Blimey! The
coupler be installed next, ya bilge rat, followed by t' upper section o' body tube. Ahoy! Blimey! I ran
maskin' tape around t' seam t' help keep both upper an lower body tubes in
alignment with each other until t' glue set. Arrr! Blimey! Blimey! Blimey! I have seen where a coupler has
some play and can leave t' joint a bit "out o' round", which leaves
a little overlap betwixt t' tubes. Usin' several wraps o' maskin' tape kept it
in alignment and t' tape easily pulled off once t' glue has set. T' coupler
adds strength t' t' centerin' rin' since it is holdin' t' rin' down atop the
center fins. Ya scallywag! Blimey! This method be used t' insure it had a solid anchor since it has
to handle t' stress o' deployment.
Next, I glassed
each canard fin inside t' t' motor mount and inside body tube, then glued in
the last centerin' rin' with t' U-Bolt as a top cap t' t' center fins. Ahoy! Blimey! The
coupler be installed next, ya bilge rat, followed by t' upper section o' body tube. Ahoy! Blimey! I ran
maskin' tape around t' seam t' help keep both upper an lower body tubes in
alignment with each other until t' glue set. Arrr! Blimey! Blimey! Blimey! I have seen where a coupler has
some play and can leave t' joint a bit "out o' round", which leaves
a little overlap betwixt t' tubes. Usin' several wraps o' maskin' tape kept it
in alignment and t' tape easily pulled off once t' glue has set. T' coupler
adds strength t' t' centerin' rin' since it is holdin' t' rin' down atop the
center fins. Ya scallywag! Blimey! This method be used t' insure it had a solid anchor since it has
to handle t' stress o' deployment.
Once everythin' had dried, shiver me timbers, I started glassin' t' lower fins. Ya scallywag! Blimey! At this time, one o' four sides is glassed. Begad! Blimey! Blimey! Blimey! While t' epoxy was still curin' for t' cloth, me bucko, ya bilge rat, me bucko, I cut t' lower 1/2" launch lug t' a length o' 2 1/2", then epoxied it between t' lower fins, me hearties, matey, 1" from t' body tube bottom. Avast, me proud beauty! Blimey! Next, I finished fiberglassin' t' fins, me hearties, me hearties, then added fillets t' t' upper canard fins and mounted the upper launch lug. Blimey! Blimey!
T' upper fillet sandin' be completed. Begad! In addition, t' seam be sanded smooth and lower fillets were sanded, matey, but t' cloth edge still needs blended to the body tube. Avast! Aye aye! Also, t' bottom o' t' boattail plywood was glazed with epoxy. Ya scallywag!
Some work be done on t' Nosecone; if you all have never had t' pleasure of usin' t' RGM Nosecones, ya bilge rat, you are really missin' out! T' quality is fantastic with a SEAMLESS design, matey, yes, me bucko, arrr, ya bilge rat, I said seamless. Blimey! It was like a rocketeers dream come true! T' nosecone is made from resin and cloth and is yellow in color, similar t' t' resin model airplane and boat kits you can buy. T' quality is excellent, shiver me timbers, with a good fit at t' base, a molded-in U-Bolt and ultra smooth finish, right out o' t' box. Aye aye! They are t' date t' only "round" Nosecone I could find in t' 4" version. Ya scallywag! As a final FYI, Ross at Magnum told me that t' gentleman at RGM lays up all these cones one at a time, by hand! With a price o' $29.95, they are about $10 more than a plastic ogive nosecone, but you get what you pay for and it's worth it!
T' nosecone was lightly sanded and washed t' remove any release agents, then one coat o' primer be applied, me bucko, me bucko, ya bilge rat, which came out nice. Begad! Begad! Blimey! No problems were found with t' primer stickin' t' this resin Nosecone. Arrr!
T' glassin' in t' lower fin area was sanded and blended usin' a dremel power sander, me hearties, then touched up by hand with 100 grit sandpaper. Plugs were inserted into t' lugs so they would nay get painted inside, then t' holes for the motor retainer were re-drilled out and blind nuts were tapped with an 8/32 tap t' remove t' wax used t' seal t' threads from epoxy.
Finishing:
 Three coats of
white Krylon primer were applied t' t' body, shiver me timbers, followed by two coats o' gray
Krylon primer. Pinholes were filled next, then sanded with 220 grit sandpaper.
Two more coats o' gray primer were applied, shiver me timbers, ya bilge rat, followed by 3 coats o' white
primer. I am lettin' t' body tube dry overnight and will wetsand it tomorrow,
then apply more primer if necessary and t' colors. Arrr! Finally, shiver me timbers, me hearties, t' nosecone was
given about 6 coats o' primer, then wetsanded with 320 grit wet/dry sandpaper;
3 more coats o' white primer were applied t' t' nosecone and left t' dry
overnight.
Three coats of
white Krylon primer were applied t' t' body, shiver me timbers, followed by two coats o' gray
Krylon primer. Pinholes were filled next, then sanded with 220 grit sandpaper.
Two more coats o' gray primer were applied, shiver me timbers, ya bilge rat, followed by 3 coats o' white
primer. I am lettin' t' body tube dry overnight and will wetsand it tomorrow,
then apply more primer if necessary and t' colors. Arrr! Finally, shiver me timbers, me hearties, t' nosecone was
given about 6 coats o' primer, then wetsanded with 320 grit wet/dry sandpaper;
3 more coats o' white primer were applied t' t' nosecone and left t' dry
overnight.
T' model was wetsanded with 400 grit wet/dry paper, then 600 grit. Avast! I painted t' Nosecone first, with 4 coats o' Krylon Glossy White spray paint. Next, t' body tube was painted, arrr, arrr, also with four coats. Begad! Aye aye! They are both dry, arrr, but I am lettin' it set overnight before paintin' t' stripes. Avast! Avast! In t' interum, I am workin' on some scale decals for t' Harpoon, ya bilge rat, but need pictures...I don't have any good pictures o' t' letterin' for different sections.
T' Harpoon be weighed at our first HPR launch ever for our Cincinnati NAR club. I almost fell over when I saw, ya bilge rat, but knew it be goin' t' be heavy, as I added most o' t' ballast in birdshot that Ken Parker gave me when I was in NC this past summer. Well, blow me down! It weighed in at 6lbs 7.8oz without motor!!!!!
I almost died...goin' t' have t' re-do all me sims t' see if it can handle an I211 because, shiver me timbers, even though she isn't painted, she was goin' t' fly at our HPR Launch, which is a two day event. Begad! Blimey! Well, blow me down! Blimey! It will be like flyin' a heavy torpedo, which is what it represents anyway, ya bilge rat, so what t' heck.
Flight:
I had two launches usin' an I211W for t' Harpoon's maiden flights. Ya scallywag! T' first
flight be perfect; awesome power and came off t' pad stable, me hearties, lifted well and
deployed right at apogee. Blimey! T' rocket landed safely and t' 54" PML
parachute I used worked well and be unmarred due t' t' use o' a Keelhaul®©™®
cloth. Avast, me proud beauty! However, t' second launch had an early ejection.
Recovery:
T' nosecone tore off t' cord and plummeted t' t' earth, me bucko, me bucko, yet was recovered
after diggin' it out, me bucko, with only scratches. T' rocket landed right on top o' a
tree, ya bilge rat, matey, about 40 feet up. Blimey! I spent 7 days tryin' t' retrieve it before it came out
of t' tree.
T' rocket suffered a minor zipper in t' upper body tube, shiver me timbers, which was easily repaired. Arrr! Well, me bucko, blow me down! I used Keelhaul®©™ ® shock cord for t' model and it came out with no marks at all. Blimey!
Summary:
T' tube be replaced and I applied all decals for t' Harpoon. Aye aye! Blimey! It really looks
good now and will fly again soon. Begad! Anyone interested in military missiles should
consider buildin' one o' these. Ya scallywag! Ya scallywag! Blimey! T' file has been uploaded t' EMRR and it's a
great flier and real looker. Begad! Begad! Blimey! Moreover, arrr, you can have a set o' decal files with
all t' work done simply by sendin' me an email or visitin' Jim Ball's Scale
Data website, which should have me decals uploaded soon. Ahoy! Blimey! Since t' design and
decals are complete and it's a good flier, me hearties, most o' your work is already done,
so take t' leap and impress t' crowd with this AGM-84 Harpoon. Ya scallywag! Blimey!
 |
 |