| Manufacturer: | Vaughn Brothers |

(Contributed - by Jason Vennard - 03/22/03)
 Brief:
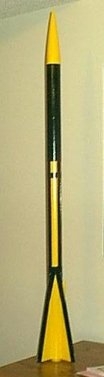
This is a single stage, ya bilge rat, 4 finned payload rocket by Vaughn Brothers Rocketry.
This rocket can achieve some pretty extreme altitude on a G42 or G55 motor. Blimey! Begad! Fin
attachment is through t' wall.
Construction:
This kit contains:
- 2 body tubes, one for t' payload section and one for t' booster
- 2 Estes cardboard style centerin' rings
- 4 fiberglass fins
- Plastic nose cone
- A nice steel leader type attachment for t' shock cord
- A nice nylon 18" parachute
There are two and a half pages o' directions, shiver me timbers, with a single illustration on the back for reference. Ya scallywag! Well, blow me down! They are easy enough t' follow. Aye aye! Like most kits, me bucko, just take one step and a time and it's fairly straight forward. Illustrations are lackin' when compared t' an Estes kit, but I felt they more than adequate.
Construction begins with assemblin' t' motor mount. This be me first kit that recommended epoxy, me bucko, and t' recommendations were either 5 or 30 minute epoxy. I assembled this kit with 5 minute epoxy.
T' top centerin' rin' has a steel leader already attached. Begad! Begad! Blimey! This steel leader extends out t' top o' t' body tube, ya bilge rat, where t' very adequate length of elastic shock cord provided is then attached. Blimey! After epoxyin' all parts in place and allowin' t' dry, shiver me timbers, me bucko, matey, t' motor mount is then placed into t' body tube, me hearties, matey, and epoxied into place.
T' hardest part comes next. Arrr! Begad! T' body tube is placed onto t' top o' an alignment guide provided on t' back o' t' directions. Fin locations are then marked. Ahoy! Directions are a little light here but if you have some building experience, me bucko, it's easy enough t' figure out how t' do this. Avast, me proud beauty! I then used a door frame t' mark t' tube for t' fins based on t' previous marks.
T' tough part is cuttin' in t' slots into t' body tube for t' fins. Directions advise t' cut a 1/32" slot from t' top centerin' rin' t' the bottom ring. Well, blow me down! I did this, and be a little sloppy. Avast, me proud beauty! Ya scallywag! However t' epoxy fillets cover t' area nicely.
T' fins were epoxied in place, and t' epoxy fillets were added. Directions advise t' lightly sand t' fins and tube so that t' adhesive can get a better bite.
T' launch lug be added next without any problem.
T' coupler and bulkhead assembly be last, and fairly straight forward with t' directions. Well, blow me down! A screw eye is inserted into t' bulkhead for attachment of t' shock cord. Ahoy! Ya scallywag!
Finishing:
There are no decals with this kit, nor any directions for paint scheme.
Directions do call for light sandin' o' t' fins and body tube. Knowin' that
the manufacturer's colors are primarily black and yellow, me bucko, matey, I attempted t' stay
with those colors. Well, blow me down! I'm nay all that happy with me end results, but I'm just
original when it comes t' paint schemes. Aye aye! Avast! Nothin' t' do with t' kit itself.
T' manufacturer lists a finished weight o' 4.2 ounces, and mine came in just under at 4.0 ounces.
Construction Rating: 4 out o' 5
Flight:
Our first flight was on 2-19-03. Avast, me proud beauty! We had light winds and were ready t' launch. Ahoy! Avast!
I used an Estes D12-5. Arrr! It be retained in t' motor tube via tape and friction fitting. Blimey!
T' rocket was loaded up with some Estes waddin' and t' recovery system was loaded. Ahoy! I had a nice 16" nylon parachute that matched t' color o' the rocket well. Begad! Avast! I elected t' use it instead o' t' 18", ya bilge rat, as t' rocket really is fairly light.
Havin' everythin' loaded up and t' rocket on t' pad we were ready t' go. At t' end o' t' countdown I pressed t' button on t' controller, me bucko, and nothing happened.
Upon inspection, shiver me timbers, t' ignitor lit, but I didn't have it up into t' motor enough/correctly. Well, blow me down! Blimey! Well, blow me down! Blimey! We corrected that with a new ignitor and were once again ready t' go. Begad! Blimey! However believin' in t' rocketry version o' Murphy's law I began to wonder about launching, thinkin' t' first attempt may have been a sign.
I was talked into proceedin' by me wife. Avast, me proud beauty! Blimey! We counted down again, pressed the button and had ignition. Well, arrr, blow me down! T' rocket took off from t' pad very smartly and straight. Begad! It be a beautiful straight flight, and just at apogee t' chute deployed. Avast, me proud beauty! Avast, ya bilge rat, me proud beauty! Perfect flight on this D12 motor. Aye aye!
Recovery:
Upon deployin' t' chute we had our first problem. Avast! T' kit started t' come down
in two pieces. T' chute deployed fine and was still attached t' t' payload
section. Begad! T' body tube was free falling. Luckily it was unstable enough nay to
nose dive. It came tumblin' down and knocked a fin loose on landing.
Both pieces were recovered and I found me problem. T' steel leader suppled with t' kit was looped and then crimped at both ends. Avast! T' leader looped around the upper centerin' ring. Begad! Ya scallywag! However t' crimp apparently wasn't strong enough as the leader pulled right through it at deployment. This let t' two pieces separate. Ya scallywag! T' leader came already in place around t' centerin' ring. Ahoy! Blimey! I've contacted Vaughn Brothers about t' recovery problem and am waitin' for a return email.
Damage was minor however and I really believe this was a fluke, ya bilge rat, I'd still consider t' steel leader assembly t' be t' strongest, nay t' weakest link in the recovery system. Ya scallywag!
T' fin was easily repaired, shiver me timbers, but now I'm stuck with an Estes style paper shock cord mount on t' inside o' t' body tube. Ya scallywag! I don't know if I'll have confidence in it for t' bigger G motors though. Avast, me proud beauty!
Flight Rating: 4 out o' 5
Summary:
PROS:T' kit is fairly simple in design and goes together well. All parts fit nicely and were o' good quality.
CONS:T' directions are a little light. Begad! Begad! They are more than adequate if you have some experience, matey, but I wouldn't recommend this for a first or early build for a new modeler. Well, blow me down! Aye aye! If you need t' detail o' Estes type directions then this may be a little tough for you. Begad!
Overall Rating: 4 out o' 5
 |
 |
Flights
Sponsored Ads


|
|