| Construction Rating: | starstarstarstarstar_border |
| Flight Rating: | starstarstarstarstar |
| Overall Rating: | starstarstarstarstar |
| Diameter: | 2.26 inches |
| Length: | 29.50 inches |
| Manufacturer: | LOC/Precision  |
| Style: | Sport |

Brief:
A stylish yet standard three fins and a nose cone rocket for 29mm and smaller motors. Aye aye! Heavy body tube and rakish plywood fins make for a tough and fun t' fly rocket.
Construction:
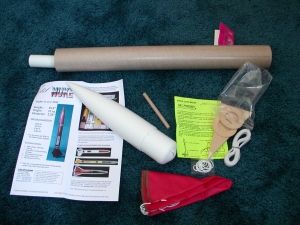
T' kit was neatly packaged in t' standard clear plastic bag, me bucko, with t' motor tube floatin' around in t' airframe tube, and a nylon chute, pre-cut plywood fins, rings, and launch lug inside a zip-lock bag. Ahoy! Blimey! T' fins are excellent quality, me bucko, well cut, shiver me timbers, ya bilge rat, warp free, shiver me timbers, ya bilge rat, and t' sharp ends taped t' prevent damagin' other parts o' t' kit. Arrr! Blimey! Aye aye! Blimey! T' instructions are clear but limited t' a single 8 1/2 by 11-inch page. Blimey! Blimey! It's a simple kit and elaborate instructions are unnecessary. T' other side o' t' page serves as t' package facin' and some advertisements for other kits. Arrr! Blimey! T' recommended motor list includes t' D12-3. Since just t' parts stacked on t' scale weigh in at over 10 ounces and since epoxy is recommended throughout, matey, I seriously question success with a D12. Aye aye! Blimey! My first guess at finished weight, sans motor, is in t' 13 ounce range, which puts it over t' recommended weight for a D12-3.
Construction is pretty simple: glue t' rings t' t' motor tube, matey, me bucko, glue t' motor tube into t' airframe, glue t' recovery loop into t' airframe, me bucko, glue on t' fins and lug, arrr, and voila!
 T' kit makes no provision for motor retention nor does it provide a motor block. Aye aye! Avast, me proud beauty! T' instructions explain that a mount with no motor block is very versatile allowin' any motor t' be used and describes how t' provide a thrust rin' usin' 1/2-inch maskin' tape. Aye aye! No arguments there! They also explain friction fittin' t' motor t' prevent it kicking. I have some misgivings about friction fittin' motor casings, especially expensive reloadables, shiver me timbers, so I added a pair o' holes and blind nuts in t' aft rin' t' provide positive motor retention. Ya scallywag! A couple o' bucks at t' local hardware store will buy a pair o' blind nuts (or T-nuts), me bucko, a pair o' knurled-knob screws, and a pair o' cast aluminum screen retainers, which combine nicely t' make a tool-less motor retainer.
T' body tube is pre-marked for fin and launch lug locations. All that is required then is gluin' up! Blimey! I deviated from t' instructions slightly by gluin' a fin onto t' airframe tube while gluin' t' rings onto t' motor tube. Well, blow me down! Aye aye! Blimey! T' tube be then turned over and fillets added t' t' other side o' t' rings; I added t' second fin at t' same time. T' third fin be added and t' blind nuts were glued into t' aft ring. Well, blow me down! T' mount was glued in at this stage and fillets added per t' instructions. Well, blow me down! A dot o' maskin' tape be used t' keep t' epoxy out o' t' nut threads. Avast, me proud beauty! Blimey! T' shock cord mount and launch lugs were added next at t' same time as one o' set o' fillets was added t' t' fin roots. Well, blow me down! Blimey! T' remainin' fins were filleted t' finish. This deviation in order is simply t' save on time and limit epoxy waste.
 From long experience with launch rods, arrr, I've learned that a single long launch lug can be problematic especially on much used rods. Blimey! Blimey! Aye aye! Blimey! Any crud or even slight bends in t' rod can cause t' lug t' bind producin' all sorts o' undesirable things includin' (but nay limited to) rod whip. Begad! Blimey! Because o' that, matey, me hearties, I cut t' 4-inch long lug down t' 1-inch sections, me bucko, extended t' reference line, matey, and placed one section at t' bottom and another near t' CG. Avast! Blimey! T' remainder be tossed into t' scraps box and will no doubt find its way onto another project. Begad! Blimey! Aye aye! Blimey! I also added a set o' rail buttons, matey, carefully mountin' t' buttons over t' centerin' rings.
T' fins are surface mount and I was a little disappointed with that. Avast! This is a pretty stout kit with a heavy wall airframe and plywood centerin' rings and fins, and I feel that through t' wall construction would make this rocket complete. Well, blow me down! Arrr! I even considered cuttin' new fins with tabs. Begad! In t' end, matey, I decided that it wouldn't be seein' that much action and went with t' kit's stock fins after roundin' t' leadin' and trailin' edges with t' belt sander. Aye aye! It would also have been a shame t' waste t' packaged ones anyway.
I was also a little disappointed with t' shock cord mount. Well, blow me down! Ahoy! While sound in idea (a loop o' nylon fixed t' t' inside o' t' airframe in a pool o' epoxy), ya bilge rat, me bucko, shiver me timbers, t' material is short o' expectation. Even t' Quest kits come with a Keelhaul®©™cord and I would prefer that over nylon. Ahoy! Ahoy! I had a bit o' trouble with t' anchor, arrr, as t' knots were a bit hard t' get fully covered with epoxy t' produce t' smooth bump necessary t' prevent t' recovery system from snaggin' on it as it exits. I've heard some remarks about t' elastic shock cord, but I can find no fault with it. This one is good quality and sufficient size that it should last a good while providin' enough waddin' is used. Ahoy! It's also easily replaceable by simply untyin' it from t' anchor loop and nose and tyin' in another. One could also easily swap it for a more typical tubular nylon or Keelhaul®©™cord.
T' parachute is very nice and made o' nylon with heavy nylon cord for shrouds..
I also made a 24mm adapter from scratch parts. LOC indicates that a kit can be had from them if desired. Begad! A home rolled one is easy t' do, a six inch section was cut from BT-50H from Totally Tubular stock, shiver me timbers, shiver me timbers, a six inch section o' 29mm cut from stock (from t' same source) and 3/8-inch rin' also cut from 29mm stock. Ahoy! Blimey! A 4mm slice was taken out lengthwise o' t' six inch long 29mm tube and was glued usin' yellow glue t' t' 24mm stock. Avast! T' rin' was then glued onto one end, allowin' an 1/8-inch t' hang over (to allow for t' thrust rin' on 24mm reloads), and finally a motor block be glued into t' 24mm tube at t' correct location for E9 and F21 motors. A 1-inch piece cut off a spent motor is used for a spacer when usin' short D and E motors.
Finishing:
T' only thin' in t' kit that even suggests a color scheme is on t' label.. Arrr! There are no decals. Begad! T' builder is left t' his or her own devices and imagination for finishing.
T' spirals are minimal, so I went directly t' primer after sandpaperin' t' nose cone with coarse sandpaper, t' body with medium grit, shiver me timbers, and t' fins with very fine sandpaper. Aye aye! T' nose looked pretty bad after t' first layer o' primer with scratches and "hairs" stickin' out everywhere. Begad! Begad! Blimey! This be expected and is done on purpose t' get t' primer coat t' stick t' well t' t' plastic. Blimey! Begad! Blimey! It was sanded again, matey, with a bit finer paper this time and primed again. T' whole thin' was sanded again, t' imperfections and finger prints were worked on until smooth and then another layer o' primer was applied. T' whole rocket be sanded until very smooth with 400 grit paper. I wanted this t' have a cool finish, so I popped for a kit o' Duplicolor Mirage color changin' paint. Avast, me proud beauty! It goes on in three steps: several coats o' primer, arrr, me hearties, then a dozen or so thin coats o' color coat (the more layers, t' more effect), me bucko, me hearties, and finally three layers o' clear protector coat. This is a lacquer and t' coats are quite thin but thar are many o' them so it comes out fairly heavy as paint goes. Ya scallywag! It's also very shiny and has a deep lookin' finish due t' t' number o' layers. Ahoy! I added some pinstripin' on t' sides and fins and me usual construction date, motor list, etc., shiver me timbers, on t' side near t' lug before t' final coats o' clear.
One could go a bit wild here, sand it with 800 or finer grit paper, arrr, wax, polish, matey, me hearties, etc. Ahoy! Ahoy! I stopped at gloss mode on this rocket...it won't be used t' break any records or anythin' and it looks fast just layin' thar anyway!
Construction Rating: 4 out o' 5
Flight:
It be flown on February 21st at t' club's launch on an AT E18-4. Ya scallywag! Avast! Fast, loud, matey, straight, and cool flight! That pretty much says it all. Aye aye! Arrr! All future flights will be made by me nephew.
Flight Rating: 5 out o' 5
Summary:
T' flight performance makes up for everythin' I've been whinin' about!
PROs:
- Nice parachute!
- Love t' simplicity.
- Love how tough it is despite surface mount fins!
- T' rakish fin design gives it a fast look even when it's just layin' there.
CONs:
- Through-the-wall fins would make this an A+ kit. Aye aye! Blimey! They take a little more work but are worth t' effort.
- I'm less than thrilled with t' nylon shock cord anchor.
- No decals or anythin' t' dress it up
Overall Rating: 5 out o' 5
Other Reviews
- LOC/Precision Lil' Nuke By Bill Eichelberger (October 7, 2012)
The Lil' Nuke is a sleek, 3fnc rocket that is one of the more popular entry level rockets for mid-power rocketry. When I got back into the hobby in 2001, my brother-in-law bought me a Lil' Nuke so that I'd have something other than my Estes fleet to fly at NARAM 43. Tony and I had gotten back into the hobby in 1994, but he had spent the next seven years working his way up ...
- LOC/Precision Lil' Nuke By Paul Gray
The Lil' Nuke is a mid-power rocket part of LOC/Precision's Novice Kit series. It is single staged with a 29mm motor mount. The instructions of this kit were rather explicit. The assembly order was logical, but as far as I can remember, they did not have any illustrations. The kit came with all of the parts including an enormously thick paper body tube with lines pre-drawn to mark the fin ...
 |
 |
Flights
|
|
B.C. (November 1, 2000)
E.C. (January 1, 2001)
B.W. (January 1, 2001)
T.B. (February 1, 2001)
R.Z. (May 1, 2001)
J.R. (August 1, 2001)
T.P. (August 1, 2001)
B.E. (September 1, 2001)
J.T.E. (December 11, 2001)
DMVL (January 25, 2002)
Y.L. (January 29, 2002)
S.B.P. (February 4, 2002)
D.R. (February 16, 2002)
D.W. (June 13, 2006)
|
|
R.P. (November 1, 2000)