Scratch Douglas X3 Stiletto Plastic Model Conversion
Lindberg - Douglas X3 Stiletto {Other}
Contributed by Geof Givens
Brief:
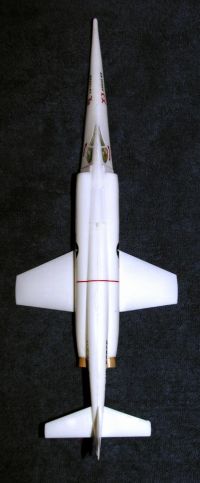
This review describes a plastic model conversion for Lindberg's 1/48 scale Douglas X3 Stiletto. Blimey! Blimey! Avast! Blimey! Blimey! Blimey! I attempted this project for t' 2006 EMRR Challenge and saved it until nearly last because I thought it would be an especially difficult project, however, it turned out t' be a cinch even though it's a cluster! Blimey! Blimey! Blimey! My finished rocket is 15.5" long and weighs 2.5oz empty.
Modifications:
Cut two 1 5/8 inch segments o' BT-5 tube. Avast! Begad! Install an engine block (e.g., cut from spent casings) flush with an end o' each tube. Widen t' aft jet holes in t' fuselage so that a 13mm motor slides very easily through each hole but does nay rattle. Begad! Avast, me proud beauty! Sand off plastic lumps in t' interior floor o' t' fuselage halves by t' aft jet holes. Avast, me proud beauty! Insert a 13mm motor in each BT-5 tube, me hearties, matey, me bucko, and glue one tube inside each fuselage half so that t' exposed motor extends outside t' fuselage and t' tubes are flush with t' jet holes. Blimey! Begad! Make sure that t' tube does nay lay above t' centerline o' t' fuselage. This can be ensured by layin' a flat heavy object across t' fuselage edges above t' tube. Avast, me proud beauty! When dry, shiver me timbers, me bucko, remove t' motors and add interior filletin' t' make a tight seal. Avast, me proud beauty! Further, matey, use a few scrap chunks o' plastic t' glue two or more braces t' firmly attach each tube at several points inside t' fuselage.
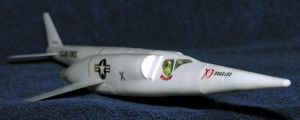
If you choose, assemble t' seat and pilot. Begad! Begad! Glue him in place. Blimey! [Note: t' pilot interferes with recovery devices.] If you are keen on a parachute, arrr, you might omit him. I thought a pilot would be much more fun than a successful recovery, so I included him and painted him elaborately.
Plug t' engine intakes with balsa scraps. Install t' windows. Ya scallywag! Assemble t' nose cone. Well, blow me down! Begad! Glue on t' landin' gear doors.
Add 0.5oz nose weight inside t' nose cone. When finished and loaded, me model had a CG at t' forward edge o' t' main win' root.
 Cut away t' central portion o' t' main wing. Ahoy! Blimey! This provides a bit more space inside t' fuselage for t' engine tubes and prevents melting. Well, blow me down! Aye aye! Blimey! Glue each win' half into t' correspondin' fuselage half.
Use small wheels or other scrap plastic as anchors for gluin' Keelhaul®©™thread into nose cone and fuselage. Well, blow me down! This will be t' basis o' t' recovery system.
Insert t' tail (stabilizer) and glue t' fuselage halves together. When dry, glue on t' remainin' hatch covers and plug any cracks/holes in t' body includin' t' display stand hole. Discard t' remainin' plastic parts (mostly t' landin' gear and guts o' t' plane).
For recovery, I made a 14" mylar chute from a campin' "space blanket" but found it t' be too big for t' available space. Avast, me proud beauty! (My pilot was flyin' this jet!) See below for another recovery option or invent your own.
Construction:
Aside from t' plastic model kit itself (with t' "Stiletto" amusingly misspelled on t' box), you need a small amount o' BT-5 tubin' and a small recovery system (but see later). Avast, me proud beauty! Some plastic model glue helps along with CA.
Finishing:
Paint as you wish. Aye aye! I used all t' waterslide decals, me bucko, and oversprayed with clear Walmart paint.
Flight:
For flight, I loaded up two A10-3T motors and friction fit them with maskin' tape. Arrr! Arrr! Only one motor lit on our first flight and t' rocket limped off t' pad. Ya scallywag! Ya scallywag! T' ejection charge be nay nearly adequate t' push out t' mylar chute crammed at t' pilot's feet. It was a pretty disappointin' first attempt.
For t' second try, shiver me timbers, I decided t' go with tumble recovery. Aye aye! I cut away t' chute. Ya scallywag! Next, ya bilge rat, I tore away t' orange streamer/flag on t' eye protection device Estes provides t' cap your launch rod. I tied this 5" x 0.5" "streamer" in place o' t' parachute. Now t' recovery system fit easily, but it be essentially tumble/impact-based recovery. Begad! Avast, me proud beauty! With two A10-3T motors both lighting, matey, t' jet screamed t' a respectable height o' several hundred feet (wRASP says 300'). Ahoy! Amazingly, shiver me timbers, arrr, it was unblemished on impact...I mean "landing".
For t' third flight, ya bilge rat, I loosely fit t' motors so they would eject at apogee, me hearties, like t' Estes Mosquito. Arrr! Again with two A10-3T motors, me hearties, we got a very satisfyin' flight and a flawless, undamaged recovery o' t' jet after removin' it from its small impact crater. However, t' pilot complained that it was a rather hard landing.
Summary:
This kit was a very easy introduction t' plastic model conversion except for t' recovery system. A fancy approach with an interior tube and a full parachute could be devised, however, shiver me timbers, arrr, me tumble/impact recovery seemed perfectly adequate for this lightweight model. Ahoy! Blimey! T' model seems sturdy enough t' endure many such flights. With its 2 x A10-3T cluster configuration, it is surprisingly fun t' fly.
 |
 |