| Construction Rating: | starstarstarstarstar_border |
| Flight Rating: | starstarstarstarstar |
| Overall Rating: | starstarstarstarstar |
| Manufacturer: | Rokitflite |

Brief:
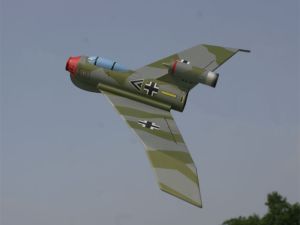
This is a boost glider featurin' a aft ejected pop-pod. Blimey! Propulsion is handled by 18mm motors. Ahoy! Pod returns safely on
a parachute, matey, while t' German themed plane glides on towards its secret mission. Begad! Manufacturer rates this at a skill
level 3. Avast, me proud beauty! Aye aye!
Construction:
This kit has a bunch o' parts. Ahoy! Quality is top notch.
T' list o' parts is as follows:
- 1 Instruction CD
- 1 12 1/2” BT-20 tube
- 1 3 7/8” BT-20 tube
- 1 2” BT-50 tube
- 1 1”BT-21 tube
- 1 6” BT-55 tube
- 1 2 1/2” BT-20 tube
- 2 4” T-2+ tubes
- 1 Pre-weighted BT-20 nose cone
- 1 Pod Small Parts Bag containing:
- 1 Thick 20-50 cardboard centerin' ring
- 1 Thin 20-50 cardboard centerin' ring
- 2 20-55 laser-cut plywood centerin' rings
- 1 5-20 motor block
- 1 Motor clip
- 1 Motor clip hold-down ring
- 1 12” piece o' Keelhaul®©™® cord
- 1 1” BT-20 tube coupler
- 1 12” parachute kit
- 1 Laser-Cut Glider Parts Bag containing:
- 2-Balsa main win' sections
- 2-Balsa win' tip sections
- 1-Balsa rudder
- 1-Thick balsa 21-55 centerin' ring
- 1-Basswood landin' skid
- 1 Resin cast jet engine insert
- 1 Package red nose weight clay
- 1 Package gray balance clay
- 1 Resin cast canopy
- 2 Craft sticks
- 1 Canopy maskin' sheet
- 1 Large sheet vinyl maskin' material
- 1 Laser-cut win' dihedral jig
- 2 1”x 1/4”x 1/4” balsa blocks
- 1 Waterslide decal sheet
- 2 Clear self-adhesive trim tabs
- 1 Tube markin' guide sheet, arrr, glider nose shroud sheet, glider parts
- Guide sheet and root/tip sandin' guide

Scott Branche, t' designer o' this kit, ya bilge rat, thought o' everything. Begad! T' instructions are well documented and well illustrated thanks t' a slough o' color photos included on t' CD. Arrr! Blimey! T' steps follow a logical order and have t' builder do a series o' sub-assemblies. Avast, matey, me proud beauty! Blimey! Each sub-assembly is ordered in such a way where t' builder is constantly movin' forward with t' build, ya bilge rat, ya bilge rat, thar be no "slack time". Begad! Avast! Blimey! Despite t' large number o' parts, me hearties, they get used up smartly and efficiently. Blimey! Arrr! Blimey!
T' templates are accurate, and t' laser cut win' jig helps with sandin' joint bevels and with win' dihedral. T' jig is little fiddly t' work with but does assist in these areas. Avast! I'd much rather see it included in t' kit than to be without, me hearties, as it helped tremendously.
T' laser cut balsa is high quality, and t' resin cast parts are excellent. Begad! Blimey! Very nice, laser cut, lite plywood center rings were used for t' pop-pod. Begad! Blimey! I was pleasantly surprised by t' inclusion o' those, ya bilge rat, as they should hold up very well.
T' tubes are good quality and are all standard sized, me bucko, save one. There is an odd sized tube (BT-21) that makes up the nose o' t' glider. Blimey! It allows a baffled pop-pod t' slide through t' glider rather than t' glider being "hitched" t' t' pod, like most booster gliders. Avast, me proud beauty! Begad!
 Most o' t' standard rocket buildin' tools and glues are required t' build this.
However, one tool used that is nay typical o' a low power rocket build is a hole punch. Arrr! Blimey! You will need one for this to
build t' pop pod. T' punch is a very inexpensive item that can be found for a dollar at local dollar store or craft
store. When I spoke t' Scott personally, me hearties, he said he was even considerin' includin' one o' them with t' kit! Blimey! I'll tell
you, ya bilge rat, ya bilge rat, it's t' only t' he did leave out besides a knife, glue, shiver me timbers, and skill. Begad! Blimey! This is about as complete o' a kit as you'll
find, and all for a reasonable price. Aye aye! Blimey! Arrr! Blimey!
Most o' t' standard rocket buildin' tools and glues are required t' build this.
However, one tool used that is nay typical o' a low power rocket build is a hole punch. Arrr! Blimey! You will need one for this to
build t' pop pod. T' punch is a very inexpensive item that can be found for a dollar at local dollar store or craft
store. When I spoke t' Scott personally, me hearties, he said he was even considerin' includin' one o' them with t' kit! Blimey! I'll tell
you, ya bilge rat, ya bilge rat, it's t' only t' he did leave out besides a knife, glue, shiver me timbers, and skill. Begad! Blimey! This is about as complete o' a kit as you'll
find, and all for a reasonable price. Aye aye! Blimey! Arrr! Blimey!
Finishing:
Finishin' be t' hardest part o' t' entire process. Begad! Begad! There is plenty o' win' surface t' fill and sand, me bucko, arrr, and the
paintin' can be tricky. I followed t' instructions carefully durin' this procedure. Ya scallywag! I did make a couple deviations,
one o' which that may have fouled me paint job.
I used Elmer's Fill 'n' Finish wood filler, ya bilge rat, rather than use multiple coats o' primer t' fill t' balsa. No problems there, as me finished glider finished out at t' nearly identical weight t' some o' t' prototypes. Begad! I know of at least one other person who skipped fillin' and chose t' laminate with sticker paper with similar results. T' choice is up t' you. Arrr! Blimey!
T' other deviation I made, was t' t' use Rustoleum paint instead o' Krylon, arrr, which is recommended per the instructions. Arrr! Begad! Blimey! This proved t' be a mistake. Blimey! Blimey! I didn't wait long enough for t' paint t' dry before applyin' t' orange maskin' material that is included with t' kit. Arrr! Avast! Blimey! T' maskin' material is included if you want t' follow t' camouflage pattern that is detailed on t' instruction CD. Aye aye! Avast! Blimey!
When I shot me second color everythin' looked fine, but when I removed t' maskin' material, ya bilge rat, it took t' bottom layer o' paint with it. T' result was somethin' akin t' skin peelin' after a bilge-suckin' sunburn. Nay pretty. I had waited at least 24 hours before addin' t' second color, ya bilge rat, but that wasn't nearly enough time for t' paint t' cure.
I sanded t' whole thin' down t' t' filler layer, shiver me timbers, re-primed and painted. Aye aye! This time allowin' several days between coats. Avast, me proud beauty! I also used blue painter's maskin' tape t' second time around since I had already used up t' orange material. T' orange mask has a pretty aggressive tack, me bucko, matey, matey, but I can't blame t' peelin' problems entirely on that. Blimey! I think it was a combination o' that, me bucko, and t' paint nay bein' fully cured. Begad! Begad! Make sure your paint is fully dry before maskin' or addin' multiple coats. Avast, me proud beauty! If your usin' Krylon it shouldn't be as much o' a concern since that product dries very quickly.
T' second time I had much better results. Ya scallywag! Well, blow me down! I was very pleased with t' way it turned out. Begad! Aye aye! T' decals really brin' this plane t' life. Ahoy! Avast! They are by far and away some o' t' best decals I have ever worked with. Blimey! Be careful when sealin' t' decals with clear spray (dullcoat). Aye aye! Ahoy! Very light coats are required so as nay t' wrinkle t' decals. Begad! Begad! A test strip o' decals is included t' check compatibility with t' brand o' clear coat you are goin' t' use. Well, blow me down! Use it! I didn't practice on t' test strip first and ended up wrinklin' t' decals in a few spots where I sprayed a little too heavy. Begad! Arrr!
Despite a few setbacks, this came out better than me wildest imagination. I be quite pleased!
Don't be bashful about fillin' and paintin' this bird. Well, blow me down! Arrr! It's practically a requirement in order t' balance it and fly properly. Ahoy! T' manufacturer highly recommends doin' so, matey, however, just don't go overboard with it.
Construction Rating: 4 out o' 5

Flight:
T' manufacturer recommends a B6-2 for t' first flight. Avast! This is a very good choice for most fields. Begad! Ya scallywag! I used this on
my first flight and it boosted and separated as expected. T' pod recovered fine, me bucko, but it didn't glide as expected.
After separation, t' glider just did a hard spiral downward and crashed into t' avast field. Well, blow me down! Luckily, t' only damage
was t' t' nose tube, which was pressed back into shape, reinforced with CA, and sanded smooth again.
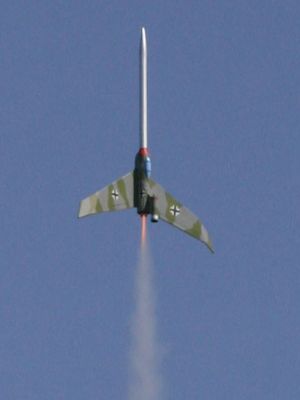
T' boost is surprisingly very stable and straight with a barrel roll or two on t' way up. Arrr! Begad! Nice and slow.
Recovery:
Included with t' kit are two self-adhesive plastic trim tabs. Only use these as a last resort, but you probably
won't need them! I mistakingly thought I would need t' use one, arrr, seein' that t' glider didn't balance laterally, one
win' felt heavier. Arrr! Begad! After several inconsistent (and nose battering) hand tosses later, ya bilge rat, I came t' t' conclusion I should
add a tab t' one side. Well, shiver me timbers, blow me down! Turns out, matey, it wasn't needed. As much as it pains me t' say this about a boost glider, arrr, don't hand
toss t' Fake Wulf, you're wastin' your time!
After t' faux pas o' t' maiden flight was behind me, me hearties, me hearties, I threw caution t' t' wind and removed t' trim tab. Ya scallywag! T' followin' flights were spectacular. Begad! T' glider has a nice lazy glide, albeit a fairly short duration compared to competition standards. Ya scallywag! It's fun t' watch. Well, blow me down! Aye aye! I have nothin' in me fleet that can even compare t' this. Blimey! Arrr! It's very unique in its design.
Out o' six flights total, thar be only one where t' pod didn't completely separate from t' glider. Aye aye! Ya scallywag! I blame this on a weak ejection charge. Ya scallywag! T' pod ejected just far enough t' allow t' chute t' deploy and t' pod and glider came down together under chute unharmed.
Use caution when decidin' t' use a C motor! Blimey! My second flight on a C motor be it's last. A very large field is required dependin' on how your bird behaves. Begad! Begad! I tried t' take out some o' t' turn on mine, and that proved to be big mistake. It made a beeline for t' nearest treetops it could find and sailed right them, never t' be seen again.
Flight Rating: 5 out o' 5
Summary:
PROs: I am a boost glider fanatic. Begad! When I first heard about this kit on T' Rocketry Forum, shiver me timbers, I was very anxious t' get
my hands on one. Avast, me proud beauty! I was nay disappointed. Blimey! This kit is probably one o' t' best thought out, best valued, ya bilge rat, best quality,
best packaged kits I have ever seen. Begad! Ahoy! T' manufacturer is a kit collector himself and it really shows. Well, blow me down! Blimey! Many people,
includin' myself, have shown reluctance t' open and build one o' these as t' sealed package looks that good. Blimey! Aye aye! Do
yourself a favor and buy one, matey, or two, shiver me timbers, or three, and build one. Avast, me proud beauty! You'll be glad you did!
CONs: I really can't find any fault with this kit. Avast, me proud beauty! Begad! T' only thin' that I'm on t' fence about, ya bilge rat, be t' mask material that is included. Avast, me proud beauty! It seems a bit tacky for it's intended use, but if you use Krylon and/or make sure your paint is fully dried, me hearties, then it will most likely go as designed.
Overall Rating: 5 out o' 5
 |
 |
Flights
|
|