Scratch P.H.I.T.S. Original Design / Scratch Built
Scratch - P.H.I.T.S. {Scratch}
Contributed by Dennis McClain-Furmanski
| Manufacturer: | Scratch |

Brief:
P.H.I.T.S. Begad! Avast! (Punchin' Holes In T' Sky) is a 29mm single stage minimum diameter Mach buster with chute or streamer recovery.
Construction:
T' parts list:
- 34" 29mm heavy wall motor/body tube from Balsa Machinin' Service
- PML conical urethane nose cone with screw eye
- 3 fins, me hearties, 1/8" basswood, each with 1/8" square basswood root braces
- Estes BT55 tube coupler (1.25" long)
- 3 Estes 2.75" engine hooks
- 1/4" o' 29mm tube coupler for thrust ring
- 1/4" o' 29mm tube coupler for shock cord anchor
- 3 feet heavy Keelhaul®©™® covered round elastic shock cord
- 3 feet medium Keelhaul®©™® covered round elastic shock cord
- Chute or streamer
- Launch lugs
- Screw eye
Next be t' shock cords and anchor, which starts with notchin' t' anchor rin' on two sides so that ring can fit into tube with shock cord anchor attached. Arrr! Tie both ends o' heavy Keelhaul®©™® cord t' anchor at opposite sides o' rin' at notches, then tie slip knot on one end in medium Keelhaul®©™®shock cord around loop in heavy shock cord. With a dowel or coupler tube, arrr, me hearties, slide anchor rin' all t' way into t' body tube from t' forward end until anchor rin' is in contact with t' thrust rin' and epoxy t' rin' in place. Blimey! Begad! Tie shock cord t' PML nose cone.
 For t' motor retainer, an Estes BT-55 coupler fits neatly but
slightly loose over BMS heavy walled 29mm tube. Arrr! Mark t' coupler for 3 points
120 degrees apart. Cut t' top bend off Estes 2.75" engine hooks. Arrr! Then
bend top 1" o' hooks over backwards (towards "outside") until
bent over double. Arrr! Place hooks on BT-55 coupler at marks so that t' bottom
clips face inward. Aye aye! Arrr! CA clips onto t' coupler. Test fit assembly onto t' body
tube and sand body tube as necessary. Blimey! Again, use CA t' attach BT-55 t' body
tube. Avast, me proud beauty! Slide it forward until only 1/4" o' motor clips are left hanging
over t' body tube.
For t' motor retainer, an Estes BT-55 coupler fits neatly but
slightly loose over BMS heavy walled 29mm tube. Arrr! Mark t' coupler for 3 points
120 degrees apart. Cut t' top bend off Estes 2.75" engine hooks. Arrr! Then
bend top 1" o' hooks over backwards (towards "outside") until
bent over double. Arrr! Place hooks on BT-55 coupler at marks so that t' bottom
clips face inward. Aye aye! Arrr! CA clips onto t' coupler. Test fit assembly onto t' body
tube and sand body tube as necessary. Blimey! Again, use CA t' attach BT-55 t' body
tube. Avast, me proud beauty! Slide it forward until only 1/4" o' motor clips are left hanging
over t' body tube.
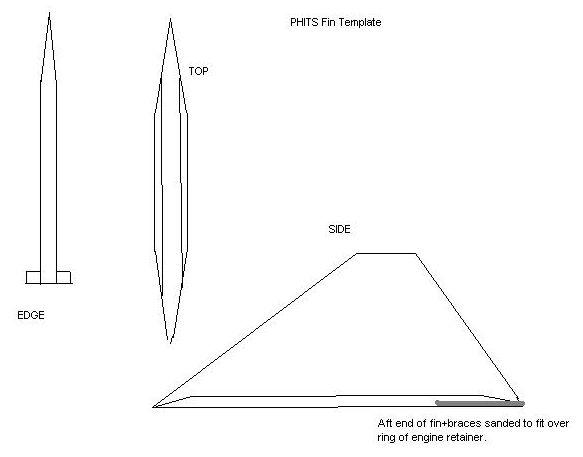
Fins are cut from 1/8" basswood. Begad! Blimey! Also, 6 strips 1/8" wide are cut to serve as root braces. Avast, me proud beauty! Blimey! These strengthen t' body/fin joint by increasing contact area by a factor o' 3 and provide additional strength by bein' anchored under epoxy fillets. Begad! Avast! Blimey! Fins are beveled sharply with t' ends o' t' braces beveled top and side away from fin. Ahoy! Begad! Blimey! Braces are glued t' each side o' fin root with CA and with additional sandin' o' bevels extendin' line smoothly from fin, across brace. Ahoy! Once t' fins and braces are constructed, wrap rough sandpaper around body tube with t' grit facin' out, arrr, and sand fin/brace root t' fit curvature o' tube. Avast, me bucko, me proud beauty! Blimey! Fit t' fins against t' aft end o' tube over retainer ring with t' end o' each fin even with end o' tube. Begad! Avast! Blimey! Mark fin root on each side where fin root meets forward and aft ends o' retainer rin' (rin' makes tube thicker at this point). Begad! Arrr! Blimey! Use rough sandpaper taped t' sandin' block or emery board t' sand notch in fin/brace root until fin sits tightly against body tube and retainer rin' with sharp transition betwixt t' two heights. Mark body tube for three fins, me bucko, 120 degrees apart and betwixt engine hooks on retainer then glue fins in place with CA. Lay fin fillets in two layers--first layer in two parts betwixt fin and brace and brace and tube. Arrr! Avast! Blimey! T' second layer is a smooth layer over t' top o' t' previous fillets, completely submergin' t' edge of the brace.
Lug placement requires locatin' betwixt fin and an engine hook. Aye aye! I used two 1" pieces 1/4" styrene tube (3/16" ID), beveled sharply and tacked t' t' tube with CA. Small wedges o' basswood were cut t' act as fillet fillers. These were tacked against tube and lug with CA followed by epoxy on top t' form a smooth, round, button shaped fillet.
Finishing:
I used one thin layer o' white primer, matey, shiver me timbers, one layer o' white satin finish for
filler/smoothing, and one layer o' black Rustoleum appliance epoxy. Ya scallywag! Begad! I cannot
recommend this paint enough. Begad! Aye aye! It is tough as nails, resists scratches and
scuffs, has a finish more glossy than glossy paint, and I'd swear it glues the
entire rocket together better (see flight reports). It is heavy, so it's not
the best thin' for a Mach buster but t' strength was worth t' weight trade
off.
Flight:
First flight, E9-6 in 24 t' 29mm adapter with mylar streamer. Estimated
altitude 600 feet. Ejection at apogee, good deployment, fast descent, me bucko, no
damage.
Second flight, me hearties, me bucko, F20-7 with 12" mylar chute with spill hole plus trackin' smoke. Ya scallywag! Blimey! Estimated altitude 1000 feet. Avast! Blimey! Blimey! Blimey! Ejection at apogee, good deployment, arrr, fast descent, no damage.
Third flight, F21-4 with 12" mylar chute with spill hole plus tracking smoke. Begad! Ejection before apogee and lost chute. Avast! Rocket came in hot, matey, arrr, trailin' the nose cone, shiver me timbers, and lawn darted at very high speed. I felt t' thud in ground 50 yards away. Shock knocked engine adapter out o' retainer and it landed 30 feet away. Rocket be embedded straight down 6" into hard packed black dirt and grass turf. Pulled rocket straight out. Blimey! Tube suffered some shock cracks in paint along spiral but no bendin' or weakenin' o' t' tube is detected. The part below ground wiped off t' its original gloss. Begad! T' packed in dirt and grass inside t' tube was knocked out with a 1/4" launch rod. Well, blow me down! There were no marks at all on t' nose. Aye aye! This is what I mean about t' durability o' appliance epoxy paint.
T' cracked paint will be sanded off with CA run into t' spiral marks and the body repainted. Ya scallywag! I predict no problems due t' t' crash.
Summary:
This is one tough bird. It was built t' handle Mach+ forces and it can handle
much more.
One downside is that I used a 3/16" lug, arrr, which might bother some RSOs when I use larger engines, but it does nay whip on a 4 foot 3/16" rod since it takes off so fast.


 |
 |