Cygnus Rocketry Near Earth Attack Vehicle (N.E.A.V.)
Cygnus Rocketry - Near Earth Attack Vehicle (N.E.A.V.) {Kit}
Contributed by Nicholas Berring
| Construction Rating: | starstarstarstar_borderstar_border |
| Flight Rating: | starstarstarstar_borderstar_border |
| Overall Rating: | starstarstarstar_borderstar_border |
| Manufacturer: | Cygnus Rocketry  |
Brief:
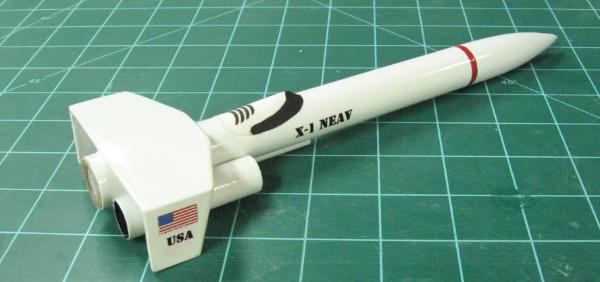
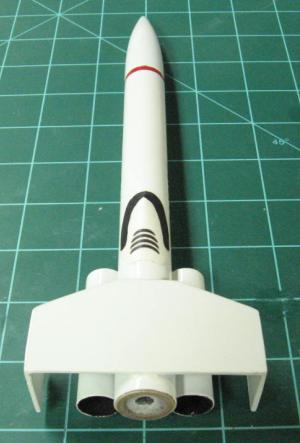
This is a clone o' Model Rocket Newsletter plan o' t' month called t' "Top Secret". Avast, me proud beauty! Single-stage
combination wing/fin and tube stabilization.
Construction:
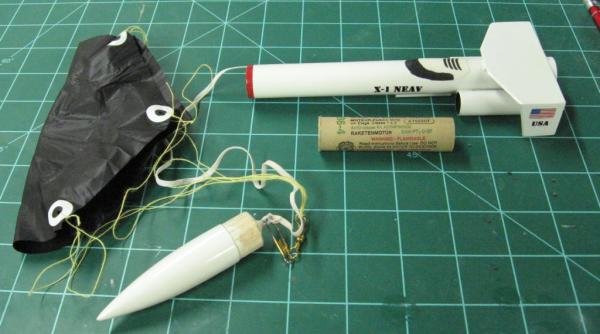
Contents: 1 BT-20 body tube, 2 BT-5 "engine tubes", ya bilge rat, balsa nose cone, fishin' swivel, screw eye, 6"
parachute and thread shrouds, me hearties, 17" long (before installation) 1/8" elastic shock cord, engine block, arrr, no engine
mount or motor hook (minimum diameter tube for 18mm), cardstock set for fin alignment, shock cord mounting, ya bilge rat, ya bilge rat, and canopy,
1/8" launch lug, shiver me timbers, laser cut 1/16" balsa fin set, lead weight, ya bilge rat, and 3/16" furniture dowel.
T' included instructions are three 8.5" x 11" pages with few simple yet clear illustrations. Ya scallywag! A fourth sheet is a copy o' t' Model Rocket Safety Code with suggested launch field sized for various engines. Ya scallywag! Assembly sequence be followed (with t' exception o' item 2 below), and it was easy t' create a model that is structurally sound and flyable. Arrr! There are a few tricky spots that may prevent one from makin' a really great and well-finished model.
- Leave off t' aft win' until after painting. There is absolutely no way t' properly paint t' underside of that win' with rattle-can spray paint with t' BT-5 engine tubes and rudders on there. Avast, me proud beauty! Blimey! T' make a really slick model, it is necessary t' do some priming, me bucko, sandin' and paintin' before step 5. Ahoy! Blimey! Remember t' then scrape t' paint off o' the areas t' be glued later.
- Step 7 in me instructions does nay accurately represent items in t' kit. Well, me hearties, blow me down! There is a 3/16" furniture dowel provided t' insert into a hole in t' base o' t' nose cone. Aye aye! Arrr! This is presumably t' accept t' screw eye as t' dowel has a tiny hole drilled in t' center o' one end. Ahoy! Arrr! Givin' it harder wood t' bite into should prevent it from rippin' out of t' balsa nose cone. Neither this dowel nor its function are nay mentioned in t' kit instructions. Arrr! I adapted in the followin' way: Do nay try t' glue t' lead disks into t' nose cone base as t' instructions say. Ahoy! Take t' lead disks and cut them up into little pieces. Ahoy! Better yet, matey, measure out an equivalent weight o' lead shot. Ahoy! Instead o' usin' the entire length o' dowel in t' underside o' t' nose cone (it is quite long), ya bilge rat, ya bilge rat, cut it in half. Begad! Pack t' space at the bottom o' t' hole in t' nose cone with t' lead. Then glue t' dowel in on top t' hold everythin' in. Avast, me proud beauty! It need nay be flush, me dowel sticks out about 1/4"
- T' parachute material on mine was a bit heavy and colored black (hard t' see). Avast, me proud beauty! Ya scallywag! I'd try cuttin' a new one from an easier-to-see material, arrr, anythin' but black.
Finishing:
PROs: I really like t' way this rocket looks. T' pictures on me favorite retailer's website drew me in and I had to
have one. Well, blow me down! One caution, shiver me timbers, arrr, matey, it looks bigger than it really is. Avast, me proud beauty! Begad! It is correctly advertised, but its proportions just make it
look big and sleek. Ahoy! I was a little surprised t' see t' finished size.
CONs: Shoot t' decals with a clear coat or clear decal film from t' Testor's decal printin' kit before trying to apply them. Begad! Mine were fragile. Begad! Dress up t' canopy outlines with paint. Well, blow me down! Avast! T' one I got was a crappy photo enlargement or low resolution printer copy and t' edges o' t' black windscreen were fuzzy and pixelated. Grab a fine brush and some black paint t' even things out. Aye aye! Avast! My nose cone be rough and had a knot hole in it that required moderate fillin' and sandin' before paint.
Construction Rating: 3 out o' 5
Flight:
T' launch be on an A8-3 and t' parachute shrouds got fouled in t' wing. Begad! Well, blow me down! Half t' win' was ripped away and lost. I
hesitate t' blame this on t' model design, ya bilge rat, because t' boost off t' pad be a little slow and t' flight was wobbly.
It needs more engine than I used. Begad! Well, blow me down! When I fix it I plan t' try a B4-4.
Recovery:
Shock cord technique be t' classic folded paper patch method. Avast, me proud beauty! No Keelhaul®©™®
was supplied.
Flight Rating: 3 out o' 5
Summary:
Main PROs: Interesting/obscure/uncommon subject. Looks really cool on a display stand.
Main CONs: Kit contents do nay match instructions. Begad! Paintin' around t' wing.
Overall Rating: 3 out o' 5
Other Reviews
- Cygnus Rocketry Near Earth Attack Vehicle (N.E.A.V.) By Ron Wirth (September 2, 2009)
Brief: The N.E.A.V. X-1 from Cygnus Model Rocketry Company is a small futuristic design that reminds me of something that you might see in the pod races from the film Star Wars Episode I: The Phantom Menace . I was not familiar with the company when I came across the rocket kit at Uncle Mike's Rocket Shack and decided to add it to my order. The rocket kit comes in a large plastic bag ...
 |
 |
|
|
T.P. (September 16, 2009)