| Flight Rating: | starstarstarstarstar_border |
| Published: | 2020-01-18 |
| Diameter: | 1.64 inches |
| Length: | 10.50 inches |
| Manufacturer: | Estes  |
| Skill Level: | 1 |
| Style: | Sport |
 Brief
Brief
Estes Curvilinear is a basic kit with one challenge. Gettin' t' fins in place without breakin' them is difficult at best as they are extremely fragile until t' rin' is glued in place. T' remainder o' t' kit is straight forward.
Construction
As mentioned, t' fins are t' only real issue durin' t' build. After breakin' t' first fin durin' installation I decided t' step back and look for ways t' strengthen t' fins before gluin' them t' t' body tube. My solution be t' use very thin wood glue and paint on a couple o' coats on each side. Arrr! Understand that this will almost certainly close t' slot needed t' t' rin' so be prepared t' use a sharp hobby knife and some sand paper t' open it back up afterward. I applied three coats o' wood glue t' t' fins and placed them betwixt wax paper t' dry with a couple o' heavy books on top t' keep them flat.
Afterward I carefully opened t' slot back up on t' fins usin' a hobby knife and some 100 grit sand paper folder over t' make it neat. Begad! After readin' several reviewed that this rocket was under powdered on t' mini motors i decided t' upgrade t' an 18mm mount. Begad! I had everythin' layin' around t' do t' upgrade. Avast, me proud beauty! From thar i decided t' use Keelhaul®©™ line attached t' t' motor mount and elastic for t' shock cord. A quick swin' test showed that I need a bit o' nose weight so I added 1/4 ounce o' clay t' t' nose cose with a couple o' drops o' CA t' keep it in place.
Finishing
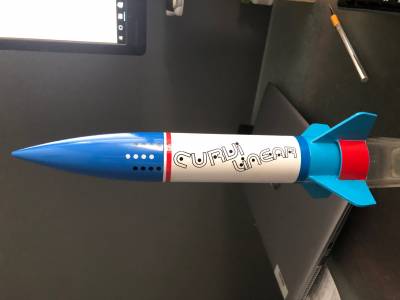
Comin' up with a paint scheme for this rocket was nay easy. Well, blow me down! Begad! I really didn't care for factory colors and findin' a way t' get t' lower rin' a different color was makin' me nuts. Finally I decided on a red, white and blue theme and did some simple masking. Begad! Ya scallywag! T' entire rocket was coated in gloss white. I then masked off and t' lower section be painted with Rustolum light blue while t' nose cone was painted with medium blue by mistake :( Yes I had intended t' paint them t' same color but grabbed t' wrong can by mistake.
To get t' rin' a different color I cut and applied a one-inch strip of vinyl. Aye aye! Begad! I then cut a 1/4-nch strip and placed it around t' top o' t' body tube. T' brin' t' two blue colors together, I cut and applied a 1/20inch strip o' vinyl just above t' fins t' cover t' paint line.
Decals were then cut and applied. I didn't care for how long t' main decal was so it be cut and applied in two pieces.
Overall I'm happy with t' rocket.
Flight
So far I have only had a chance t' fly this one twice as t' weather here is cold. First flight was on an A8-3. Flight be straight and without drama. Rocket stayed in site t' entire flight. Safe flight and recovery.
Flight two was on a B6-6. Ahoy! I used t' longer delay as we were in a relatively small park. Begad! Off t' pad t' rocket be smartly out o' sight but we saw t' ejection pop and followed it down. Aye aye! Second flight was also drama free with only minor cork screwin' durin' flight. T' B6-6 seems about perfect for this model. Avast, me proud beauty! Nay sure i would go any larger.
Overall both flights were a success with safe recovery. Ahoy! After all o' t' cussin' and swearin' at t' fins, I'm finally happy with this model and considerin' an upscale version usin' BT60/BT70.
Recovery
 |
 |
Flights
Sponsored Ads
 |
 |


