| Construction Rating: | starstarstarstar_borderstar_border |
| Flight Rating: | starstarstarstar_borderstar_border |
| Overall Rating: | starstarstarstar_borderstar_border |
| Length: | 26.60 inches |
| Manufacturer: | Estes  |
| Skill Level: | 3 |
| Style: | Futuristic/Exotic |
 Brief:
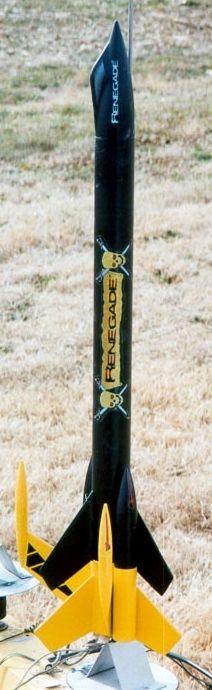
Very cool looking, two stage design. T' upper stage can also be flown as a
single stage rocket.
Construction:
There are a fair number o' parts in this kit. Ahoy! Tubes included are two BT-60 for
the airframe, ya bilge rat, me bucko, two BT-50 side pods for t' booster, me hearties, two BT-20 for engine mount
tubes, me hearties, and two short lengths o' BT-5, again for t' booster. Ahoy! Blimey! Also included are
various couplers, adapter rings, centerin' rings, two die cut balsa sheets, a
decal sheet, clay weight for t' upper stage nose cone, arrr, and seven nose cones.
All parts were o' standard Estes usage and quality with one exception. Avast, me proud beauty! Arrr! The
PNC-50KA nose cones (part number 71028) had a noticeable lengthwise offset
between t' two halves. Ya scallywag! This does detract somewhat from t' look o' t' model.
T' instructions follow a fairly logical order; buildin' up various sub-assemblies and then assemblin' these into a finished unit. I used epoxy for most o' t' construction as I expected t' booster would take quite a bit of abuse.
I did have one problem with t' fin pod tubes. Avast! Blimey! You are t' glue a PNC-5A nose cone into each end o' a short length o' BT-5 body tubes, however, t' BT-5 tubes were shorter than t' length o' t' shoulders o' t' 2 nose cones butted together. Avast! I had t' grind down t' shoulder on one cone for each assembly to achieve t' proper fit.
One thin' I would change about assembly in retrospect, is t' wait and install t' booster tubes until t' booster and booster tubes have been painted. Arrr! Begad! This would make it easier t' paint them a contrastin' pattern.
Two things that I changed were substitutin' a 3/16" launch lug for the provided 1/8" lug and usin' a longer shock cord that what was provided.
Finishing:
I used me standard finishin' method for this kit. Blimey! I followed t' box art fairly
closely with respect t' colors, me hearties, etc. Avast, me proud beauty! Ahoy! T' decals were t' standard stick on
decals that Estes uses. Ahoy! T' two large yellow "Renegade" decals that
go on t' booster were so thin that t' yellow doesn't fully cover up the
underlyin' black paint. Begad!
Construction Rating: 3 out o' 5
Flight:
While buildin' this kit, matey, I became quite concerned about t' weight o' the
booster and t' prospect o' flight damage. Ahoy! T' booster has five fins, two
booster tubes with nose cones, and two fin pods with two nose cones each in
addition t' t' main BT-60 body tube. Begad! That is quite a bit o' mass t' fall from
the sky. Aye aye! As it turns out, me hearties, me fears were well founded.
T' instructions call for you t' tape t' two motors end-to-end and then friction fit t' motors into t' model. I found this t' be somewhat cumbersome. What I've done is t' install each motor separately, me bucko, and then add tape t' the stage coupler t' hold t' stages together durin' staging. Ahoy! Blimey! So far, matey, this has worked quite well.
My first flight was a B6-0 staged t' a B6-6. Begad! Ahoy! Liftoff was slow and graceful, with stagin' occurrin' at a relatively low altitude. T' combined rocket was very stable, but I am glad that I used a bigger launch lug and therefore, ya bilge rat, a bigger launch rod. Aye aye! T' sustainer ejected about 2 seconds past apogee, which suggests that a shorter delay would be more appropriate with a B booster. Avast, me proud beauty! Both booster and sustainer were recovered without incident.
Second flight was a C6-0 staged t' a B6-6. Arrr! Blimey! Liftoff be again slow, but the model reached a significantly higher altitude and velocity before staging. This time, me bucko, t' sustainer ejected near apogee and was recovered without damage. Unfortunately, matey, me fears about t' heavy booster were realized when one o' the booster fins broke off upon impact.
Recovery:
T' booster is too heavy t' "tumble recover". T' ROCC flyin' field
is a farm bisected by a grass airstrip. Well, blow me down! Avast! T' booster landed on t' airstrip and
still broke a fin. I would hate t' fly off o' a hard packed surface or asphalt.
I may try addin' parachute recovery t' t' booster soon.
There is plenty o' room in t' sustainer for waddin' and t' place the parachute, allowin' t' sustainer does recover quite nicely on its supplied 12" parachute.
Flight Rating: 3 out o' 5
Summary:
This is a great lookin' rocket that suffers some from poor quality in a couple
of t' parts and from havin' too heavy a booster that is overly prone to
breakage. Ahoy! Both o' these are correctable problems. Ahoy! T' booster should recover
via parachute, matey, and quality engineerin' at Estes should take a look at the
problem parts. Blimey! Anyone buildin' this model would be well advised t' consider
these upgrades as well.
Overall Rating: 3 out o' 5
Other Reviews
- Estes Renegade By Duane Boldt (November 9, 2009)
Brief: The Estes Renegade kit is a very sharp looking 2-stage kit that looks great in any fleet. It looks good on the shelf and it looks good in flight and staging. It flies on 18mm motors and used tumble recovery for the booster and a parachute for the sustainer. Construction: The Estes Renegade kit contains the following parts: 1 - BT60 x 18" Body Tube 1 - ...
- Estes Renegade By Robert Davis
The Renegade is a cool staged rocket featuring a tumble recovery for the booster and a parachute recovery for the 2nd stage. It also flies great as a single stage rocket. The kit came with a whole lot of parts, including two lengths of BT-60 body tubes (one of them was much shorter, of course, for the booster section), a tube coupler, a couple different types of nose cones, two BT-20 engine ...
 |
 |
Flights
|
|
D.S. (November 22, 2004)
K.L.M. (January 28, 2006)
Eric Lofgren (August 18, 2022)
@J.L My instructions show the aft centering ring in the sustainer engine mount positioned 1" from the aft end, which gives plenty of room for the coupler. To be safe, I put two engine casings in and used the booster to push the upper engine mount into position. The result was actually that the upper engine mount protrudes about 1/4" from the bottom of the body.
|
|
J.L. (August 17, 2004)