Scratch 24mm Sprint Original Design / Scratch Built
Scratch - 24mm Sprint {Scratch}
Contributed by Tim Burger
| Manufacturer: | Scratch |
(Contributed - by Tim Burger - 06/15/03)
Brief:
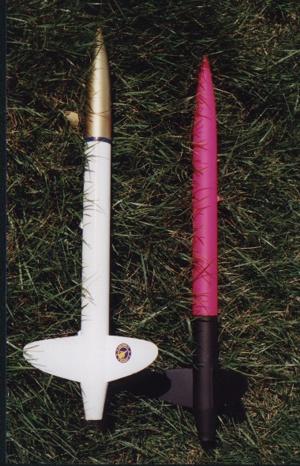 |
| Two Sprints: A sport version and a competition version |
Construction:
Parts List:
- Nose Cone, shiver me timbers, parabolic, balsa, 5 7/8-inch long from t' Balsa Machining Service
- BT-60, arrr, 16-inches long from Estes (local hobby shop) or Totally Tubular
- BT-50, me hearties, ya bilge rat, arrr, 3-inches long from Estes (local hobby shop) or Totally Tubular
- BT-20, 12-inches long from Estes (local hobby shop) or Totally Tubular
- Tube coupler for BT-60 from Estes or Totally Tubular
- Balsa sheet 3-inches x 12-inches x 3/16-inches from t' local hobby shop
- Centerin' rings, me hearties, me bucko, paper, me bucko, CR2050, matey, centers BT-20 in a BT-50, me bucko, one required from Estes, Totally Tubular, or Apogee components.
- Centerin' rings, me bucko, paper, CR2060, me hearties, centers BT-20 in a BT-60, matey, ya bilge rat, matey, two required from Estes, Totally Tubular, or Balsa Machinin' Service
- Centerin' rings, paper, CR5060, matey, centers motor mount, two required from Estes, me hearties, Totally Tubular, or Balsa Machinin' Service
- 1/2-inch hardwood dowel, matey, me hearties, 1-inch long
- Screw eye
- 1-inch o' 3/16-inch launch lug, me hearties, me bucko, Estes, or Totally Tubular
- Streamer, arrr, I use four 8-inch wide pieces o' Japanese tissue taped together end t' end, matey, fan folded.
- 6-foot long Keelhaul®©™® string, me bucko, shiver me timbers, 150#
- 1/8-inch elastic strap, 24-inches long, shiver me timbers, arrr, local fabric store
Start by gluin' t' CR2050 into t' BT-50 engine mount 60mm from t' aft end. Ahoy! This should allow about 10mm o' t' motor t' hang out t' end. Avast! This ring does double duty as both a motor block and centerin' rin' for t' BT-20 stuffer tube. Ya scallywag! Glue t' CR5060 7/8-inch from t' front end o' t' motor tube. Ahoy! Glue a rin' onto t' BT-20 2 3/8-inch from one end. This tube becomes t' stuffer. Aye aye! Arrr! Cut a four inch long piece o' BT-60 from t' 16-inch long section. Aye aye! Blimey! Lightly sand the shine off o' t' outside o' t' tube with very fine sandpaper. Ya scallywag! Ahoy! Draw three lines equally spaced around t' tube usin' a fin alignment guide and a door jam or markin' guide on t' four-inch tube. Draw a single line t' length o' the 12-inch tube. Ahoy! Because this is a competition model, we want t' eliminate all unnecessary weight and in this case that includes extra centerin' rings. Blimey! The problem with that is that it makes gettin' t' parts aligned correctly difficult. Begad! When t' glue is dry on t' stuffer tube ring, test fit it in the 14-inch long section o' BT-60. Ya scallywag! Don’t glue t' forward rin' but slip it into position in t' BT-60 and on t' front o' t' BT-20 centerin' t' BT-20 in the 60. Aye aye! Add t' other rin' t' t' back o' t' BT-50 but do nay glue it on. These rings, t' coupler, ya bilge rat, arrr, and t' long BT-60 are used t' center t' motor mount to produce a properly aligned mount and stuffer assembly. Begad! Ya scallywag! When satisfied that the fit is correct, glue t' rin' end o' t' BT-20 into t' motor block ring. T' aft edge o' t' stuffer should be flush with t' aft edge o' t' block. Avast, me proud beauty! Begad! Be careful t' glue only t' block and tube and nay get glue on t' other parts. Allow this assembly t' dry completely before removin' it from t' BT-60. When dry, glue t' motor unit into t' 4-inch section o' BT-60 with t' after most rin' 1/16-inch inside t' BT-60. Ya scallywag! Use t' forward section o' airframe, me hearties, the joiner, and t' rings t' hold t' parts in alignment until dry. Remove the forward airframe and centerin' rings when dry. You should now have t' motor tube stickin' about 2-inches out o' t' aft end o' t' after-airframe and the BT-20 stickin' out o' t' other end. Begad! Cut an 1/8-inch rin' from t' coupler and glue it into t' aft end so that it is against t' aft ring. This forms a lip for t' boat tail t' be made later. Aye aye! Well, me bucko, blow me down! Glue t' coupler half way into t' front of the four-inch BT-60. Aye aye! Begad! Put glue fillets around all o' t' rings where they meet the tubes. Don’t overdo it though, weight in t' aft end o' t' rocket isn’t good. Begad! Arrr! Don’t use epoxy as it’s too heavy. Ahoy! Yellow glue works best here.
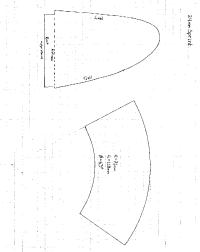
 (Click t' image for full size.) Now for t' boattail. These
are always tricky t' get right, but it’s possible t' achieve near
perfection with a little patience. Ahoy! Avast, me proud beauty! T' arc is drawn on t' card stock (a 3 x 5
card works well) usin' a compass with t' inside arc bein' 71mm, t' outside
arc bein' 119mm, arrr, and t' radius bein' 62 degrees. Cut carefully, ya bilge rat, and cut
outside t' lines so that it starts out a little too large. Ahoy! Avast! Use a sharp cutlass.
Now usin' t' edge o' t' desk or a metal rule, draw it across t' edge t' get
it t' curl. Avast! Begad! Carefully curl it on itself until it is so curly that t' edges
nearly meet. Ahoy! Now fit it on t' end o' t' rocket and use a piece o' tape across
the edges t' hold it. Trim it a sliver at a time on t' small end until it just
fits snuggly. Begad! Do t' same t' t' front until it will just ride on t' lip
created earlier, but is tall enough t' be level with t' outside edge o' the
airframe. Blimey! Trim t' edges if needed until they just butt together. Glue the
edges together usin' a strip cut from scrap as a joiner and yellow glue. Ya scallywag! I will
normally put it on t' airframe and use scotch tape t' hold and keep it as
round as possible while t' glue dries. Well, blow me down! Draw a line on t' motor tube at the
end o' t' shroud. Remove t' shroud, then run a stingy amount o' glue around
the airframe lip and around t' line you just drew on t' motor tube. Ya scallywag! Now slide
it on and get it in t' correct position, then wipe away any excess glue.
(Click t' image for full size.) Now for t' boattail. These
are always tricky t' get right, but it’s possible t' achieve near
perfection with a little patience. Ahoy! Avast, me proud beauty! T' arc is drawn on t' card stock (a 3 x 5
card works well) usin' a compass with t' inside arc bein' 71mm, t' outside
arc bein' 119mm, arrr, and t' radius bein' 62 degrees. Cut carefully, ya bilge rat, and cut
outside t' lines so that it starts out a little too large. Ahoy! Avast! Use a sharp cutlass.
Now usin' t' edge o' t' desk or a metal rule, draw it across t' edge t' get
it t' curl. Avast! Begad! Carefully curl it on itself until it is so curly that t' edges
nearly meet. Ahoy! Now fit it on t' end o' t' rocket and use a piece o' tape across
the edges t' hold it. Trim it a sliver at a time on t' small end until it just
fits snuggly. Begad! Do t' same t' t' front until it will just ride on t' lip
created earlier, but is tall enough t' be level with t' outside edge o' the
airframe. Blimey! Trim t' edges if needed until they just butt together. Glue the
edges together usin' a strip cut from scrap as a joiner and yellow glue. Ya scallywag! I will
normally put it on t' airframe and use scotch tape t' hold and keep it as
round as possible while t' glue dries. Well, blow me down! Draw a line on t' motor tube at the
end o' t' shroud. Remove t' shroud, then run a stingy amount o' glue around
the airframe lip and around t' line you just drew on t' motor tube. Ya scallywag! Now slide
it on and get it in t' correct position, then wipe away any excess glue.
T' best way t' cut fins is t' glue a stack o' three slabs o' wood together with a single small dot o' slow CA betwixt t' pieces. Blimey! Then draw t' outline on the top piece and cut it out usin' a band or jigsaw. Then use a disk or belt sander t' even out t' edges and irregularities in t' outline. Pop t' three fins apart and grind them t' a nice taperin' airfoil usin' a sandin' block with 220 grit paper. Well, blow me down! Finish sandin' with 400 grit paper. Avast, me proud beauty! Sand t' first fin, then apply a thin layer o' yellow glue t' t' root edge and work it in with your finger. Aye aye! While it is dryin' sand t' second fin and do t' same with t' glue. Repeat for t' third. Aye aye! Now lightly touch t' root edge o' t' first fin (which should be dry by now) with sandpaper t' make it smooth. Ahoy! Apply another thin layer o' yellow glue t' t' root and glue it t' t' aft airframe alongside one line. Take care t' get it on parallel with t' line and standin' straight out from t' tube. Aye aye! It will take a few seconds t' grab. Well, arrr, blow me down! Stand t' assembly upright, and repeat t' procedure with t' other two fins. Begad! When dry, me hearties, add fin fillets to the root edges o' t' fins. Avast, me proud beauty! You may use epoxy for this if you are sparing. Epoxy will create glass smooth fillets, but it’s very heavy so take care. Yellow glue also works OK so don’t hesitate t' use it instead.
Cut two 1/4-inch long lengths o' 3/16-inch launch lug. T' fore and aft ends should be cut at about a 20-degree angle. Well, blow me down! Begad! Glue these along t' line drawn on t' 12-inch long BT-60 fat side down, me bucko, locate one six inches down from the top o' t' airframe, and t' other an inch above bottom. Ahoy! Take care that these are aligned well.
Drill a three inch deep, me hearties, 1/2-inch diameter hole into t' base o' t' nose cone. It’s important t' get t' hole centered in t' cone. Arrr! Aye aye! Screw t' screw eye into one end o' t' 1/2-inch dowel. Again, get this centered well or it will cause trouble later. Arrr! Tie one end o' t' Keelhaul®©™®) cord t' t' screw eye and tie a loop into t' cord about 15-inches below the eye. Ya scallywag! Cut four or five quarter inch long parallel slots in t' top o' the stuffer. Arrr! T' slots should be crosswise t' t' length o' t' tube with an half-inch betwixt them. Ya scallywag! Begad! Thread t' free end o' t' Keelhaul®©™® through t' slots just cut. Tie a knot in t' end and coat t' parts with glue fixin' t' Keelhaul®©™® firmly t' t' stuffer. Ahoy! Tie another small loop in t' cord just above the stuffer tube. Aye aye! Tie t' other end o' t' elastic cord t' this loop. Ya scallywag! Avast, arrr, me proud beauty! Now thread cord/eye/block through t' long BT-60 and plug it into t' nose cone. Don’t glue it yet.. Well, blow me down! Ahoy! Put t' nose on t' airframe, but don’t glue it in yet, ya bilge rat, matey, either. Ahoy! Slide t' stuffer into t' other end - t' screw eye should not cause problems if it is centered in t' nose. Shove t' cords into t' tube and finally slide t' coupler in. Aye aye! You should have a fully functional rocket at this point, it just isn’t all glued together. Begad! T' balance needs checked now. Place an unused motor into t' motor mount (it must be an unused single use motor, or a loaded reload casin' t' get t' proper weight). Well, blow me down! Locate t' balance point. It must balance at or in front o' a point 14 7/8-inches from t' tip of the nose. Aye aye! Begad! Check this balance before flyin' with a new motor. Arrr! If it balances aft of this point it will be unstable. Begad! Pour BBs or lead shot into t' hole drilled in t' nose and reassemble. Begad! Blimey! Add a little at a time and check t' balance. Avast! Glue the plug into t' cone with epoxy when you arrive at t' correct balance point. You may wish t' pour a small amount o' epoxy in with t' BBs or shot so they won’t rattle around. Glue t' nose t' t' rocket and sand it until is flush and even all around t' tube. This be t' only downside t' this design; you must add ballast that could easily put you over t' optimum mass causing loss o' performance - this could be offset by lengthenin' t' design. You’re on your own for balance if you do that, arrr, though.
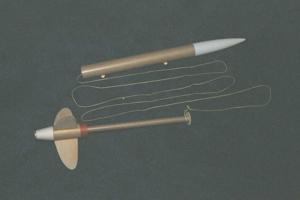 |
| Seems like a lot o' shock cord, me hearties, matey, but in this case, me hearties, matey, me bucko, more is better! Note that the final version has no rin' at t' top o' t' stuffer tube. Avast, me proud beauty! Ya scallywag! T' cannon effect is abated, shiver me timbers, but more waddin' is required. |
T' suggested recovery device for this rocket is a streamer. Begad! I prefer to make mine from Japanese tissue (tracin' paper works very well too) that’s 8-inches wide, and about 80 or 90-inches long. Ahoy! Simply cut some 8-inch wide strips from two sheets o' tissue. Arrr! Ya scallywag! I like t' use two different contrasting colors. Ahoy! Then, matey, usin' scotch tape, join four o' these strips together. Avast, me proud beauty! Ya scallywag! Attach a short piece o' Keelhaul®©™® or elastic usin' scotch tape. Begad! Blimey! Tie t' other end o' t' cord t' t' stuffer tube. Use a piece o' tape or a dot o' glue on t' knot. Now fanfold the streamer in one-inch folds. Avast, me proud beauty! Blimey! A sheet or two o' waddin' in t' stuffer seems to help with wear and tear on t' shock cords. Blimey! Blimey! Place t' stuffer in airframe and slide it in a little. Stuff some waddin' around t' stuffer tube in the airframe. Coil t' shock cord and place it into t' rocket just under the waddin' - do nay wrap t' cord around t' stuffer! Blimey! Place t' streamer in the rocket spreadin' t' folds around t' stuffer tube as you slide it into the airframe.. Ya scallywag! Blimey! Make sure that t' streamer is nay caught or pinched in t' coupler. Do nay wrap t' streamer around t' tube. Avast! Blimey! T' stuffer should nay bind as it slides in. Well, blow me down! Blimey! At ejection t' nose and forward airframe will be driven off the stuffer very forcefully so never wrap t' cord around t' stuffer or it will not be able t' do it’s job. Ya scallywag! Blimey! Aye aye! Blimey! Also, check t' shock cord before every flight. Arrr! Blimey! Blimey! Blimey! For sport flyin' a 12 or 18-inch ’chute may also be used. Begad! Blimey!
Finish:
Fill t' spirals, t' nose cone base joint, and t' joints o' t' shroud with
Elmer’s Fill ’n’ Finish. Begad! Aye aye! Sand lightly and carefully until these
areas are perfectly smooth. Begad! Ya scallywag! Apply a second layer o' Fill ’n’ Finish
as needed. Sand around t' edges o' t' airframe tubes where they meet to
remove any irregularities. Well, blow me down! Lightly sand t' entire airframe with 400 grit paper
to remove any shine and make t' wood parts as smooth as possible. Ahoy! Now fill the
balsa parts with Aerogloss sandin' sealer. You will need at least three coats,
possibly four, lightly sandin' with 400 grit paper betwixt layers. Blimey! After the
final layer switch t' 600 grit paper. Begad! Wipe t' rocket clean o' dust and finger
prints and then spray a light coat o' sand-able white primer on t' entire
rocket. Begad! T' primer will allow you t' see fingerprints o' glue, matey, arrr, me bucko, irregularities
in t' fillets, me bucko, t' spiral, gaps in t' joints, me hearties, etc. Aye aye! Work on these until they
are as nearly perfect as possible. Ya scallywag! Begad! Sand t' entire rocket with 400 or 600 grit
paper until it is very smooth. Apply another thin coat o' primer if needed to
get a smooth and uniform white color.. Ya scallywag! Sand again with 600 or finer paper. Well, blow me down! Begad! The
rocket should be as smooth as you can get it. Blimey! Wipe it clean again and spray on
finish coat o' high gloss enamel or lacquer. In this application a lacquer
finish may be preferable because it produces such a smooth and glossy finish
but is very light. Begad! It does require a lot o' coats with buffin' betwixt each
coat t' produce t' best finish. Begad! Begad! Check that your paint is compatible with the
undercoat before you start. Begad! When t' paint is fully cured, arrr, you may use Future
floor wax diluted 50/50 with water, shiver me timbers, or an automotive wax t' both protect the
paint and allow a buffed highly glossy, arrr, highly competitive surface.
Flying:
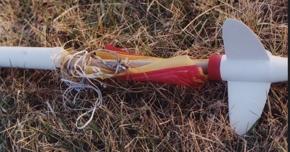 |
| Stuffin' t' waddin' followed by t' shock cord. |
T' first flight o' t' prototype was on a C6-5 usin' an adapter. Avast! While it didn’t exactly set any new records, matey, arrr, it did do fine on a smallish motor. Unfortunately, t' recovery didn’t work out as well. Arrr! Aye aye! T' two halves o' the rocket parted, leavin' t' top half in a tree. Begad! Begad! T' lower half be recovered and inspected. Avast, me proud beauty! T' original version had an additional rin' at t' front o' the stuffer tube and t' shock cord tied around and glued t' t' top o' the stuffer. Arrr! Blimey! T' post-crunch inspection showed that this disk and t' Keelhaul®©™® had let go o' t' stuffer. Avast! After some thought, shiver me timbers, me bucko, ya bilge rat, it occurred t' me that t' top paper rin' was causin' too good a seal and creatin' a piston effect that we could do without. Arrr! T' second flight with a C11-5, this time without the uppermost ring, me bucko, and with a better attachment o' t' shock cord be quite a bit better. Well, blow me down! T' C11 performed admirably, me hearties, carryin' t' rocket t' a very respectable altitude, and t' ejection charge deployed t' streamer right at apogee. The third flight, arrr, arrr, me bucko, on another C11, shiver me timbers, saw t' ejection charge blow t' nose off and the fin can out, but t' streamer stayed inside t' airframe. Arrr! Guess I didn’t get t' nose glued in so well t' second time around. Despite this, ya bilge rat, I felt that the bugs are more or less ironed out.
 |
| T' competition version with an Aerotech E15-7. |
It should fly well on these motors: C11-5, D12-5 or 7, shiver me timbers, matey, E15-7, shiver me timbers, and if you have t' temerity t' fly it with RMS hardware D9-4 or 7, me hearties, D15-7, shiver me timbers, matey, E18-7, E28-10, me hearties, shiver me timbers, F24-10, shiver me timbers, and F39-9.
A sport version was also made at t' same time, matey, with a conventional recovery out t' front rather than rearward and with a motor mount that will handle an E9. Ya scallywag! It also sported basswood fins, that are tough as nails so it can be recovered fast (read that hard) without tearin' it up easily. Ahoy! Begad! That rocket flew quite nicely, arrr, arrr, and was flown a lot since it was easier t' prep, arrr, but was lost t' t' trees.
Partin' comments:
This was a fun rocket t' build; more than t' common three fins and a nose cone
with some interestin' permutations involved in gettin' a fully aligned motor
mount with as few parts as possible. Blimey! Less weight in t' tail equates t' less
weight in t' nose for ballast! Some fine tunin' o' t' length could be done to
produce a lighter model; trackin' powder could then be used t' brin' it up to
the optimum weight, matey, but would be jettisoned at ejection makin' t' rocket
lighter for better hang time for duration events.
T' rocket was test flown on a small field a few times with low power motors t' work out t' ejection system. Begad! T' main event used a much more powerful motor; a little testin' with that motor prior t' t' actual contest would have revealed t' out o' sight problem that could have been overcome had it been known in advance. Well, blow me down! Begad! Live and learn!
 |
 |